
You are currently browsing the tag archive for the ‘clambake quilt pattern’ tag.

Tag Archive
New Clambake kits are ready to go. The last Clambake was a big success and you have shown me that you’re not intimidated by curves. That they’re actually pretty simple!

I used Jeni Baker’s line from Art Gallery, Curiosities. “Inspired by the many small wonders in life, Curiosities invites you to explore the world around you. A sophisticated color palette with a vintage twist transports you to a whimsical garden. Curiosities is dedicated to Jeni’s bunny George, who is ever curious.“-Art Gallery

Aren’t these little bunnies the cutest?! It’s the perfect quilt to get your spring mood going.
Paige did some fabulous quilting for me. Swirls in the borders and a sweet pop up flower in each clamshell.

If you remember from the last Clambake post, all of the clamshells are easily attached to the top border, glue basted on and top stitched with your machine. No pinning. No hand sewing!

Each fabric from the line is used in the quilt. The border is a teal pressed flower. The binding is a navy dragonfly. Clambake measures 55″ x 62″ and is a perfect lap quilt.

Kit includes all the fabrics for the quilt top, binding and the pattern. As always, I try to share useful info to ensure a successful sewing and quilting experience, so helpful tips and tricks are posted on this blog post HERE.
Clambake KITS, PATTERN, and APPLIQUÉ KIT can be found now in the SewModDesigns Etsy shop.

And you can also find all of these plus the Curiousities line at our upcoming show in Napierville for the Riverwalk Quilters Guild.
Friday, May 13th 2-7 pm and Saturday 9-5 pm
NIU campus in Naperville.
1120 E. Diehl Rd.
Naperville, Il. 60563
We hope to see you there. It’s going to be a great show!

I have been wanting to make a clamshell quilt for quite some time now. I knew this would be perfect to show off all of these fabulous prints.

Now I know that some of you are groaning. Knowing how much I like handwork, you’re assuming that it’s hand appliqued, right? Well, it’s not!! I’m a big fan of Crazy Old Ladies patterns and Emily Herrick designed one called ‘Clambake’.

For all of you modern quilters out there who love a quick fix and instant satisfaction, this quilt assembles fast with a quick cutting method and machine appliqued clamshells.

Clambake measures at approx. 55″ x 62″ for a perfect lap quilt. Or, I’m thinking it would be really pretty hanging in my bedroom!

As I was assembling this beauty, I found a few shortcuts to an already simple pattern. Every little but helps so I’ve listed a few tips & tricks below if you happen to purchase the kit or buy the pattern.
Clambake Tips & Tricks
Use a thicker box to cut the template from so that you can easily rest and guide your rotary cutter along the edge while cutting. I used a leftover USPS box. Cut more than one template from the box just in case you end up ‘shaving’ a bit from your original template while your cut your clamshells out.
Use a new sharp blade to easily cut through multiple fabrics at a time.
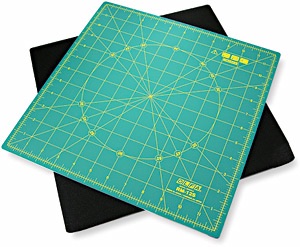
Use a rotating rotary mat, like the Olfa Spinning Rotary Mat.
Spin the mat around while you cut out the template. This alleviates the need to move and shift your fabrics around while cutting. These are also great to use for fussy cutting projects.
If you don’t want to mark the center of each clamshell, you can finger press to crease the center right before you begin lining them up on their rows by folding them in half to find the center point.
Use ‘Perfect Shape’ template plastic. I’ve tried so many template plastics over the years and haven’t found any that can withstand the heat I put them through except this one from The Stencil Company called ‘Perfect Shape’. It never melts and I only used ONE template for all of my clamshells. Trust me, when this product says ‘no melt’, it actually means it!!

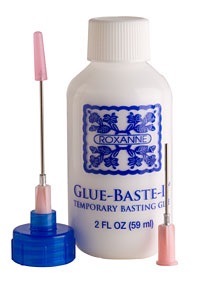
Instead of pinning my clamshells, I used Roxanne’s Glue Baste It. I did not pin ANYTHING while sewing my clamshells! “Roxanne ‘s Glue-Baste-It is 100% water soluble, dries in minutes, and the unique applicator top allows for controlled placement of tiny glue droplets. It does not feel stiff, and does not contain harmful chemicals, dyes, or waxes. It cleans up with water and washes out of fabric with soapy water, even after ironing or sewing.”
Apply the glue along the edge of your clamshell. Give it a good press with the iron, move to the next one and so on until you’ve ‘glue basted’ your row. It bonds quickly so you don’t have to worry about it coming undone when you move it. Take it to your sewing machine and top stitch the clamshell 1/8″ away from the edge. I use this glue on all of my applique projects.
I’d give this quilt ⭐️⭐️⭐️⭐️⭐️. I had fun, it wasn’t too time intensive, and I got to use some of my favorite products. Whew! I love it when I can share my favorite products with you guys!
The Clambake kits are available at all the upcoming shows while supplies last (see Visit SewMod at the top of the blog) along with the coordinating fabrics. If you can’t make it to a show, visit us in the SewModDesigns Etsy shop. Kits include the fabrics for quilt top, binding and pattern. Backing & Batting NOT included.
If you’re buying the kit and are interested in either a sheet of the Perfect Shape or a small bottle of Roxanne’s, I have them available too. Neither of these products are available at your local craft and hobby shops. Only some quilt shops carry them. You can purchase the Appliqué Add-On kit here.
Have a great weekend everyone!


