
You are currently browsing the category archive for the ‘etsy’ category.

Category Archive
I can’t believe how fast this year has flown by! It’s already that time of year again and we’re having a year end sale. Most of the shop is 15% off. Here’s a few of the bundles and other fabrics that are on sale-

Paradise Gray stash builder

New fabrics, Funny Farm

The last kits available in the Chatsworth StarStruck & Rodeo Rider


And these pretties called Milk, Sugar Flower

Hurry over! Don’t miss out…theres still time to grab something special for the quilter in your life or sew up a quick gift for your holiday sweetie!
We’re being invaded…by cute animals taking a ride above the neighborhood in planes, saucers, and balloons! Seeing Stars is back in stock and kitted in a Riley Blake design called ‘Little Flyers’. The fabrics are perfect for this pattern. Just like the fabric says…it’s awesome!

Machine appliqued planes soar through this quilt among half square triangle (HST) stars. The smoke trails are hand embroidered in different colors using a straight stitch to add that special touch to the baby quilt.

HST’s are made using the Spinning Star papers to give you perfect half square triangles every time! You can find a quick demo HERE on the papers.

Quilt measures 45″ square. Kit includes instructions, the HST papers, fabric for the quilt top and binding. Batting & backing are NOT included. The kits can be found in the SewModDesigns Etsy shop.

You know what time it is…Christmas in July. Time to get that list made of all the handmade items you’d like to make before Christmas so that you’re not stressed during the season. The Dresden tablerunner was 1st on my list and now it can be on yours too because we’ve made it simple for you by adding it to the shop as a kit and added the easy tutorial for the fat quarter napkins.

This lovely was made from Lecien’s Flower Sugar Holiday line. The Flower Sugar lines are consistently beautiful if you ask me and I think Lecien has once again out done themselves with the large florals and poinsettias, tossed candies and swirling ornaments. The Dresden centers are set on an aqua dot which is then carried to the flange around the binding to tie the fabrics together.

Your Christmas table will not get any prettier than this!


And didn’t Paige do a beautiful job quilting it? Makes me wish it was Christmas now 🎄❄️
We have the KIT available as well as the pattern. Kit comes complete with all of the fabrics, including the backing. Batting and the fat quarters to make the napkins are NOT included. Runner measures approx. 21″ x 67″.
Get a jump start on your holiday sewing!
New Clambake kits are ready to go. The last Clambake was a big success and you have shown me that you’re not intimidated by curves. That they’re actually pretty simple!

I used Jeni Baker’s line from Art Gallery, Curiosities. “Inspired by the many small wonders in life, Curiosities invites you to explore the world around you. A sophisticated color palette with a vintage twist transports you to a whimsical garden. Curiosities is dedicated to Jeni’s bunny George, who is ever curious.“-Art Gallery

Aren’t these little bunnies the cutest?! It’s the perfect quilt to get your spring mood going.
Paige did some fabulous quilting for me. Swirls in the borders and a sweet pop up flower in each clamshell.

If you remember from the last Clambake post, all of the clamshells are easily attached to the top border, glue basted on and top stitched with your machine. No pinning. No hand sewing!

Each fabric from the line is used in the quilt. The border is a teal pressed flower. The binding is a navy dragonfly. Clambake measures 55″ x 62″ and is a perfect lap quilt.

Kit includes all the fabrics for the quilt top, binding and the pattern. As always, I try to share useful info to ensure a successful sewing and quilting experience, so helpful tips and tricks are posted on this blog post HERE.
Clambake KITS, PATTERN, and APPLIQUÉ KIT can be found now in the SewModDesigns Etsy shop.

And you can also find all of these plus the Curiousities line at our upcoming show in Napierville for the Riverwalk Quilters Guild.
Friday, May 13th 2-7 pm and Saturday 9-5 pm
NIU campus in Naperville.
1120 E. Diehl Rd.
Naperville, Il. 60563
We hope to see you there. It’s going to be a great show!
We’ve been working really hard to get some new kits together for the special little ones in your life!
This first one is called ‘Sweet Baby Girl’ and it’s from the Sweet Baby Girl fabric line from Riley Blake. The monkeys & frogs in the this line are so cute and the alphabet fabric is adorable with the toys mixed in!

We kit this strip quilt up often and it’s perfect for beginners and experienced quilters alike. A fast quilt that can be made completely DIY style.

The quilt is easy enough to quilt at home with straight line quilting on each side of the seam allowances.

The Sweet Baby Girl complete KIT can be found in the SewModDesigns Etsy shop for $40 plus shipping. Everything is included in your kit except the batting. You even get to select your favorite backing..

To read more about this Sweet quilt click HERE.
A quilt for the future sports star…Play Ball Baby Quilt KIT.

This was my first time kitting the Radio Way pattern from JayBird Quilts. This was just about the easiest thing I’ve sewn! Half of the cutting is already done since it’s made from a jelly roll so this sews up super fast!

Measuring at 40″x40″ and having all of the straight lines on the quilt, make ‘straight line’ quilting easy. Paige actually quilted this one for me with stars and loops so it’s definitely another great quilt for beginners and experienced quilters.

The fabric line is Play Ball from Riley Blake with every sport boys love…baseball, football & basketball. Every piece of the line is featured in the quilt top.

The backing is your choice of tossed jerseys in navy or the Play Ball main print. The complete KIT including the top, backing, binding & pattern is $40 plus shipping and can be found HERE.

Catch-up part 5…we’re almost done!
If you love it, you will save it. Every bitty piece of the line! This is not a typical trait of mine but I’m so glad that I did just that with Tasha Noel’s Vintage Market line.
I mean how the heck can you even discard this cuteness to the trash can anyway!?!
It came into good use when I decided to have a sew day with Paige. We worked all day on the Scrap Happy Purse pattern by Crazy Mom Quilts.

We had a blast making these! We get so much accomplished during our sew days. I love to try to have the girls over once a month. We usually pick a Saturday and start bright and early, about 9am. I fix lunch, there’s always wine involved, and we usually end with a finished project. I like to keep everybody on track!

You need about 200 skinny scraps for the front and back panel. That sounds like a lot but once you start cutting it really isn’t. I actually had leftovers…which I did not toss away…
The only difficult part of the pattern is attaching the handles. It takes time, working your needle through the leather. I’d suggest getting the tool to help with that, which Dritz makes, or puncturing the premade holes in the strap to help your needle slide in and out of easier. Check out this tutorial on how to use the Speedy Stitcher from Dritz at Sew4Home. This handy tool is definitely on my list to buy next time I come across one. Anyone out there ever use this?

Just in case someone tried to run away with my sweet little purse, I added my name label to it along with a cute embroidered heart! Lol

Paige decided on a more scrappy look, using up some of her leftover fabrics.

The Scrap Happy Purse pattern can be found along with the cute red & white polka dot handles in the SewMod Etsy shop. Sadly, all of my Vinatge Market fabric is sold out but don’t fret, I’m awaiting a new shipment!
Now that we’re all caught up from last year, I’m going to try to stay on track. Oh…who am I kidding lol.
Catch-up part 4…
I knew when I saw this Riley Blake line by Emily Taylor that I had to have it and make something beautiful for us grown-ups! It reminds me of a ‘pretty cowgirl’ with all its florals and weathered pieces.

I especially love the blues. It reminds me of a repurposed piece of furniture that you’d find in a farmhouse.

And with any pretty cowgirl theme, there needs to be a star design. I chose to make this kit from Lella Boutiques StarStruck pattern. The large and small florals are featured in a star and snowball quilt combination. The kit assembles easily because the focus fabrics are precut 10″ squares.

Kit comes with fabrics for the top, binding and pattern. Quilt measures 62-1/2″ x 72″.

As of now, I have this quilt sample on display, draped over the couch. It makes my heart smile every time I see it!

I’m pretty sure this sample is one that will have a permanent home in my house!
As of this post, most of the Chatsworth fabrics have been sold. I have kits left and a couple of layer cakes and a FQ bundle along with one bolt of the dainty blue floral backing. If you’d like to check these out you can find them in the SewMod Etsy shop.
Catch-up part 3…
Lazy Girl Designs brings us a fun way to play around with all of those zippers we collect. You can easily interchange your zipper pulls in this SweetPea Pods pattern.

With the One-Zip technique, you cut the zipper apart and remove the pull. Sew one side of the zipper to the fabric, use her trick to get a coordinating pull back on and complete the sewing process.
This technique works with the Atkinson zippers and pulls and we have the colorful pulls in stock in the shop! The package comes with about 30 pulls to mix and match with your zippers.

These make great little gifts and whip up in no time. Two different FQ fabrics, one for the outside and one for the inside will give you 2 Pea Pods.
I made these for the board members for Christmas and stuffed them with binder clips.
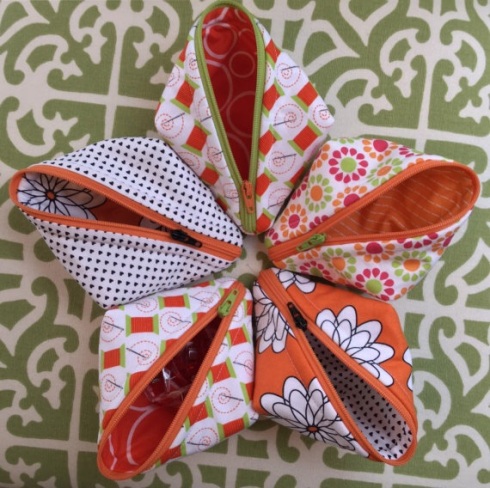
This cute Pea Pod would also make a handy doggie treat holder when you take your pup on the road with you. I’m adding this idea to my project list!
Or how about a Valentine’s one for your secret pal filled with chocolate hearts!
The zipper pull technique also works on Joan’s Becca Bag pattern. I can’t wait to try this one next:)

Both patterns and pulls can be found in the SewMod Etsy shop.
Playing catch-up…better late than never.
whew..the end of 2015 went by so fast my head is still spinning. And while I feel like I accomplished quite a bit over the holidays, I definetly slacked when it came to blogging, so I’m going to try to play catch up over the next couple of weeks. Which, btw, did you realize it’s already the third week in January!?!
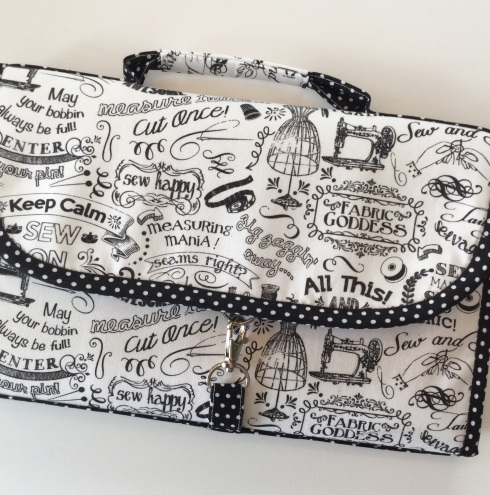
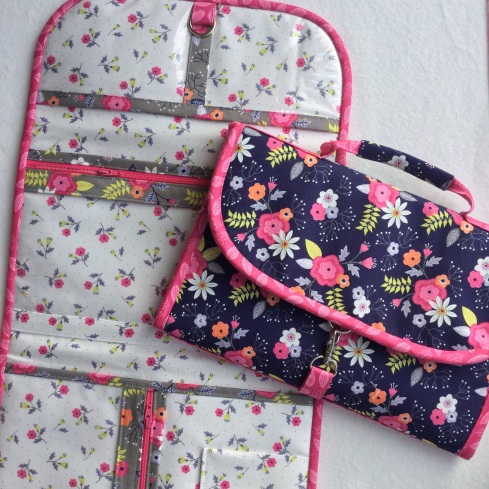
First up is the Classmate pattern from Atkinson designs. I can’t say enough about how well her patterns are written. Step-by-step instructions that are clear as day make something that looks a little difficult, seem sooo easy!
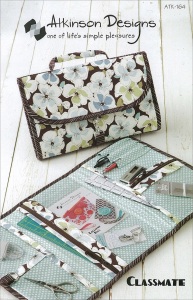
So ‘easy’ in fact that I made 4 of them in about 3 days! What a great tote to keep all your tools and supplies in for that quilt class or to take along with you to guild sew-ins.
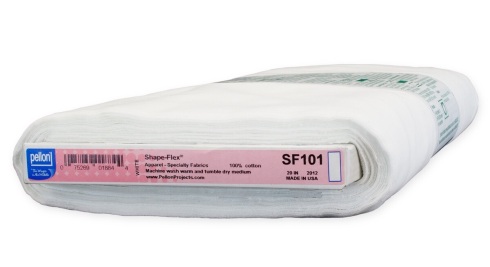
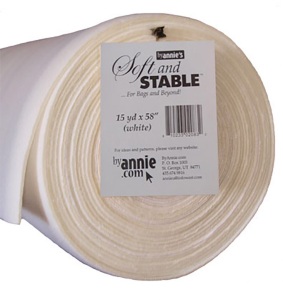
The first thing I want to talk about is some of the ingredients needed for this project that I haven’t used before.
Annie’s Soft And Stable and Pellon’s Shape-Flex.
Shape-Flex is pressed onto the back of the fabrics before cutting. This is the best interfacing y’all! I’m totally going to use this more often and I’m just wondering how the heck had I not heard of it before now?! I read that it’s great for purses and backing my embroidery projects before stitching. It’s so nice and flexible. I think it just might help with that icky wrinkly effect that some interfacings give you even after its pressed onto the fabrics.
Annie’s Soft And Stable gave my project the stability it needed without feeling stiff. This is used as a replacement for your batting in projects like bags and totes. I wish you could touch my finished Classmate to see for yourself!
And never fear the zipper installment when working on a Atkinson pattern. Once you sew a zipper with her method, you’ll always refer back to it on all of your other patterns that need a zipper.
There’s also a great tip for sewing with vinyl. Just layer tissue paper between the presser foot and the vinyl. This helps the foot glide along without sticking. I just sewed mine right on top of the vinyl and pulled it away after I was was finished.
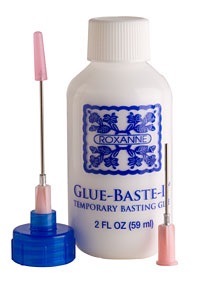
The other tip I have is to skip the basting and use the Roxanne’s Glue Baste-it. This sped up my sewing and didn’t give me any issues whatsoever for taking the short cut of not pinning anything. I glue basted the entire thing!!
I did skip the step on adding the pen pocket. I never carry marking utensils and if I did, I’d keep them zippered up, so I just made that an extra pocket.
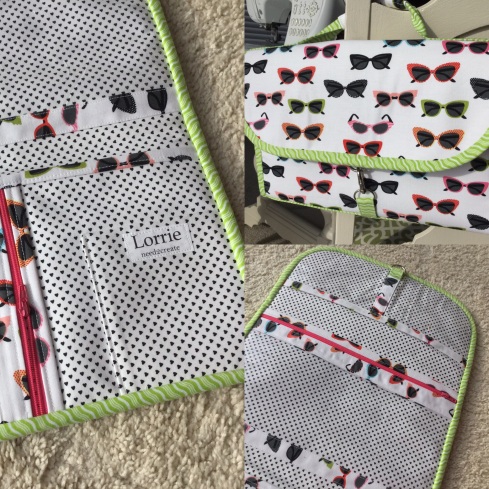
One last bit of advice…take the time to hand bind it and don’t forget to add your label. That’s the finishing touch.
My Classmates came out looking so professional if I do say so myself! I gave them away to the girls for Christmas presents this year. But don’t take my word for it. Check ’em out!
This one was made for Paige using Timeless Treasures ‘Sewing Words‘ fabric. Which I’m almost out out of, so if you love it like we do, then you’d better hurry!
I made these two for Shelley & Wendy using two different prints from the Paradise line from Camelot Fabrics.
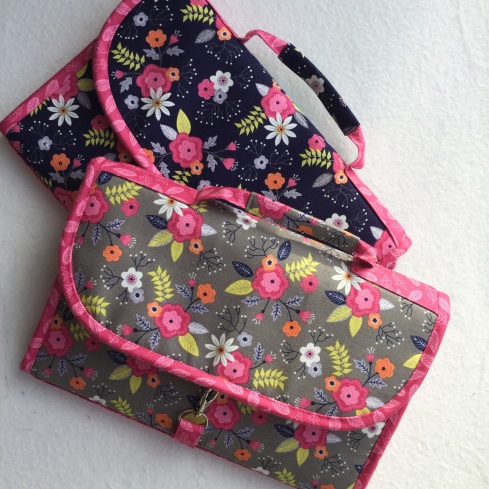
I just love that little white floral print for the inside.
And this one I kept for myself!
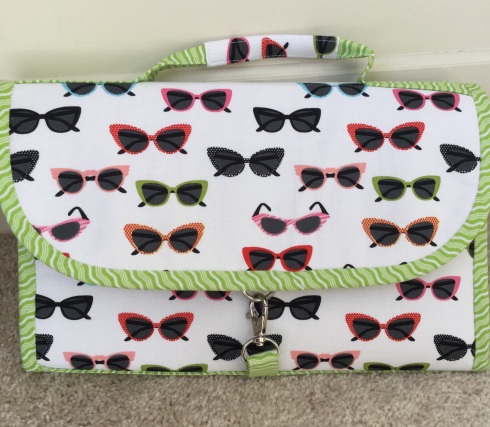
Made with Riley Blake’s retro Sunglasses fabric and coordinating crimped green binding. And how cute are those tiny black hearts for my inside?…swoon…
I do hope that you take some time this year to make one of these. You won’t regret it. I promise!
Oh, and I also hope this year doesn’t speed by as fast as 2015. How do we make time slow down? Is there a secret?
Are you ready to make pillows?

I’m going to show you how to stitch a 3-1/2″ Road To Tennessee quilt block and construct an 18″ pillow cover. Let’s begin!
To make each Road To Tennessee block, you’ll need (1) 3-1/2″ Dinosaur square and (2) 2″ background squares for a total of (36) 3-1/2″ Dinosaur squares and (72) 2″ background squares to complete your pillow top. Draw a diagonal line on the back of each square with a pencil.

With right sides together, place a white square on each opposite corner of an 3-1/2″ square. Stitch on the line.

Trim a 1/4″ away from the stitched lines.

Press your seams open. *This reduces bulk and makes it easier to match your seams on this particular block.

Lay your pillow out in a 6×6 setting and rotate the blocks as shown and sew.

Cut a 19-1/2″ piece of batting. This is where all those batting scraps come in handy!
Layer your pieced pillow on top of the batting, pin and quilt as desired. I quilted a 1/4″ on each side of my seams.

Trim to an 18-1/2″ square.

Cut (1) 18-1/2″ square of fabric. This will be your pillow lining. I use a lining on my custom orders because it hides all of the quilting/threads and batting for a more finished look.
Cut (2) 13″x18-1/2″ pieces for your pillow backing.
**Place your quilted pillow on top of the 18-1/2″ lining. ‘Square up’ and trim any excess to make them the exact same size. Sometimes after quilting your work, it ‘shrinks‘ a bit, so if your top doesn’t exactly measure 18-1/2″, that’s still ok. Just make sure that your pieces are the same size as your top. This will help when stitching through all of your layers when sewing your finished piece together.
For the pillow backing, turn under 1/2″ on the 18-1/2″ long side and press. Turn under again, press and top stitch the hem for each piece. Attach your label now if you have one. I stitched mine on the outer backing part of the hem. You now have 4 pieces for your pillow.

Layer them in the following order and pin, being careful to match all of your seams. Pin well.

Pillow liner right side down.
Pillow top right side up
Outer backing piece right side down
Inner backing piece right side down
Stitch around your pillow with 1/2″ seam. Clip your corners . Zig Zag around your raw edges to decrease fraying.
Turn your pillow cover right side out through the backing envelope. Push your corners out and insert your 18″ pillow form.
You’re all finished!

The possibilities are endless when it comes to these covers. Need a quick Christmas gift? Make them for any holiday. Make them with different 3-1/2″ quilt blocks or how about one quilt block. It just needs to be an 18-1/2″ unfinished square to make this pillow!
Here’s a patchwork Christmas pillow I made with some of my leftover Alpine Wonderland scraps.
Keep an eye on my Instagram feed. I’m sure there are more pillow examples coming this holiday season!


