
You are currently browsing PaigeAlaine’s articles.

Author Archive
I finally snagged a few minutes today to photograph the beautiful group of rows I received a couple weeks ago from our SewMod row exchange. I’ve been daydreaming of all the possibilities for layouts and borders! From left to right the rows were made by Andrea, Lorrie, Pattie, Vicki, Shelley and Kelly! What a creative group!

I thought I’d show you a picture of my first row quilt made with rows received by each member in my long time quilting group Pieceful Pals which was the inspiration for this SewMod group challenge.

Page 3 of Journal: (for Pages 1 & 2 click here)
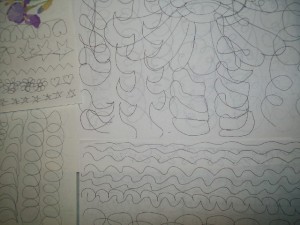
On this page we will be filling in the space with some basic and fun designs to use as large overall patterns or background fillers. Set up the sandwich with a vertical and horizontal line to create a 4-patch as in my sample below.


The following images can be printed then placed under a white sheet of paper to practice doodle before quilting, I used a heavy black marker so it would show through.
Square 1 – Starting with the top left square of the 4-patch meander around the space with loops. Add variety by vary the size of the loops. This is a great basic overall pattern to fill in small areas or over an entire quilt.

Square 2 – Start at any corner you are most comfortable I tend to work this pattern from top left to bottom right or vice versa. This pattern is a tear drop shape echoed multiple times. As you can see in the enlarged example you can echo back over one to move to another area. If you follow my lines you will see how that works. I have used this design as a large overall on a single panel baby quilt it can also fill in particular block pieces of a block to enhance other pieces or design within the block.

Square 3 – This pattern is a repeating swirl or wave pattern and looks best when you vary the size of the swirl. I like to start my swirls in a clockwise motion…forgive my unsmooth swirls Kitty insisted on helping this morning by showing me where the next swirl should go while giving me head-butts…in cat terms that truly means a head and a butt in your face!
This is a great design to use on borders though make sure it balances your quilting in the center if you make really small swirls and dense spacing your borders will tighten up. To avoid this visualize the size of your hand when you make a fist then keep your swirls larger. You will be pleasantly surprised how fast you can quilt a border with this design.

Square 4 – This is one of my favorite alternatives to straight parallel lines and can be quilted on the 45 degree angle for more interest if you like. Your spacing can be tight or generous depending on the area you are filling like space around appliqué or to create texture in a basket block. If you noticed I filled the entire area with one continuous line – to illustrate this my lines don’t touch the outer square seam but when you actually quilt it be sure to get as close to the seam to keep it neat looking. Tip: Use the lines created by your seams as a guideline to help keep your line straight and spacing consistent. Visualize how many lines you want to fill the space and keep it in mind as you move from one side to the other and adjust spacing on the next line as needed.

A few tips:
1) Practice doodle each design on paper first.
2) Watch your tension and adjust as needed.
3) You may find quilting gloves helpful with maneuvering the fabric.
A couple years ago I designed this quilt journal for a machine quilting class I taught at Quilt in Joy and thought I’d share it with you as your next free motion quilting challenge. It is a great project to document the quilting doodles you’ve learn thus far in my tutorials and to learn a few more filler designs.


You will need the following supplies:
- Sewing machine in good working order with attachable table and ability to drop feed dogs.
- (6) @12”-14″ square quilt sandwiches
-For the first page/sandwich choose a large print
-For the remaining choose a solid, marble, or subtle monochromatic patterned fabrics with a cohesiveness will work nicely.
*I used a variety of batiks and majority of the sandwiches I used the same batik on the front and back. - Cotton Batting
*I chose Warm & Natural batting. - 40-50wt Cotton or Cotton/Poly contrasting top thread and 50wt matching bobbin thread.
*I used Superior King Tut Variegated for more fun and impact and Master Piece in the bobbin! My machine likes this combo. - Topstitch or machine quilting needles (extras in case one breaks). I use 90/14 size with the King Tut thread.
- 2-3 bobbins
- Darning or free-motion foot
- Blue washout quilting marker and/or chalk marker
- Safety pins for basting – you will only need to use 4-6 pins per sandwich
- Scissors & Pinking Shears
- Notebook and pen/pencil for doodling practice
- Optional: Quilting Gloves, rubber finger tips
Today’s post we will work on Pages 1 & 2 which are using the techniques you learned in Parts 1-5. Don’t worry about finishing off the edges of the sandwiches yet like in my pictures we will address that step in the last post in this series.
Page 1:
Begin with your large print basted sandwich and free motion quilt around the design similar to the project we did in Part 5: Doodling with a Purpose. Have fun and let loose. Fill in the pattern to enhance the design – here I added tiny loops in the center of the sunflowers which provide a distinct texture from the petals.

Page 2:
On this page you will set up the sandwich with horizontal lines same as in Part 3: Doodle Sandwiches and quilt it with the doodles practiced in Part 4: Doodling on Fabric. Use the layout in the image below for a guide you are welcome to fill the space with your favorite fillers… this journal will be a great reference tool when you are quilting an actual quilt!

Happy doodling!
The last month has been stressful finding out my uncle Bobby (and godfather) had pancreatic cancer and now with his passing last Sunday our family has gotten really small. When someone close passes you realize you never spent enough time with that person and how short and precious life is. Be sure to slow down and find time for the people in your life that really matter!
By the way, he was a huge Packer fan so I wasn’t too crushed they beat the Bears today…I think they had a little help from above! :)
So, since I didn’t have time to pull together a machine quilting tutorial I pulled together some quilts I quilted. Enjoy.
This is my first run at McTavishing!
I saved this dresden top from a resale shop and practiced echo quilting and feather circles – I luv this quilt!

These hand sewn basket squares were set in a 1″ bright green sashing and tied with green polyester yarn. I had to save the quilt, the blocks had so much potential. I found the perfect green fabric and used various colored fabrics around each block. Then used a thin black border to provide impact and to distract the eye from the different sized baskets -there was a 2″ difference between the smallest and largest blocks. I’m pleased with how it turned out. This was the first quilt I quilted on the Gammill almost 4 years ago.

Sun rays are fun to free motion quilt…


This was a giant queen size quilt. I used a tracing of a template in the light areas and free motion waves in the star. Wool batting which has a higher loft gave the quilting a more dramatic impact.

Rest in peace Bobby…and go Packers!
I just finished machine quilting this on the Gammill for Kelly (supercool Kelly as Lorrie puts it!). Her quilts inspire me so much the creativity just flows so easily. She designed this quilt from the center out until it reached the dimensions she wanted @ 96×101! I believe most or all the fabrics are Wonderland by Momo for Moda Fabrics. Here are a few of my favorite pictures…


Isn’t this design perfect for flying geese?

The back of the quilt turned out just as interesting lots of texture.


Check out my Flickr site for more pictures!
Lorrie and I were working hard on some projects last Sunday – the air was cold but the sun was warm and bright. It was time for lunch we planned on homemade French Onion soup but we needed something to calm the onions and quench our thirst! I made up this festive drink using Frontera Cranberry Sangria mix, a red Zinfandel by Blackstone, fresh cranberries and orange slices…YUM!!! The glass pitcher and mix are both from Crate & Barrel and they are resting upon hand crocheted placemats I picked up years ago at a resale shop -don’t they go perfectly together. What a beautiful color cranberry is!


The onion soup was fabulous too Lorrie modified Paula Dean’s recipe and it tastes like it simmered all day – it was so flavorful with the added Thyme.

Here is her revised recipe:
1 big yellow or Vidalia onion sliced
1 clove garlic minced
Drizzled with olive oil
2 TBSP flour
1-16oz. beef broth
Pinch thyme
1 bay leaf
French bread cubed
Mozzarella or Provolone
Sauté the onions and garlic till tender.
Sprinkle with flour and brown.
Add broth thyme and bay leaf.
Reduce heat and simmer 20 min.
Ladle in bowls top with french bread and cheese …place under broiler (toaster oven)
I don’t know about you but my mouth is watering!
Hi all and welcome to the new year! I’m so excited for you to move on to the next practice sample. This technique will introduce you to working with a larger quilt sandwich and to doodle with some guidance. Some of you found it a little challenging to doodle on a blank sheet of paper so in this step you will utilize the fabric design to create shapes not only by tracing around the designs but to embellish and fill in the space. Try continuous sewing no need to be perfect here…let yourself be free and incorporate the shapes you practiced in Part 4 like loops, stars, vines/leaves. But don’t worry if you find yourself in a pickle with nowhere to go stop, secure the thread and start fresh in another location.
Hopefully you found a nice large print and basted your sandwich. Below I used safety pins roughly 6-8 inches apart. I choose this fun flower pattern which has several different flowers some solid some just outer lines. If you are just joining us click here for the supply list.

It is best to begin quilting from the center outward this will help keep you organized and to help avoid stretches, folds and bubbles in the top fabric. In the beginning it’s inevitable these will happen but as you practice more and more you will begin to use counter maneuvers to prevent them from occurring. By starting from the center and moving outward the top fabric moves with you if you decide to wonder off one direction then come back another you risk ending up with an un-quilted area surrounded by quilted areas. The un-quilted fabric is now secured all around and has nowhere to move as you quilt it…a fold or bubble is likely.
As you can see this fabric design provided a great palate to embellish. I quilted around the green petals and then added a design within them. The white line flowers I used as a background only and created my own flower design over them. Definitely have fun with this!

A few tips:
1) In free motion quilting your thread tension will need to be adjusted so be sure to test before you begin quilting.
Remember the following:
*If your top thread looks like a solid line on the top and you see bobbin thread poking thru – loosen your top thread tension.
*If the bobbin thread looks like a solid line on the back and you see the top thread poking thru – tighten your top thread tension.
2) If you are still having tension issues check your thread weight every sewing machine is different but using a 40wt thread on the top and a 50wt in the bobbin can help – preferably the same brand. I find bobbins like thinner threads. Try this combination unless you are experienced at adjusting the bobbin tension…this is a topic for a future post!
3) Make sure you workspace is clean and free of obstructions. You won’t be happy if your sandwich hits something as you are in the middle of a nice smooth loop.
4) Quilting gloves can help eliminate hand and arm fatigue.
5) Be sure to remove the safety pins as you quilt an area.
6) Don’t rush though finding the right rhythm will increase stitch length consistency and provide a more fluid motion.
For those of you who successfully quilt your entire sandwich leave a comment here letting me know how this project went. Include your email address and I will email you a bag pattern to make out of your newly quilted sandwich!
Definitely have fun with this!
Paige
With six days left before Christmas and New Years just around the corner I’m looking forward to a few days off from my day job to quilt of course and to enjoy some relaxing time with my folks and sister and all our pets (3 dogs and a kitty)…so doodling can wait until the new year!
In the meantime, if you get a chance pull together the following supplies and prepare a quilt sandwich for the January 3rd Free Motion Monday – Part 5: Doodling with a Purpose.
Supply List:
1 yard large print fabric (see example below)
1 yard coordinating small print or marble fabric
1 yard batting (medium loft cotton preferred – i.e. Warm & Natural)
Contrasting thread – variegated works well so you can see your quilting lines
Baste sandwich
Quilting Gloves if you like
Darning/Free Motion quilting foot

The other day Lorrie mentioned our “collaborative blog” so far mostly reflects her personality and passions so I decided this weekend to keep my camera handy and snap a few things that captured some of my passions and personality.
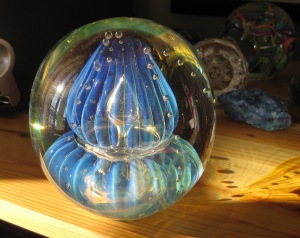
I love when sunlight flows thru glass and creates intricate designs. The sun is just about at its lowest angle to the horizon so my entire house was filled with light art. I have a small collection of paperweights see how they sparkle…this one reminds me of an upside down jelly fish!
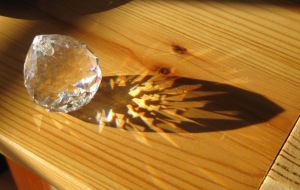
This one looks like a diamond…
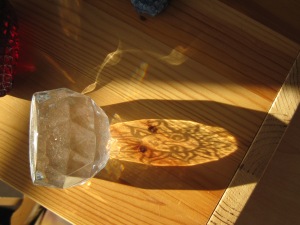
This one has a sun etched into the back of it…check out the dancing ribbon of light just above the it.
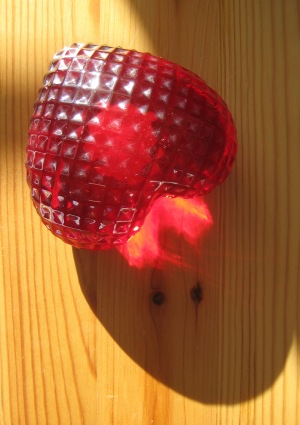
This one had shooting flames out the top of the heart…pretty cool!
After playing with the paperweights in my loft I proceeded to my quilt studio in my basement where I have an ensemble of blue bottles…
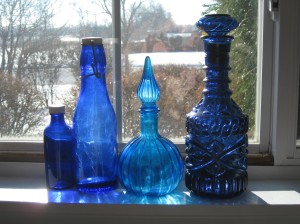
I must have color – lots of color around me especially during the long cold months of winter!

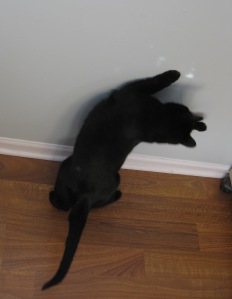
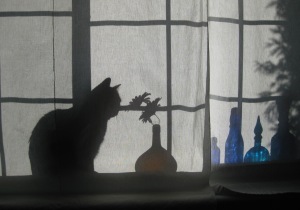
Of course Kitty also likes to play with light too! She never did catch it :)
Then grandma and grandpa and sis came over today to pick up some Kolachkis (yummy Polish cookies I make once a year) and let the doggies play – and Kitty, well when the doggies come to play she runs for cover…in this case I wonder if she realized we all could see her!!!!
Sophie is my 5 1/2 year old lab mix rescue dog – she is the sweetest and always wants to go for a walk!

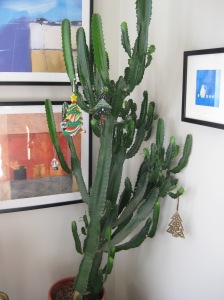
And finally, a few pictures of my holiday decorations – NOTHING like Lorrie’s -she does have the knack…and yes, that is a Cactus Christmas tree with Christmas tree ornaments – ok, a little different but I do love Arizona!!!
And what do you think of my present wrapping?!

Santa did a early drive by last Sunday – see…he really does exist !!! :)

Happy Monday!
Paige
Ok, internet is up and running again! Thanks Lorrie for coming up with a last minute post! So, how did it feel to sew free motion straight lines? Was your stitch length consistent? Did you eventually adjust your hand speed or needle speed without thinking? Did you use your previous line as a guide -did it help keep the next one straight? Lorrie’s lines look great and I’m so glad Gail sent in pictures of her doodling (below). I see feathers – very ambitious – fun aren’t they? You are very close to achieving them too -great job! After we get thru the basics I will post three feather techniques from various designer I teach at the local quilt store, I’m sure you will find one that works best for you.
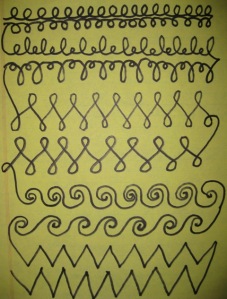
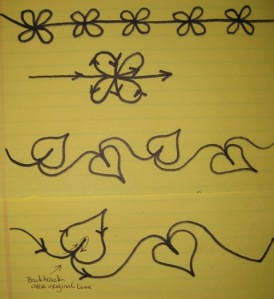
Now that you have 4 sandwiches prepared I bet you are wondering what’s next. Well, let’s start sewing doodles in between the lines. Imagine these lines as the outer boundaries of sashing in your quilt and start doodling the following shapes – practice each shape on two lines.
I started sewing left to right then continued down to the next line without stopping and sewed the next line from right to left. You can see in the drawing below I mirrored the loops on the second line to mixed up a bit and to get use to sewing shapes in different directions. Continue with the “L’s” and “e’s” , lace, waves, zigzags, flowers, then leaves on a vine. If you have extra space at the bottom create your own shape and repeat.
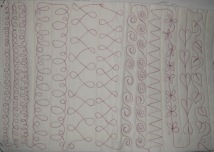
Here is one of my first practice samples…
As you sew each shape watch the stitch length and the overall consistency in the shapes. Depending on what you used to based the sandwich with be sure to watch for pins and remove them as you go. If you are finding it challenging to move your fabric around try using quilting gloves – I fought them for a long time because they made my hands hot but they’ve come a long way over the years and are much lighter in weight and more comfortable to wear. They will help reduce hand fatigue as well.
Use your 4 practice sandwiches and continue practicing throughout the week – if you get bored don’t limit your practice to just the shapes above definitely explore others – flip thru quilting magazines/books or images on the internet to find more examples. Many times I find inspiration from catalogs with metalwork designs.
Here are a few tips:
1) I highly recommend keeping a stash of practice sandwiches by your sewing machine so when you have the urge to doodle everything is ready to go!
2) Make sure you work space is clutter free so your fabric will move freely.
3) Adjust your chair height or sit on pillows to insure your elbows are at a 90 degree angle this will reduce wrist and shoulder fatigue.
4) Set up plenty of light so you don’t strain your eyes.
5) Watch your thread tension during free motion quilting you will find you may have to adjust. Start by adjusting your top thread tension as needed then bobbin thread.
6) Don’t quilt if you are stressed or have other things on your mind you won’t enjoy the process!
Remember, this is practice so don’t be hard on yourself. As you progress thru the steps you will look back at your first few sandwiches and smile at what you have accomplished! Practice Practice Practice!
Well, how is the doodling practice going? Easy? Difficult? Lorrie is doing a wonderful job – thanks for sharing your doodles! It’s fun to watch your progress.
Hopefully you all were able to squeeze in some practice over the holiday if not plan to dedicate at least a couple times a week going forward! Doodling consistently will help train the muscles in your hands/arms to work together with your brain to draw straighter lines and smoother curves and to fill up a space without having to think too hard.
This week we will prepare some Doodle Sandwiches. These should go fairly quickly but there is some practicing involved. You will need the following materials:
2 yds muslin or solid color fabric
1 yd cotton batting (medium loft)
Contrasting Thread – choose a cotton 40wt or 50wt
Walking Foot
Darning / Free Motion Foot
Safety Pins (or whatever basting technique you prefer)
Rotary cutting knife/ cutting board/ ruler
Scissors
1) Start with your workspace – remove all clutter around your machine, set up plenty of lighting, adjust your chair so your arms are at a 90 degree angle to your machine’s work surface.
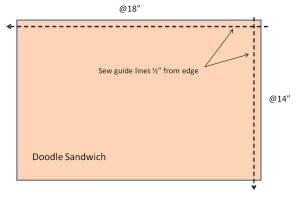
2) Prepare your sandwiches by layering the fabric and batting and cutting into 6 @14″x18″. Baste by pinning every 6-8″ or whatever basting technique you prefer. Set aside 2 sandwiches for future practice.
3) Attach the walking foot. On each sandwich sew across one short side and one long side about 1/2″ from the edge to provide guidelines and to further secure the sandwich. See drawing below.
4) Remove the walking foot and place on the darning foot. Be sure to drop the feed dogs otherwise the fabric will not move around freely.
5) Now for the fun part – free motion parallel straight lines! This is a good technique to practice stitch length. During free motion quilting each stitch will not be exactly the same length but the goal is to have an overall consistent look. The way to achieve this is to find the balance between the speed of your hand movement and the speed of the needle. The stitch length you are striving for should resemble the stitch length on the guidelines you initially sewed to secure the sandwich.
Remember the following:
*Stitches too long – increase the speed of the needle or decrease the speed of your hand movement
*Stitches too short – decrease the speed of the needle or increase the speed of your hand movement
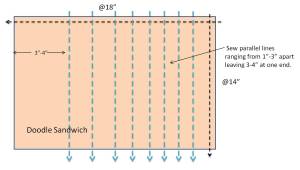
6) Start sewing parallel lines approximately 1″-3″ apart using the initial guide line sewn as a guide to help keep lines as straight as possible. See drawing below.
*You may have the tendency to push or pull the fabric faster than the needle can complete its cycle and end up breaking a needle so take your time.
*You can stitch up and down or left to right better yet try both ways to see if one way feels easier.
7) Complete 4 sandwiches. Next week we’ll work on filling in the spaces!


