
You are currently browsing the category archive for the ‘Crystal Lake Modern Quilt Guild’ category.

Category Archive
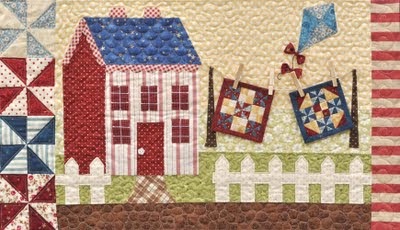
well…an almost finish. It still needs to be quilted by the talented PaigeAlaine and binding added. And let’s not forget any embellishments and embroidery I see fit.
All of my borders are finished and on time. I’m really proud of myself. With everything I’ve got going on with work, family & guild commitments, I stayed on track and did it!

I worked until midnight the night before to get all of my embroidery work finished.

Our final border task was either a cross block or hand applique and the color choices were peach and sunshine yellow. I started out wanting to do the picket fence idea but it was looking a little ‘chunky’ and all of the lines within the ‘cross’ were conflicting with the seperating borders I added. I thought about the hexies I had finished but they were too small and I thought the quilt needed some more curves. So I finally decided on an orange peel hand applique.

And I decided all of that only 1 week before it was due y’all! Yes, I’m a glutton for punishment and my poor fingers hurt but the pain was worth the gain!

I’m completely satisfied with my overall choices in borders and my color scheme.
Hand applique✔️
Sunshine Yellow✔️
We have until the September meeting to be completely bound and ready for display in our local quilt show at Countryside Flower Shop in Crystal Lake. I can’t wait to see all of our quilts proudly displayed.
To see all of the previous border tasks click below:
Border Task 1
Border Task 2
Border Task 3
Border Task 4
Border Task 5
I have to say I’m pretty proud of myself for keeping up with this commitment. Last month, although, was quite the challenge to get everything finished on time.
Our task was Scrappy Stars, the color orange and incorporate this ‘not so me‘ fabric in somewhere.

Well the fabric is not so much the problem but keeping the stars small was a bit of an issue. Since the majority of my quilt is bitty sized, I didn’t want to add a 6″ star around it. I’m trying to keep with a theme here ya know! And, I didn’t want anything that would come across as ‘chunky’ like a sawtooth star. So I searched the Internet and found that Quiltmaker has a feature they did on bitty blocks and thank gawd that one of them was a friendship star. It’s perfect for scrappy and it’s only 3″ finished!! Woo hoo win!!
My stars look like they’re twinkling around the border. I love it! I’ve only used two whites in this quilt, a ‘less than bright‘ white tone on tone dot from LakeHouse Fabrics which I hoard and only use on special projects, and a white and aqua dot from Riley Blake. I figured the two different whites would give it a more scrappy and vintage feel. I think that’s working for me…


Wondering where the ‘challenge’ fabric is? Can you find it? It blends in so well. That’s one of the advantages of starting with your medallion in a variety of colors. You don’t end up boxing yourself into one color combo and it’s less stressful when the next color task is picked because you know it can be incorporated into your quilt somewhere.

Scrappy Star✔️
Orange✔️
Challenge fabric ✔️
The next task chosen for us this past Sunday at our guild meeting is hand applique and/or crosses and the color peach and/or yellow. Yes. You heard that right…we get to choose one or both tasks & colors. Hmmm…the possibilities.
Maybe a Cross variation with a picket fence like the one from this Shabby Fabrics block.
Or I could just skip the Cross block altogether and hand applique all of the hexies I’ve been working on for this quilt. Either way I’m guessing it’s the same amount of time for each. Any suggestions?

I’d better get a move on it. I still have to finish the embroidered corners and my last border before our next meeting on June 12th to be eligible to stay in the running.
This will be our last task for this challenge and then it will be time to get this baby quilted and bound for a quilt show. Wish me luck this month!
My quilt now measures 36″.
You can find the previous border tasks here…
Border task 1
Border task 2
Border task 3
Border task 4
Two more rounds left for the CLMQG Medallion Border Challenge!
My goal for this challenge, other than actually completing it on time, is keeping it small. When the task/color for last month was chosen as a red Dresden block, I knew I wouldn’t have a problem. I’ve been making bitty Dresdens for a while now. I got this one covered.

Do I really need to to point out the red. Nope, didn’t think so. It’s everywhere! I made 40 half Dresdens for a total of 200 Bitty Dresden blades..whew. Lots of fun work ya’ll!

I took this baby all the way to Florida. I was the only nerd on the beach under an umbrella sewing 40 Dresdens by hand.

Red✔️ Dresden✔️ I also added a small red Dottie border between the 2nd & 3rd borders for some sort of separation.

What’s next months challenge you ask? Orange is the color. Scrappy stars is the task. But wait, there’s more! We have to incorporate this green icky fabric in it somehow. As little or as much as we want.

My quilt so far measures 31-1/2″. This one will be a challenge for sure!
To read about the previous border challenges click below…
So I know you’re wondering what prettiness I came up with for my 2nd border. Well…I wanted to do 2 rows of clamshells for my curves but once again I became distracted and time got away from me. So I put my medallion on the design board and walked away. Then I would walk back again, audition a few things, then walk away again. Only to do this, what seemed like a few thousands times, and end up with one row of clamshells which inevitably ended up looking like a scrappy scalloped border lol. Whew. All that to end up with scallops!!

Curves ✔️ Carnation Pink ✔️

Anyway, the end result is still fabulous in my eyes and that’s all that counts. This challenge, even though it’s time consuming, is sparking a bit of creativity in me. I knew when I started it, that I wanted scrappy, embroidery, beautifulness. And so far I think I’ve achieved my vision.

Like everything else I design, I kinda fly by the seat of my pants at first and my ‘scallops’ didn’t end up meeting where I wanted in the corners. But I’m not gonna fret. Embellishments can fix that! I have cute buttons to add as a ‘distraction‘ after the quilting is complete. Do not add embellishments like buttons and sequins before sending to the quilter. That’s a big no-no!!

And obviously I’m taking my sweet ass time on the embroidery work…I’ve still only finished the two corners. Time seems to escape me these days, between family, the guild commitments, SewMod, and all of the wonderful opportunities so far this year. I wish I could clone myself!
March’s task is dresdens and the color is red. Dresden blocks are a plenty! If you Google dresden quilt block you will find so many creative ways to make one. I’m looking forward to this one for sure!

Good morning everyone!
One of our CLMQG members is hoping to sell her practically new Bernina 440QE. If you’re interested, leave a comment and I’ll put you in touch with her. This baby needs a new home!!
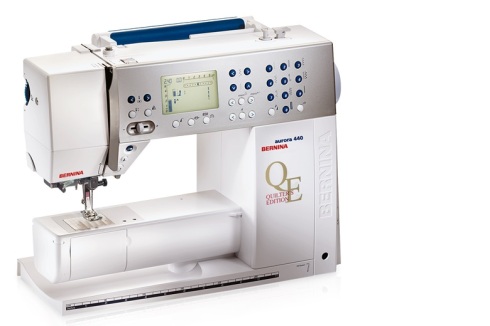
**Stock photo
“The aurora 440 QE – A sewing machine for everyone and every application.
The aurora sewing machine is a sensation, making sewing easier than ever before. A wealth of new functions and the greatest possible ease of operation make the aurora a sewing machine for everyone and every application. The aurora 440 QE is the first sewing machine in the world to be equipped with BSR (BERNINA Stitch Regulator) – the exclusive BERNINA innovation for free-motion stitching with consistent stitch lengths even at variable sewing speeds. The BSR makes free-motion quilting easier for novices and pros alike.”-Bernina.com
Check out the attached photos for more info…don’t ya just want to take her home and whip up a fabulous project!?


I’m participating in the CLMQG Medallion Quilt Challenge which I talked about last month found here.
I did decide to go ahead with the embroidery in the corners of my center. I hemmed & hawed over it a while, knowing full well I’d do it even though that much embroidery was going to be a lot of work. I just think it needed something to fill the space. Most importantly though, it does not change the initial design elements, it’s just an addition…kind of like embellishments to the medallion.

And if you’re gonna do something, it might as well be fantastic, right!? I have two corners completed and working on my third.

To recap last months challenge, we needed to implement a snowball block with a red-violet color. I added the tiniest snowball blocks I could, which I think were 2.5″ finished on the corners with some of the Timeless Treasures bicycle fabric scraps I had left and added a crochet trim to make the separation from the center to the border. I felt like since the center was going to be so busy with the dresses and embroidery work, that the next border needed to calm it down, which is why I only added snowballs to the corners.
Can’t see the red-violet? Here’s an up-close. Remember…it can be a little or a lot of the color. I chose a little…

Perfect right!?
Now I’m working on February’s challenge, border #2. The task drawn was ‘curves‘ and the color was ‘carnation pink’.
I think I can handle February’s challenge! Does anyone see where I’m going with this? You’ll have to check back for my progress on this border which I should have completed soon. My next meeting is this Sunday. I’d better get busy!!
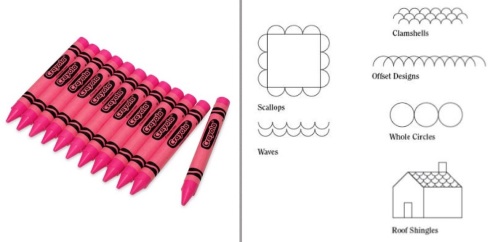
*photo-Handiquilter
Join us for the Crimson Tate lecture & workshop at the Crystal Lake Modern Quilt Guild.
Sunday March 13, 2016
11:00am Lecture/Discussion
1:00-5:00pm Workshop
The location for our meeting, lecture, and workshop is:
Home State Bank Commercial Banking Center
611 South Main Street
Crystal Lake, IL 60014

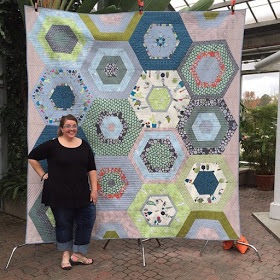
The CLMQG will host fabric and pattern designer and quilt shop owner extraordinaire Heather Givans of Crimson Tate at our March meeting! She will deliver a one hour lecture/open discussion on the topic of fabric design at 11:00am followed by a quilting workshop on her “Succulent Garden” pattern (pictured below) from 1:00-5:00pm. She will also have fabrics and other goodies from her Indianapolis shop available for purchase during her visit.
CLMQG members may attend the 11:00am lecture free of charge.
Guests may attend the 11:00am lecture for a $5 fee.
Registration is REQUIRED for the quilting workshop. For more information regarding the workshop or lecture, please visit the CLMQG website. Don’t delay. Registration ends Saturday, March 5th, 2016. We hope to see you there!
A new year with the CLMQG means new projects, block lotteries, and Secret Pals! I’m really excited. We have the entire year planned and I’m positive it’s going to be fun & exciting. I’ve never played Secret Pal so I’m pretty giddy over this one. Although, I’m sure I’ll blow the surprise. Or she will instantly know it came from me because chances are there will, at some point, be a crocheted flower, embroidery work on her gift or I’ll have no self control and show it all over the blog and instagram. If you figure me out early Secret Pal, I apologize now lol.
The other program we started in January is a Medallion Border challenge. We start with a center square of our choice and each month a new set of guidelines will be chosen for us to complete a border.
For example..this is my center square I showed in January. It’s a retro dress design from a Sizzix die that I traced to turn into a pattern I could hand appliqué. I wanted to work with lots of florals so I chose to focus on some of the LakeHouse and Flower Sugar fabrics I’d been hoarding. I appliquéd them onto a white tone-on-tone dotty background. It took on a dresden like effect when I decided to lay them out in a circular pattern.

My favorite is the navy blue with the big cherries on it!

A recurring theme I’m planning on having is cherries, strawberries, dots, and florals. And of course I’m going to add lots of hand embroidery. To start, I embroidered a purse in the center of my medallion. Every great dress deserves a beautiful purse! This is an embroidery design by CrabApple Hill from her Sundress pattern. I’m going to be incorporating several of those designs into this challenge. Hopefully more along the center corners and into the borders as well.

Each month a design task and a new color is randomly chosen for us to incorporate into the next border. In January the task was a Snowball block and the color was red-violet. Here’s a few Google images so you can visualize my task this month…we can use as many or as few blocks in our row and as much or as little of the red-violet. We just need to to be able to identify it to the challenge coordinator.

For the February meeting I will need to come prepared to show my finished row attached to my medallion or risk being expelled from the program or worse…having some sort of fitting punishment. Oh my. That sounds worse doesn’t it? The unknown is ALWAYS worse!
So I’d better get moving if I want to make my deadline. I’ll be back soon to show you my progress!
Our June guild swap was ‘fabric baskets’. I used that super cute Paris Bonjour fabric that arrived from Timeless Treasures and a tutorial found at St. Louis Folk Victorian. The instructions were easy and clear, which made this basket a breeze but made it difficult for me to bid it adieu because it turned out so darned cute! Not to fret. It went to a good home:)

What I received in return was one of these fab one hour baskets made by Shelley over at Elsie’s Girl. Don’t you just love that stripe & polka dot!

I also managed to finish up yet another MineCraft quilt. But I’ll spare you yet another pic of that. But expect a new MineCraft character to be gracing a quilt top soon, with a tutorial…psst..it’s the bad guy in MineCraft, if your wondering. BOOM!
I partially watched The Sound Of Music while cutting 27 new kits.

Paige quilted an HST baby elephant quilt for me.

This was just made using my leftover squares from the Spinning Star demo I did here. And ‘Oh Boy’, did it turn out cute or what?!

This is bound and you can find this SewMod cutie for sale in the SewModMakes Etsy shop.

And lastly, I spent some time making a block for our next guild lottery entry. We’re doing a Halloween theme with a specific color palette this time using paint chips that Shelley picked…A Modern Halloween.

It will be interesting to see what everyone comes up with. I think I’ll make two more to increase my chances of winning!

But for now, I’ll say…
🎶🎶So long, farewell, auf wiedersehen, adieu
Adieu, adieu, to you and you and you🎶🎶

Supplies needed for tutorial:
2 pieces of Scraps approx. 11″ x 6″
Batting
Button
Thread/embroidery floss
Elastic tie…these can be found in the hair accessory section at your local Target. They are the tiny ones. They come in all black or a multi colored selection.
Disposable coffee cup
The CLMQG is going to be vending at the Spring Fiber Fling May 16th-17th in Woodstock, IL to promote the guild, raise funds and entice new members to join our fabulous group. In doing so, the members are making small handmade items to sell, such as bookmarks, pincushions, zipper bags, and…coffee cozys!
Now, I know that I’ve already shown you a tutorial on these but I think it’s time to revisit the project. The previous one was a scrappy cozy with embroidered stitches. This one is your ‘not so plain Jane’ one…modern, whimsy and with just a touch of detail.
These are so easy ya’ll! I made 4o of them in 2.5 days plus I wrote this little tute for you. So let’s get started, shall we?
First, you’re going to print the pattern. We’ll use the previous pattern because it works just fine. You can find it here. Cut the pattern out on the solid line.
Dig through all of those scraps. Find something fantabulous! After all, you want everyone at Starbucks to be jealous that your coffee wears a ‘designer’ cozy.

Press and layer your fabrics. Outer fabric face up, inner fabric face down and your batting on top. Pin your pattern on top and cut the fabrics out. See. I told you to never throw those scraps out!!

Cut the elastic tie where it was fused together. Snip that part off. Some of them have a little metal piece in them and we wouldn’t want to stitch that. Cutting it also helps release the tension so that it stays in place without wiggling around.

Take the cozy sandwich to your machine. Fold your batting and inner fabric back a bit and place your elastic tie on the outer fabric with the loop facing inward. Take a few stitches to secure into place.

Re-layer your fabrics. Stitch the sandwich with a scant 1/4″ all the way around the cozy, leaving about 3″ for turning right side out. Make sure to back stitch at the beginning, over the elastic tie for stability, and again at the end. Clip your corners.

Turn right side out through the opening. Push your corners out with a thingamajig and press the cozy. Turn the unfinished seam allowance in and top stitch close to the edge around the entire cozy. I like to top stitch using a coordinating Sulky thread. I like it. It’s shiny. If you have a label you’d like to attach, do so now.
Wrap your cozy around your disposable cup to measure the placement of your button. I marked mine with a pin for the demo. Use a pencil to mark your button spot. Make it snug. Your cozy will be used over and over again. You don’t want your coffee to lose its cozy at Starbucks…A naked coffee cup? How embarrassing!

Use coordinating embroidery floss to attach your button.

You’re all finished! So easy and what a great gift for your friends, secret pals, or teachers.
If you’re in the area, come visit our booth at the Spring Fiber Fling. We’d love to see you!
Spring Fiber Fling
May 16, 2015 – May 17, 2015
Saturday 9:00 am to 5:00 pm, Sunday 9:00 am to 4:00 pm
McHenry County Fairgrounds
11900 Country Club Rd.
Woodstock, IL 60098


