
You are currently browsing PaigeAlaine’s articles.

Author Archive
We’re excited to release a PDF version of our Cannon Beach pattern released this past March. The PDF version has lots of pictures to support each step with more detail to give even a beginner quilter, looking for a challenge, the help to complete this quilt with ease.
The original quilt design was inspired by my trip to Cannon Beach, Oregon in 2010 with my mom, sister and one of my longest and dearest friends, Karen –it was such a memorable trip for me, and everything was so beautiful.


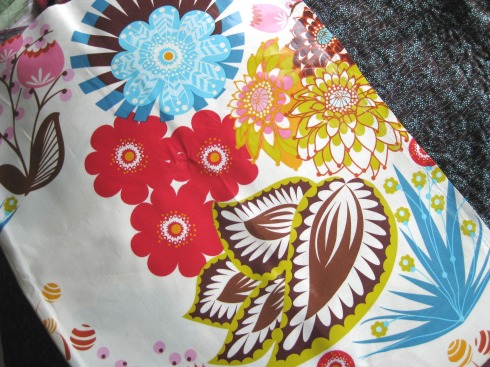
When I stumbled upon a bundle of Denyse Schmidt’s Hope Valley fabrics the images above, forever embedded in my mind seem to flow right thru the fabric into this giant Dresden design.


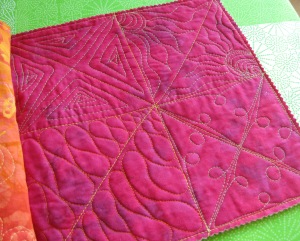
The machine quilting design seemed to flow just as easy once the quilt was loaded onto the Gammill. I started from the center and continued outward with concentric circular patterns, changing the design with each circle. This photo was taken when the sun was perfectly diffused thru the window over my front door – the quilting popped and the quilt came alive! This is definitely my favorite picture.

The small half Dresdens in the corners were quilted similarly.

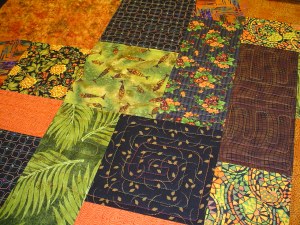
When we received the Midnight Garden fabric line by Sandy Henderson for Michael Miller, Lorrie was inspired to make her version of the pattern. She added some Art Gallery Bespoken and Oval Elements, and one of Joel Dewberry Heirloom fabrics –they all went together so very nicely. I love how fabric can reflect a quilter’s vision, personality and inspiration so differently.

Isn’t the Midnight Garden Gate the perfect center! Lorrie requested a swirl pattern so I quilted each blade from the center outward to the tip.


The large center Dresden was made using Marilyn Doheny’s 25” 9-degree Wedge Ruler and the smaller outer half Dresdens were made using the Easy Dresden tool by Darlene Zimmerman. See Lorrie’s Easy Dresden Demo on how to use. These tools are so versatile and I highly recommend getting them so you can create any size Dresden and acrylic rulers do make it easier to cut multiple wedges. As a bonus though, we included paper templates for the specific size wedges in the Cannon Beach pattern.
We had such great feedback on this fabric line, Lorrie made up kitsfor this version which include a free pattern. Kits, PDF patterns and the original hardcopy version are all available in our Etsy shop!

Hi all, yes this is Paige. I don’t get much time to blog but I’m hoping to change that so I can share some of my quilting journey as well. A couple weeks ago, I spent a wonderful relaxing vacation in Austin with one of my dear friends and her cousin, who lives there. We did a little bit of everything from touring caverns to live music to helping a bit at a bicycle race for MS to the best tex-mex cuisine and margaritas! Definitely hard to come back to the cold and overcast skies.
Of course, all quilters know the best way to plan a road trip is to layout the route based on where the quilt shops are located, am I right?! Well, Karen and I developed our own shop hop and visited 10 shops over the week. I did my Google Maps search and here are the shops we chose based on location, their websites and images of their shops. I must say, they were all worth the stop.
*Stitch Lab -Austin, TX stitchlab.biz
*Las Colchas -San Antonio, TX lascolchas.com
*Creations -Kerrville, TX creations-online.com
Honey Bee Quilt Store -Austin, TX honeybeequiltstore.com (Will be featured in the 2012 Quilt Sampler Magazine)
The Quilt Store, Inc. -Austin, TX quiltstore.com
Ready To Sew Bernina -Cedar Park, TX readytosewbernina.com
Poppy Quilt ‘n Sew -Georgetown, TX poppyquiltnsew.com
B & B Quilting & Gifts -Buda, TX bbquilting.com
Quilt Haus -New Braunfels, TX creativesewlutions.com
Here is a little bit about my top three favorites:
The Stitch Lab in Austin was such a cool place. Leslie, the owner, was so kind to take a moment and tell us a bit about herself, her journey and how her place was evolving. Her selection of fabrics included cottons, voiles, linens and home dec – all were current and vibrant. There was lots of energy flowing thru the rooms and lots of busy hands cutting and folding the new fabrics that just arrived. We fell in love with the quaintness of the shop and wanted to hang out all day –click here to see more pictures of her shop.

Las Colchas was another must see shop in downtown San Antonio. A charming cottage home converted into a quilter’s paradise filled with fabrics from modern to folk, a cozy classroom and deck off the back. The staff was pleasant and very helpful.


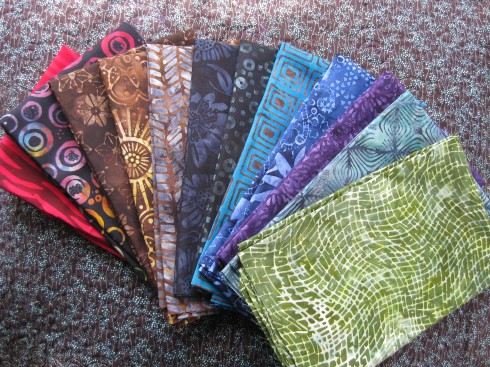
When we walked into Creations in Kerriville (NW of San Antonio), I was instantly drawn to the 100’s and 100’s of bolts of Batiks. Their selection was amazing…I had to touch each bolt and wanted a yard of each for my stash. About 15 minutes into the shopping spree, my phone started beeping -I had a new text…hmmm, who could it be…it was Karen texting me from the front of the store telling me “this place is huge!” and before I knew it she was at my side saying “you’re still here? You’ve got to see this place”. Creations had a separate room for every style quilter and do-it-yourselfer. The staff was so personable and helpful I didn’t want to leave –a definite must see!
Below are some of the goodies I couldn’t do without! I definitely went on a Batik binge.


When a client mentioned he wanted a quilt with a horse theme for his wife, I practically yelled out yeehah! Well, I was a little more professional than that but I had been designing a western style quilt in my mind’s eye for years and this was the opportunity to finally make it come to life. Oh, and what an opportunity to dive into my batik stash which is overflowing with every color imaginable. I jumped right in and pulled out stacks and stacks of batiks – OMG I had to tell myself to focus on only a few colorways… brown, blue and green. In the end, I sneaked in a few more colors -purples, reds and oranges!
I had such a blast laying out strip after strip, starting with the blues down to the light browns and yellows, to create a western landscape with silhouettes of beautiful horses against a sunset. It felt like I was painting with fabric!

Throughout the layout process, I daydreamed about how I was going to machine quilt it. The design didn’t come until it was fully loaded on the Gammill, and I sat for about an hour debating on the complexity of the design. It definitely needed to be simple with lots of movement without taking away from the beautiful batiks. I ended up quilting a simple overall swirl throughout the background and focused more on enhancing the horse blocks.


I quilted with Superior Threads variegated King Tut, one of my all time favorite threads to use – nice sheen and great range of colors!


And here it is!

I had a little fun with the back too!

My sister Wendy, Karen, Jen and I just returned from a wonderful quilt retreat in Hillpoint, WI called Homestead about an hour west of Madison. It was Wendy and Jen’s first time, Karen and I were here back in 2007.
Friday was a beautiful day to hit the road and drive with the windows open. When you arrive you see this quaint restored old cabin which is a gathering space inside to relax and kick your feet up in front of a fireplace but behind it is a large work area which can handle up to 17 quilters. Patsy the owner is a wonderful and personable host making us extremely comfortable we didn’t want to leave!


One of her dogs, aka “Juice”, posed perfectly for this shot of the property.
Shortly after we arrived, Patsy served dinner and we all hung out on the back porch to catch our breath and enjoy a glass of wine. We then jumped right into our projects. I started with creating a fun cover for my date planner using the SewMod embroidery Lorrie did for me in beautiful varigated thread -look how wonderful it goes this awesome batik! I love this batik so much I couldn’t resist making a cover for my cell phone.


I added a pen and business card holders on the inside panel.

I then tackled an April Bag – a pattern created by Elizabeth Hartman.

I was wondering what to do with this cute fabric by Daisies and Dots by Piece O’ Cake that matches our SewMod logo so nicely I decided to make a couple more April Bags….but shhhhh, one if for Lorrie!

Wendy worked on this adorable doggie quilt…not bad for her first appliquéd project! It was a general consensus this block would make a cute lap quilt.

Karen worked on a Yellow Brick Road pattern for her cousin. Doesn’t it remind you of the orange-raspberry sherbet!

Jen cut out several aprons, I loved this one in an orange/white flower from Denyse Schmidt’s Hope Valley line. She also completed a beautiful cotton knitted blanket for her husband.


I love retreats and getting away to quilt with my dear friends and family but also to have the opportunity to meet other quilters and crafters. We were very fortunate to share the space with 10 wonderful quilters/embroiders at the retreat who shared their projects and stories. We ended up signing up for the same weekend next year to share the space with them again…we look forward to seeing you all in a year or sooner! :)
Are you thinking about taking a quilt to a longarm quilter and not quite sure what you need to do to prepare your quilt before dropping it off or sending it out? I’ve pulled together some helpful tips to ensure a better end result with your quilt while helping to reduce the possibility of unnecessary extra work for your quilter and extra costs to you.
- Please piece carefully. Longarmers cannot quilt out bubbles and pleats that have been pieced.
- Make sure that all seams are stitched securely. When the quilt is loaded onto the rollers the fabric is kept taut. If the seams are not strong and accurate they will pull apart. (It’s a good idea to take into account the thread color you are piecing with verses using whatever is handy. I’ve seen purple thread used to piece white fabric and white thread to piece black fabric -it’s not pretty when seams pull apart!)
- Take the time to square your quilt top, batting and backing – I can’t stress this enough! Many times it is not obvious to the longarm quilter until the quilt is fully loaded on the machine rollers. In some cases, it will require extra work for the quilter to unload, square and reload and most likely they will charge you to do so.
- For flat borders, measure your quilt center in three places as shown in the diagram below…1) where the border will be sewn on 2) down the center and 3) the opposite side of the quilt then take the average -this will give you a consistent accurate measurement for the opposing borders. Pin borders on, stitch and press. When stitching your borders on, consider using a dual-feed/walking foot on your sewing machine to help pull both the quilt center and border fabric at the same time avoiding either from stretching more than the other.

- All seams on the quilt top and back must be pressed.
- Back seams should be 1/2″ and pressed open.
- Remove any selvages – they do not stretch and can cause blocks or backings to not lie flat.
- Trim all loose threads – you do not want to see dark thread tails lying behind lighter fabrics.
- Backing and batting must be at least 6-8” longer and 6-8″ wider than the quilt top. This allows the quilter to attach grips to the sides of the quilts to help distribute tension on the quilt evenly…if less, the grips will get in the way of the machine when close to the edge of the quilt. I also recommend the backing and batting be fairly close to the same size, if backing is much larger than the batting the tension grips can only grip the back fabric and because of their weight can cause the quilt sides to sag resulting in uneven tension.

- Before purchasing batting check with your quilter as they may have batting type restrictions. Some battings perform better than others on a long arm.
- To prevent uneven shrinkage, if you have washed your quilt top, you should wash your quilt back.
- If you have a heavily pieced border stay-stitch 1/8” in from the edge around the perimeter of the quilt to prevent seams from unraveling and/or stretching.
- Do not baste layers together. Top/batting/backing should be neatly folded separately and placed in a bag or pillow case to protect.
- Identify the top of your quilt with a safety pin if you have a preference.
Following these simple tips will help your longarm quilter be more successful in quilting your treasure and you being more please with the end result.
I thought I’d share some of the machine quilting books in my stash that I reference often when needing ideas for my next project. I would recommend them for beginners through experienced machine quilters – they are chockfull of ideas, patterns to utilize and tips to get you started!


Quilting Possibilities…Freehand Filler Patterns by Sue Patten – In this book, Sue takes various blocks (@ 40) like 4-patch, 9-patch, Kansas Star, Pinwheels, Dresdens, borders, etc. and provides alternate designs to quilt the same block. She focuses on the primary or secondary pieces in the block to create dramatic variations in look and textures. There are many flower and feather designs I would say for a more intermediate/experience quilter but definitely will provide inspiration for any beginner!
Machine Freehand Patterns by Nan Moore – I highly recommend this book for all levels. Nan starts you with the basics by guiding you through an overall or continuous-line block design with the use of arrows all the way to elaborate feathers designs including borders. The pages are full of patterns you can shrink or expand to fit any block you are working on.
Follow-the-line Quilting Designs Volume 3 by Mary M. Covey – I believe there are 3 volumes in this series with full-size patterns for blocks and borders which makes it simple to trace, transfer and stitch continuous-line quilted motifs. I like the variety of designs and the how-to instruction booklet that is included.
Creative Classics – 250 Playful Continuous-Line Quilting Designs by Laura Lee Fritz – Laura takes basic shapes like the clamshell, waves, serpentines, Baptist fan and feathers and fills the pages of this book with endless variations of each to utilize as an overall designs, blocks or borders.
250 Continuous-Line Quilting Designs for Hand, Machine & Long-Arm Quilters by Laura Lee Fritz – This book is filled with fun themed designs such as Home& Garden, Birds, Flora & Fauna, Domestic Animals, Woodland Animals, Under the Sea, and Textures. She includes some tips on planning and transferring the designs to help you get started.
Foolproof Machine Quilting by Mary Mashuta – For those of you struggling to get started or having trouble with free-motion quilting with a darning foot, Mary teaches you how to machine quilt using your walking foot and going beyond stitching in the ditch. She also utilizes paper templates to expand your design options.
As always, have fun with machine quilting and remember it takes practice! So keep trying different techniques until you find one that works best!
Page 5 of Journal: (for Pages 1-4 click here)
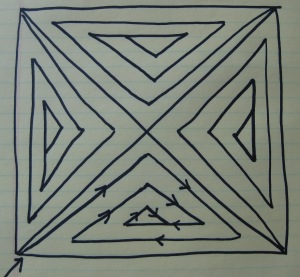
This journal page we will be filling in a defined space like a 1/2 square (or triangle) which is very commonly used in block designs.
Set up the sandwich with a vertical and horizontal line to create a 4-patch then in Square 1 & 4 add a second line to create an “X” in the square as in my sample below.
The following images can be printed then placed under a white sheet of paper to practice, I used a heavy black marker so it would show through.
Square 1 – Spiral Lines –Starting with the bottom left corner sew a line somewhat paralleling the seam line to just below the top point of the triangle then down paralleling the right seam line but not all the way into the corner and move back left continuing to spiral into the center finishing with a small triangle. The goal here is to create equal spacing as you spiral inward so you end up with the small triangle fairly centered. Use your seam lines as visual guides for spacing and line straightness.
You can use this technique in large 1-piece square blocks if your challenged with filling a large blocked space. (Beginners -try using this on a Yellow Brick Road pattern!)
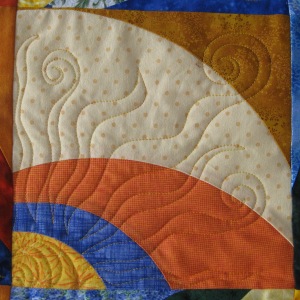
Square 2 – Sunburst – Start at the right angle corner of the triangle here I started at the bottom right with a tear drop shape echoed multiple times (or clam shell design) same as in Page 3 Square 2 tutorial. Echo out about 5 times or however many times needed to produce the center of a sun. As you move outward start rounding the curves a bit so your sun center doesn’t get elongated in shape.
Once your sun center is done, without stopping move right into the rays of the sun by sewing a wavy line outward away from the center toward the corner and the long side back to the opposite corner of the triangle. Depending on the size of the block you can adjust the number of sunrays. In this block I used 5 – an odd number of rays tends to look better. This design fills space quickly and is quite forgiving – have fun with it, I use it a lot!
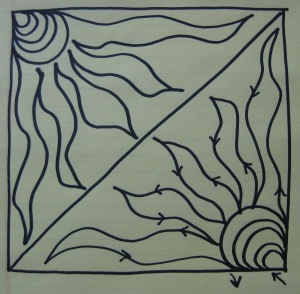
Be daring and add a swirl at the end of some of the sunrays!
Square 3 – Ribbon Candy – The next pattern reminds me of Peppermint ribbon candy and can fill a triangle space very nicely or sashing around blocks. It definitely will take practice if used in a triangle because the length and width of the curves vary with each pass (or fold in the ribbon) and to determine which way is more comfortable moving thru the space -left to right/top to bottom. I started from the upper right corner and worked to the bottom left then flipped the sandwich over and repeated the other side.

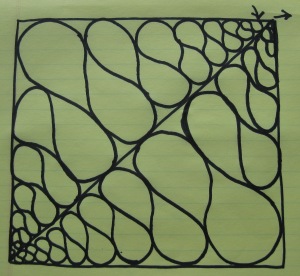
If you have to stop to adjust your hands it is best to stop when you touch the previous line or in the seam area to avoid any bumps in the curves.
I used this design in the star block below in the pieces around the star to enhance and make it pop. I slightly opened up the spacing for a more casual relaxed feel. Since this was a small 6″ block if I would have quilted tighter and more densely it would have made the star pieces pucker too much – a very important tip to remember…make sure your quilting is always balanced across the block and quilt otherwise the non-quilted areas will look too puckered and wavy.
Square 4 – Not sure what to call this design but sort of reminds me of a section of an old wrought iron fence -check out this link for all the free-motion design possiblilites!
For this design, start in the lower left corner and begin moving right slightly increasing the space from the seam line then create a loop at the center of the line then decreasing the space until you end in the corner of the triangle. Repeat this design in each of the other triangles.
The loops can be big like in the actual quilted page at the top or smaller like in the drawing below. Keeping the loops consistent size and in the centers of each leg of the triangle will create a pretty overall block design.

A few tips:
1) Practice doodle each design on paper first.
2) Watch your tension and adjust as needed.
3) You may find quilting gloves helpful with maneuvering the fabric.
4) Strive for consistency in stitch length, spacing and loop sizes and you will find the overall quilting impact will be very satisfying!
We’re in the homestretch, one more page to go!
Saturday, Kelly coordinated an awesome pasta making class over at Cooking Fools in Chicago. She happens to be friends with the owner, Nick, who we were very lucky to have teach the class!

We learned how to prepare pasta dough, fill raviolis, cut pappardelle noodles and make two sauces -Vodka and a walnut Pesto —YUM YUM YUM!
There were 30 eager pasta makers in the class but Nick gave us the VIP treatment with front row work stations and refreshments -want a workout…knead pasta dough for 8-10 minutes! Those refreshments sure quenched the thirst! ;)
Here on the left – Shelley, Vicki and Andrea are manuevering their pasta sheets and Vicki’s friend Emily on the right was filling her raviolis.

Loved the label on this wine bottle, which by the way was a nice tasty red to start the afternoon off…the flowing design looked just like the pasta dough swirling around everywhere!

Check out Shelley’s wrist action…her pasta sheet ended up longer than her work table.

Here’s our group from left to right -Emily, Vicki, Andrea, Kelly, Paige (me), and Shelley…my sister, Wendy, was taking the picture.

Here’s Wendy, she helped Nick make the walnut pesto…first time for her using a food processor!

Once everything was prepared we dusted off the flour and headed over to the dinner tables and filled our tummies with salad, Pappardelle with Vodka sauce and the ricotta/mushroom/garlic Raviolis with walnut pesto sauce.


And to finish off the evening we heading over to Kelly’s house for more wine and make-your-own sundaes! Great party, girls! …we definitely missed you Lorrie!


Since I have never quilted with metallic thread I tapped into our creative friend Vicki over at AccioFabrics and owner/designer of Bugglet Quilts.
Metallic thread is not as difficult as people generally say it is to work with if you follow these simple guidelines.
1) Use a needle designed for metallic thread. They are readily available at your local crafting stores.
2) Quilt slowly. I have to constantly remind myself to slow the foot and hands down w/metallic thread. If you go to fast, you will break it.
3) Adjust your tension. You will need to do a little practicing to find the right tension, it will most likely need to be lessened.
4) Use cotton in the bobbin. I use a 50wt Aurifil and it works well. I have tried the recommended rayon thread in the bobbin, but I could never get the tension to work correctly.
5) Put your metallic thread spool farther away from the tension disk, in a straight line, to give it more time to uncurl. I put mine on a pencil propped in the pocket of a bin on the table to the right of my machine.

Page 4 of Journal: (for Pages 1-3 click here)
This journal page we will be filling in the space with slightly more challenging designs with a masculine feel for men and boy quilts. A couple are also great on art quilts for landscape textures such as pond water, tree bark, or mountain ranges.
Set up the sandwich with a vertical and horizontal line to create a 4-patch as in my sample below.

The following images can be printed then placed under a white sheet of paper to practice, I used a heavy black marker so it would show through.
Square 1 – Starting with the top left square of the 4-patch meander around the space with a jagged / haphazard motion. Add variety by varying the length of the lines and angles. This is a great basic overall pattern to fill in small areas or on borders. I love using this on black fabric with black thread for lots of texture or variegated thread to add interest when the black area is too bold.

Square 2 – Start at any corner you are most comfortable I tend to work this pattern from top left to bottom right. Basically this is a swaying motion back and forth as you meander across the space. This pattern gives you the effect of a water if you follow my lines you will see how that works. I have used this design on a landscape panel with a pond -the water came alive. It can also be used in a sky to create a eerie stratus type cloud perfect in those Halloween panels!

Square 3 – This pattern is very similar to the water design above it has the same back and forth motion but instead of a soft curve as you change directions you create a sharp point. I found this pattern easier to quilt by going up and down rather than side to side.
The design reminds me of flames or tree bark. You will create more interest by varying the length of the flame and width. I love the positive space the quilting lines create.

Square 4 – This pattern reminds me of mountain ranges and can be quilted fairly quickly. I started in the upper left corner and moved right then dropped down to the next line echoing the previous line as I moved back left. I didn’t mimic each line exactly to create more interest but if you do I would recommend varying the spacing between the echo -this will create a controlled modern feel. If you are having trouble seeing your previous line start from the bottom instead and work to the top.

A few tips:
1) Practice doodle each design on paper first.
2) Watch your tension and adjust as needed.
3) You may find quilting gloves helpful with maneuvering the fabric.
4) As you fill a space with any of these designs and find yourself in an awkward location with no way out – stop, you can always take out some of the stitches back to a point where you can easily start up again like a point, where one line crosses another or where a change in direction occurs. If you are near a seam just bury your stitches in the seam and start over at another area where you can start up your pattern again.
My goal here is to help you get over the fear of quilting and tackle all those wonderful tops you made that are sitting lonely and folded in your closet for no one to enjoy! Your quilting does not have to be perfect once you quilt everything you will see the overall consistency in your quilting not each individual imperfection. Keep practicing!


