
You are currently browsing the category archive for the ‘free motion quilting’ category.

Category Archive
With six days left before Christmas and New Years just around the corner I’m looking forward to a few days off from my day job to quilt of course and to enjoy some relaxing time with my folks and sister and all our pets (3 dogs and a kitty)…so doodling can wait until the new year!
In the meantime, if you get a chance pull together the following supplies and prepare a quilt sandwich for the January 3rd Free Motion Monday – Part 5: Doodling with a Purpose.
Supply List:
1 yard large print fabric (see example below)
1 yard coordinating small print or marble fabric
1 yard batting (medium loft cotton preferred – i.e. Warm & Natural)
Contrasting thread – variegated works well so you can see your quilting lines
Baste sandwich
Quilting Gloves if you like
Darning/Free Motion quilting foot

The other day Lorrie mentioned our “collaborative blog” so far mostly reflects her personality and passions so I decided this weekend to keep my camera handy and snap a few things that captured some of my passions and personality.
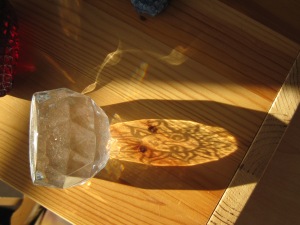
I love when sunlight flows thru glass and creates intricate designs. The sun is just about at its lowest angle to the horizon so my entire house was filled with light art. I have a small collection of paperweights see how they sparkle…this one reminds me of an upside down jelly fish!

This one looks like a diamond…

This one has a sun etched into the back of it…check out the dancing ribbon of light just above the it.
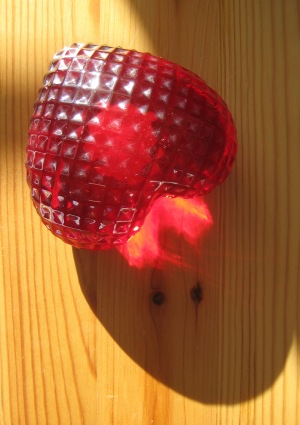
This one had shooting flames out the top of the heart…pretty cool!
After playing with the paperweights in my loft I proceeded to my quilt studio in my basement where I have an ensemble of blue bottles…

I must have color – lots of color around me especially during the long cold months of winter!

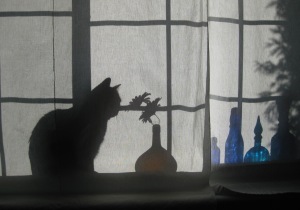
Of course Kitty also likes to play with light too! She never did catch it :)
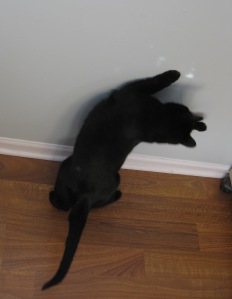
Then grandma and grandpa and sis came over today to pick up some Kolachkis (yummy Polish cookies I make once a year) and let the doggies play – and Kitty, well when the doggies come to play she runs for cover…in this case I wonder if she realized we all could see her!!!!
Sophie is my 5 1/2 year old lab mix rescue dog – she is the sweetest and always wants to go for a walk!

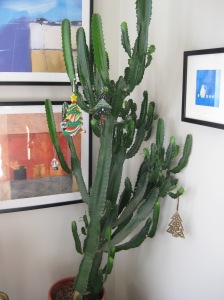
And finally, a few pictures of my holiday decorations – NOTHING like Lorrie’s -she does have the knack…and yes, that is a Cactus Christmas tree with Christmas tree ornaments – ok, a little different but I do love Arizona!!!
And what do you think of my present wrapping?!

Santa did a early drive by last Sunday – see…he really does exist !!! :)

Happy Monday!
Paige
Ok, internet is up and running again! Thanks Lorrie for coming up with a last minute post! So, how did it feel to sew free motion straight lines? Was your stitch length consistent? Did you eventually adjust your hand speed or needle speed without thinking? Did you use your previous line as a guide -did it help keep the next one straight? Lorrie’s lines look great and I’m so glad Gail sent in pictures of her doodling (below). I see feathers – very ambitious – fun aren’t they? You are very close to achieving them too -great job! After we get thru the basics I will post three feather techniques from various designer I teach at the local quilt store, I’m sure you will find one that works best for you.
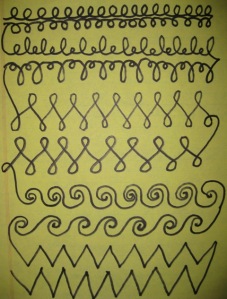
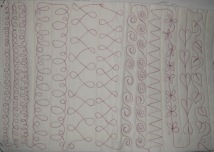
Now that you have 4 sandwiches prepared I bet you are wondering what’s next. Well, let’s start sewing doodles in between the lines. Imagine these lines as the outer boundaries of sashing in your quilt and start doodling the following shapes – practice each shape on two lines.
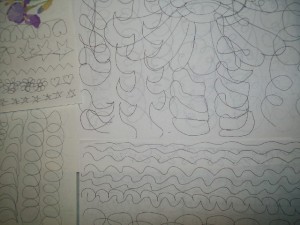
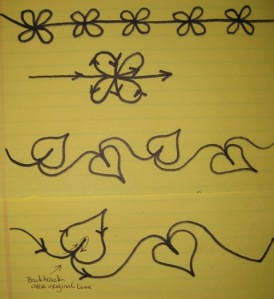
I started sewing left to right then continued down to the next line without stopping and sewed the next line from right to left. You can see in the drawing below I mirrored the loops on the second line to mixed up a bit and to get use to sewing shapes in different directions. Continue with the “L’s” and “e’s” , lace, waves, zigzags, flowers, then leaves on a vine. If you have extra space at the bottom create your own shape and repeat.
Here is one of my first practice samples…
As you sew each shape watch the stitch length and the overall consistency in the shapes. Depending on what you used to based the sandwich with be sure to watch for pins and remove them as you go. If you are finding it challenging to move your fabric around try using quilting gloves – I fought them for a long time because they made my hands hot but they’ve come a long way over the years and are much lighter in weight and more comfortable to wear. They will help reduce hand fatigue as well.
Use your 4 practice sandwiches and continue practicing throughout the week – if you get bored don’t limit your practice to just the shapes above definitely explore others – flip thru quilting magazines/books or images on the internet to find more examples. Many times I find inspiration from catalogs with metalwork designs.
Here are a few tips:
1) I highly recommend keeping a stash of practice sandwiches by your sewing machine so when you have the urge to doodle everything is ready to go!
2) Make sure you work space is clutter free so your fabric will move freely.
3) Adjust your chair height or sit on pillows to insure your elbows are at a 90 degree angle this will reduce wrist and shoulder fatigue.
4) Set up plenty of light so you don’t strain your eyes.
5) Watch your thread tension during free motion quilting you will find you may have to adjust. Start by adjusting your top thread tension as needed then bobbin thread.
6) Don’t quilt if you are stressed or have other things on your mind you won’t enjoy the process!
Remember, this is practice so don’t be hard on yourself. As you progress thru the steps you will look back at your first few sandwiches and smile at what you have accomplished! Practice Practice Practice!
I love wool!
But I have a confession to make. I kinda hate working with it. It’s just not my favorite thing. So I pawn all my projects off on my mom. This is the latest project she made for me. It turned out sooo cute!
And this is where I’m displaying it this Christmas…..thanks mom!
So, I came across this thread that’s made for your machine especially for wool. It’s Aurifil Lana thread. I’m going to give mom a break and work on a wool project by myself.
I’m excited about it and I’ll update everyone on how the new thread works.
Now, for my doodle sandwich….so far so good! Can’t wait to see what Paige has for us next Monday.

Well, how is the doodling practice going? Easy? Difficult? Lorrie is doing a wonderful job – thanks for sharing your doodles! It’s fun to watch your progress.
Hopefully you all were able to squeeze in some practice over the holiday if not plan to dedicate at least a couple times a week going forward! Doodling consistently will help train the muscles in your hands/arms to work together with your brain to draw straighter lines and smoother curves and to fill up a space without having to think too hard.
This week we will prepare some Doodle Sandwiches. These should go fairly quickly but there is some practicing involved. You will need the following materials:
2 yds muslin or solid color fabric
1 yd cotton batting (medium loft)
Contrasting Thread – choose a cotton 40wt or 50wt
Walking Foot
Darning / Free Motion Foot
Safety Pins (or whatever basting technique you prefer)
Rotary cutting knife/ cutting board/ ruler
Scissors
1) Start with your workspace – remove all clutter around your machine, set up plenty of lighting, adjust your chair so your arms are at a 90 degree angle to your machine’s work surface.
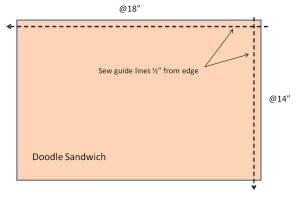
2) Prepare your sandwiches by layering the fabric and batting and cutting into 6 @14″x18″. Baste by pinning every 6-8″ or whatever basting technique you prefer. Set aside 2 sandwiches for future practice.
3) Attach the walking foot. On each sandwich sew across one short side and one long side about 1/2″ from the edge to provide guidelines and to further secure the sandwich. See drawing below.
4) Remove the walking foot and place on the darning foot. Be sure to drop the feed dogs otherwise the fabric will not move around freely.
5) Now for the fun part – free motion parallel straight lines! This is a good technique to practice stitch length. During free motion quilting each stitch will not be exactly the same length but the goal is to have an overall consistent look. The way to achieve this is to find the balance between the speed of your hand movement and the speed of the needle. The stitch length you are striving for should resemble the stitch length on the guidelines you initially sewed to secure the sandwich.
Remember the following:
*Stitches too long – increase the speed of the needle or decrease the speed of your hand movement
*Stitches too short – decrease the speed of the needle or increase the speed of your hand movement
6) Start sewing parallel lines approximately 1″-3″ apart using the initial guide line sewn as a guide to help keep lines as straight as possible. See drawing below.
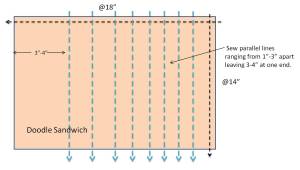
*You may have the tendency to push or pull the fabric faster than the needle can complete its cycle and end up breaking a needle so take your time.
*You can stitch up and down or left to right better yet try both ways to see if one way feels easier.
7) Complete 4 sandwiches. Next week we’ll work on filling in the spaces!
Paige’s Pick – Those that know me know I love color and contrast even during the holiday season and even more so because of the lack of sun as the winter settles into the midwest. This selection is called June Bug by Alexander Henry House Designer …ok I know we just had Thanksgiving but can’t we daydream of a nice warm sunny day in June!

*****
Did you know that Moda is carrying the Basic Grey Grunge line as one of their basics now! Love these “solids”. I used some of them in the Figgy Pudding and Fruitcake lines & now I want them all!….hint, hint to anyone needing a Christmas idea for me:) 
So, I told you I’d show you my doodle progress…well, I don’t think I did too bad. Practiced every day on it and I did get better. I had a hard time keeping my pen on the paper and I constantly wanted to stop and think about where I was going next. I think my doodles look more like drawings than Paige’s awesome “doodle” but hopefully I’ll progress.  .
.
And this was my final result….
I had a hard time being creative so I decided to start with something I knew how to draw……the letter “L” from my name…can you see it? And I just kept drawing what inspired me from there. Thanks Paige for pushing me into thinking outside my comfort zone! I definitely felt like I learned something from this challenge.

Happy Thanksgiving from Lorrie & Paige
Well, how did the doodling practice go? Easy? Difficult? Hopefully you were able to squeeze in some practice each day if not plan to dedicate at least a couple times a week going forward! Doodling consistently will help train the muscles in your hands/arms to work together with your brain to draw straighter lines and smoother curves and to fill up a space without having to think too hard.
With the Thanksgiving holiday upon us it will be difficult to find time to focus on doodling but try to squeeze in a couple 15 mins sessions if you can. Below is a doodle I did in a meeting at work (shhh…don’t tell my boss) in less than 20 mins on 3×5 inch piece of paper. I started with the small hook shape in the center and kept building off that shape as I moved around the page. You don’t have to be perfect this is just a technique to fill space quickly without having a plan.
So, pull out a black marker pen (no erasing allowed) and a small piece of paper and start drawing circles, spirals, hooks, squares, diamonds, etc. then connect them with lines or curves, fill them in or echo their shapes…before you know it you with have a very unique design!
This can be fun so don’t think just let loose!

I did! I’ve resisted free motion. It makes me throw small tantrums and I know my sewing machine does not like to be called naughty words. It’s my own fault. I’m impatient and want it to be done right the first time. That’s just not the way it works when you quilt though. And when someone told me it takes many, many hours of practice to get it right…well…I have many, many projects I’d rather be doing. So, I kept putting it off. So, I promised Paige I would give it a try to show you guys my progress. I’m starting from the beginning y’all… starting with Doodling. Sure it looks kinda shaky and I ran over my lines a couple of times and I froze up when I started to think about it too hard, but I’m going to practice, practice, practice. Hope you guys do too…Keep in touch and let us know how you’re doing!
I spent yesterday with Shelley from Elsie’s Girl blog finalizing our fabrics for Welcome to the North Pole quilt we’ve been wanting to do together.
I’m using the new Sheri Berry Christmas line, 12 Joys of Christmas, with a black night sky. You can’t tell from the pic but it’s a black with grayish dots (my snow falling).
Its kinda retro and I’m excited to get started. So, hopefully I’ll have some progress to show you soon.
Tomorrows post…more Christmas. I just want to apologize now for my Christmas fabric addiction:)
Talk soon
Are you hesitant to drop the feed dogs and machine quilt your top with anything other than straight line quilting? Well, I hope to help get you thru the initial fears and help guide you to freeing yourself to experience Free Motion Quilting! Over the next several weeks I will post steps to practice for the week – this is a process which requires practice practice PRACTICE! If you jump into quickly your brain won’t be trained to think outside the “square box” and frustrations will set in. Quilting should be fun not a dreadful task inhibiting us from taking our quilt project to the next level.
I’m a strong believer in doodling! If you can’t draw it you can’t sew it so this week’s practice is FUN and SIMPLE…make a stack of all those old spiral binders or scrap sheets of paper you don’t know what to do with and start doodling. Draw continuous loops and hearts and if you get bored move on to flowers or whatever shapes you fancy – big and small. Fill up the paper as you are listening to music or a movie or sitting on the deck enjoying a sunny day. Don’t worry if you have to start and stop but see if you can keep your pen down the entire time. Focus for 15-30min intervals a couple times a day or every other day. It’s all about practice and training your brain and hand to work together…remember when you started writing in grammar school?! It takes time.
So…Kitty says “get doodling”!!


