
You are currently browsing the tag archive for the ‘Crystal Lake Modern Quilt Guild’ tag.

Tag Archive
I have to say I’m pretty excited for our upcoming March Guild meeting! March will be our first quarterly drawing for our UFO prizes. Now while I cannot, and will not, tell you what the prize will be until after our meeting, I am certain our members will be pleased! Our sponsors for the guild this year have been extremely generous and we are so thankful for their gracious donations.
Not only is the Guild hosting a UFO Challenge, we have lots of other ideas, projects & guest speakers planned this year!
Keeping the Guild running smoothly is a team effort. Not just by the executive board, but also the members. So one of the fun things we do monthly is thank our members for all the wonderful things they do by passing out tickets.

For example, volunteering for a demo, bringing a friend or a treat, helping to clean up, and wearing a name tag will earn you tickets! Each ticket increases one Lucky member the chance to win a door prize.
The door prizes are typically handmade items from either myself or Shelley. January’s prize was a Henrietta Turtle kit with a handmade crochet flower.

February was the coffee cozy..

And March?… It’ll have to bee a secret for now! But I’ll be showing all the fun door prizes for the year so stay tuned each month.
We have a guest speaker in March. Lynn from A Different Box Of Crayons is coming! Lynn continues to inspire us with her use of mixed media into her designs. She incorporates alternative fabrics into her work such as silk, wool, embroidery, and decors. Her newest BOM is Cathedral Doves. Is that a beauty, or what?

She recently moved her studio to 121 West Wesley in Wheaton, IL . If you happen to be down there, check it out. I’m going to make a special trip to Wheaton just to see it. How can you resist!? The studio has regular, but not typical hours. Thursday & Friday 10 – 4, & ODD NUMBERED Saturdays are 10 – 2 during the winter. Head over to her FB page, give her a ‘like’ to check for studio updates and see what she’s up too.

March is also our first swap for the year…the Mug Rug Swap. We’ve posted a couple of sneak peaks on the guild FB page. If you’re already a guild member, I hope you’re planning on participating. The ones I’ve seen so far that are finished, are swaptastic! Lol, yes, I said that.

Remember, that if you’re in the ChicagoLand area and would like to join us for a meeting and give it a test run, we’d love to meet you! We are a welcoming, friendly group and we encourage you to come have some fun too. The CLMQG typically meets the 2nd Sunday of every month at the Crystal Lake Mortgage Center on Rt. 14 but check the CLMQG blog before attending for any updates. Guests fees are $5. I hope we see you there!
Who knows? Maybe you’ll get Lucky!

…or tea…or coffee. Whatever your favorite winter drink is, I’m sure it could use a little ‘glamming up’.
Or how about making a little something for your Sweetie Sewistas? 💕💕

If you’d like to surprise someone this Valentines, all it takes is the pattern, 2 pieces of scraps, a piece of batting, a button, and an elastic tie. You can find the colored elastic (hair)ties at Target. They’re the tiny, skinny ones in the girls section where the barrettes are found.

Follow the directions on the ‘Handmade Holidays‘ blog post found here. I eliminated the patchwork and embroidery this time. I simplified.

Finish up with your handmade fabric labels for a personal touch. Grab a gift card from Starbucks and toss some candy hearts inside your disposable cup! Yes. Starbucks will give you a free, unused cup if you ask sweetly!

I made these cozys for the CLMQG board members and one lucky girlie from the guild meeting gets to walk away with the one filled with goodies as a door prize for February. It’s not only filled with sweets, I added embellishments too, like cute buttons and sweet crocheted hearts(thanks mom)! Personalize your cup to suit your Valentine! ❤️
LollyGagging that is…-verb 1.Procrastination in its fullest. 2.Purposely finding other things to do other than what you should be doing.
The CLMQG is having a UFO contest from January-October. The idea is for members to register their forgotten loves for $2/project…unlimited. All the money collected goes towards prizes. Once a project is completed, you get a stamp of approval and your registered quilt/sewing item goes into a quarterly drawing with a chance for a grand prize in October!
I’m going to register 5….and 3 of these are doozies. They’re going to be time intensive. Lots of handwork/applique. I’ll need to be disciplined in scheduling time for them, which sometimes can be a problem. I already sew for SewMod and there’s only ‘sew’ much time in the day!
Dare I estimate how much time I’ll need for each completion?
Susan’s Dresden Garden. (8weeks) A CrabApple Hill embroidered bluework quilt. I’ve had all the fabrics and finished over half of my embroidery work so far. I’ve even made some of the pieced Dresdens. It takes a lot of commitment to stitch the same Dresden, with the same color floss 12 times y’all. What can I say..even though it’s going to be positively beautiful when completed, it’s boring the hell outta me!!

Batik Spools from the book by Edyta Sitar Friendship Strips And Scraps (2weeks)
I started this quilt about 3 years ago with Shelley right before my move and didn’t find the time or the actual project until about a month ago. I’d really like to finish this one up. I just need to work on applying the applique to the borders, then it’s off to the quilter.

SewMod Halloween Row Quilt (2weeks)
My row quilt has been on and off of my design board so many times I’ve lost count. It was up there as recently as two weeks ago. I want it to be spooktackular and I think it’s paralyzing me creatively. I have a few ideas I’m playing around with. It’s just a matter of conjuring the right spell.

The last two are basically just about crossing something off my list and freeing that space up in my closet and my brain.
Batik Tuffet (1week)
The foundation pieced tuffet is almost completed. I have one more section and I’d like to also write an accompanying blog post with tips and tricks to making and finishing a tuffet. After the top is completed, it’s just a matter of assembly.
This one pictured is Paige’s Batik Tuffet…

And lastly, 2 Bindings (1week)
Just waiting for these to come back from the quilter. I’m considering these 2 as one finish.
My time estimates are assuming I’m not wasting time lollygagging around on Pinterest or whatever Netflix series I might be binging on that week. Also..3 out of the 5 projects requires them being sent to the quilter and that alone can take 4-6 weeks.
What I wouldn’t give for just 2 extra hours in a day…Who am I kidding? I’d probably just end up doing more lollygagging…
This Clutch was made using the demo from the Martha Stewart show and pattern provided by UpStyle Design. You can find the printable PDF under Tutorials and Free Patterns.

Supply List:
ONE FQ Non-directional Decorative fabric for outside of clutch. (Cotton may be used)
ONE FQ Cotton fabric for lining.
1/2 yard Heavy weight fusible stabilizer Pellon 808
1/2 yard Fusible fleece Pellon TP971F
UpStyle Clutch Frame
Basic supplies including: Sewing machine and standard foot. We will not be sewing 1/4″ seams. Coordinating thread, iron, tape, small binder clips, Rotary cutter, cutting mat, E-6000 glue.
*A note about glue…original pattern suggests Gutermann Textile HT2 which is imported, expensive and only sold online. The Martha Stewart show suggests Bond 527 Multi-Purpose Cement and I used E-6000 which has always been very dependable for any project.
Don’t forget any embellishments that you might want to ‘bling up’ your clutch with!
Cutting:
Cut your outer clutch fabric and lining to 13″H x 13-1/2″W
Cut your fusible stabilizer to 12-3/4 x 13-1/4″. (Your stabilizer should be 1/8″ smaller than your outer clutch fabric on each side)
Cut your fusible fleece to a 10″ x 13″ piece
*I recommend back-stitching your project.
Let’s begin!
Fuse your stabilizer to the back of your outer clutch fabric according to manufacturer’s directions. Center your fusible fleece and press into place on top of the stabilizer.

Layer the lining fabric and the outer clutch fabric right sides together and pin into place.
Sew 1/2″ seam along the top and bottom edges…the 13-1/2″ edges.

Making The French Seams:
Turn right side out and press. Fold the clutch in half matching the seams. Use small clips to secure the top of the clutch. This will prevent it from slipping while you sew.

Sew a 3/8″ seam along the short edges (sides).

Trim seams to 1/8″ and clip corners. Snip through the corner seams about 1/8″ to create a tiny opening. This helps the fabric lay flat after turning.

Turn the clutch so that the lining fabric is on the outside and sew 3/8″ side seams. Turn right side out.

With the corners of the bottom of your clutch flat, use a pencil to mark a 1-1/2″ diagonal line ACROSS the point as shown. *If you mark more than 1-1/2″ across it will alter the dimensions of your finished project.


Sew on the line creating the gusset. Repeat for the other point. Sewing across the marked line is easier if you place the bulk of the fabric under the machine as shown.

Trim the points to 1/8″.
Turn once more so that the lining is on the outside and sew a 3/8″ seam. Sew slowly through all the layers. Turn right side out and press your clutch well before adding the frame.

Mark the center of your fabric with a pencil. My clutch measures 11-1/2”, so my center is 5-3/4”.
Center your frame on the clutch with the clasp opening in the middle and insert your fabric. Place a piece of tape on each side where the ends of the frame are. This is your guideline for frame placement after you insert the glue and the tape will help protect the fabric from any glue that may ooze out.

Remove your frame. Working one side at a time, apply the glue into the channel of the frame, starting 1/2″ in on each outer edge. Do not add too much glue. Work the glue towards the edges.
*I used the cut off end of a Q-tip. It doesn’t take too much glue for the fabric to bond. Use the Q-Tip to spread the glue into the channel. Do not fill the entire channel with glue y’all! Less is more!
It’s best to be patient and if it seems like it’s not adhering after the recommended bonding time, remove and add more glue.
After applying glue into the channel, center the frame and insert the fabric. Secure with tape. Allow glue to set for 30 minutes before repeating the process for the other side.
Remove the tape, open the frame and tuck the corners in under the hinges and close the frame.

Pattern and hardware can be purchased from Robin Grawunder @ UpStyle.Etsy.com.

Here’s a quick YouTube video for this demo from the Martha Stewart show. Happy sewing everyone!
For the October CLMQG meeting, Wendy and I will be doing a demo on how to make this super cute and easy clutch.

Now I know that y’all have someone that would really enjoy recieving something this pretty…for christmas maybe, bridesmaids gifts, or a birthday coming up?

If you’re in the Chicagoland area, join us on October 12th, from 11-4 for the Crystal Lake Modern Quilt Guild meeting where several demos will be taking place. We meet at the Home State Mortgage center on route 14. Guests are certainly welcome!

Shelley has posted a supply list on the CLMQG blog and on Facebook. We must have a confirmed number of attendees who would like to participate in the clutch demo by October 1st. An order will be placed for the frame handles in advance and to ensure you receive one, please RSVP on the MQG site or you can leave a comment here on this blog posting. The cost is only $5 for the frame which can be paid at the time of the class.
Here are the other supplies needed:
The deadline for ordering a handle set is
Wednesday October 1
Supply List:
ONE FQ Non-directional Decorative fabric for outside of clutch. (Cotton may be used)
ONE FQ Cotton fabric for lining.
1/2 yard Heavy weight fusible stabilizer Pellon 808
1/2 yard Fusible fleece Pellon TP971F
Please prep before demo:
Pre-cut your outer clutch fabric and lining to 13″ x 13-1/2″
Pre-cut your fusible stabilizer to 12-7/8 x 13-3/8″. (Your stabilizer should be 1/8″ smaller than your outer clutch fabric)
Pre-cut your fusible fleece to a 13″ x 10″ piece.
Basic supplies:
Sewing machine and standard foot. We will not be sewing 1/4″ seams.
Rotary cutter
Ruler
Coordinating thread
SewMod will bring additional supplies including iron, transparent tape, mat, glue and your pre-ordered clutch frame.
Don’t forget to bring any embellishments that you might want to ‘bling up‘ your clutch with!
We will be making a clutch that is not pieced. Piecing the clutch results in too many seams to work around. So please, for your first one, bring the supplies stated and prepped before class.

It’s so simple, you will be leaving with a finished gift! Thanks so much and we look forward to showing you something new!
I worked on a birthday present for my nephew. Another Minecraft Creeper…sSSSSsss BOOM! This time I used a variety of greens instead of solids. I like it. It looks more like grass:)

I drooled over a Janome Hello Kitty machine..in turquoise:)
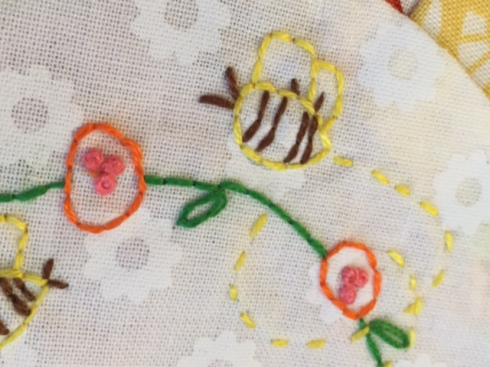
I worked. I did some blogging, cut some fabrics and prepped for a guild meeting. My embroidery demo is all ready to go. Can’t wait to see everyone again. Wow the months are just flying by! I’m starting to feel a bit pinched for time with the holidays creeping up on me…sSSSSsss BOOM!

There are a few things I’d like to check off my list before the end of the year… 2 t-shirt quilts and our CLMQG BOM, not including other crafty things that I want to do too! So I need to get busy…
We had a sewin/sleepover on Saturday and we made some good progress on the BOM.

I only have 1 block left to complete and my printer is unable to print the template…figures…

Paige is working on the layout and, hopefully soon, I’ll be able to get it ready for quilting.

Then, us girls went out to celebrate and unwind at the Blues Bar for dinner. The Bluesmobile is actually in the bar y’all! Very cool place with some tasty BBQ.

So tell me, …what projects would you like to complete before the holidays roll in? Christmas will sneak up on us before we know it! sSSSSsss BOOM!
We will be at the Crystal Lake Modern Quilt Guild this Sunday, September 14th. If you’re in the area come see us! I will be giving a demo on a few hand embroidery techniques and I will also be vending so everyone locally can take advantage of all the great sale prices we have going on.
I will be bringing all of the half yards, which are just $3/each.

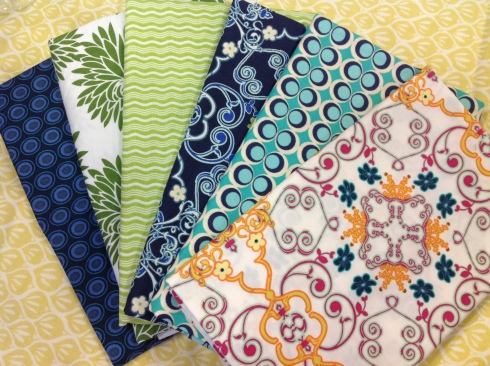
Samples of all the new arrivals and kits are coming along too!
And we have a little shop game for everyone to participate in and win some fat quarters.
If you are coming and see something on the shop site, like extra yardage, just convo me and I’ll be happy to bring it with me. No one will blame you…I mean who can resist yardage at just $6/yard and new arrival fabrics at $7.20!
So bring a friend and make a list and expect to have a fun time on Sunday! Meeting is from 1-4 p.m. A few of the member techniques include..embroidery, half square triangles, machine binding.
Guests are also welcome for a nominal charge..$5.
We hope to see you there!
After staring at my Micael Miller challenge fabrics for 2 weeks, I’m finally done designing and quilting it!

Anyone ever get stuck and can’t seem to find a vision when designing? Me too! It’s always easier for me to start with a few tricks to get me started.
Find inspiration. I knew the fabrics reminded me of all those pins I’ve been drooling over on my Mid-Century Modern Pinterst board so that was definetly my inspiration.
Write down every idea or design that pops in your mind! This one is important. I can’t stress this enough. I do this for my writing also. Even if you don’t think that idea will ever become something you create. Sometimes just one thought/picture/word can catapult creativity. I kept a mini notebook next to me on the couch along with the fabrics. I came up with several ideas, all of them involving a kitty. If you don’t write or sketch your ideas, you will forget them!

Keep a visual in your sight, for instance your fabrics you’re working with. Now, I know this is kinda sadistic if you’re stuck in a design rut, but trust me…outta sight, outta mind. And that’s bad if you have a deadline! I used my portable desin board, which is just a cardboard moving box from U-Haul with a piece of batting pinned to it, to aide in this process. I pinned all my fabrics to it with my ideas and made labels to remind me what goes where, placed it next to my television, which forced me to constantly look at it, and proceeded to hem & haw over it another week.

You’ve decided on a direction, now go for it! Nothing changed on my board for that whole week, so I knew it was what I wanted to make. At least the basic idea, which included the kitty, tile counter top, and the button clock.
Once I started sewing, I told myself the story. What’s kitty staring at the clock for? Cocktail time, of course! It’s five o’clock and she’s a Cosmo Kitty! So I added a couple of martini glasses.

And everything sorta fell into place. Embellishing is my favorite part! After quilting the background, I raw edge appliquéd. I added real clock hands to the clock, along with the buttons and embroidery detail to the Cosmos.


You’re finished? Well you know what that means, right? Put your feet up and enjoy your own Cosmo while you admire your hard work! Here’s my favorite Cosmo to get you started…I’m sure it’s five o’clock somewhere.

Ice cubes
2 ounces vodka
2 ounces cranberry juice
1/2 ounce lime juice
1/2 ounce Triple Sec
Fresh cranberries and lime wedge
Cheers y’all!
Wow that’s a lot of initials. I’m all caught up on the guilds block of the month and I wanted to share how our progress was going.
These block tutorials are located on the Crystal Lake Modern Quilt Guilds blog. Just click the button on the left hand side of our blog and it will take you there if you’re interested in making one of your own.
Paige picked out all the fabrics and I’m doing the sewing. Together we’re going to have one fabulous quilt! She’s using a variety of Kaffe prints, modern plaids and hand dyed solids. I’ve already showed y’all 2 of the blocks so far but since it was such a beautiful day here and I had time to spare, I took some great shots of the blocks outside.
Block #1

Block #2 Modern Maple

Block #3

Block #4 Modern Movement

Block #5 “X And +”

Block #6 Anita’s Arrowhead

Block #7 Rolling Diamonds

And here they are showing off all together like jewels in the sun!

I’m back with my second CLMQG BOM tutorial. Our inspiration for this block came from Sara Peterson at KnottyGnome.com. Remember, if you want to play along too, you can find us at The Crystal Lake Modern Quilt Guild or download the BOM instructions directly from the CLMQG blog.
Gather your fabrics & lets get started!

Begin by cutting your fabrics.
(12) 2.5″ white squares
(8) 2.5″ orange squares
(4) 4.5″ dark blue squares
(1) 4.5″ white square
(4) 4.5″ x 2.5″ green rectangles
(4) 4.5″ x 2.5″ light blue rectangles

On the wrong side of your fabric, use a pencil to mark a diagonal line through your (12) 2.5″ white & (8) 2.5″ orange squares.

Making your corner squares:
Place one of the white squares and one of the orange squares in opposite corners of the dark blue square. Sew directly on the diagonal line.

Use your ruler to trim 1/4 inch away from your seam.

Press your block and repeat with the other two corners. This time using (2) 2.5″ white squares. Press. Make 4 of these units.

Making your center square:
Using the same method as you did to make the corner squares, place a 2.5″ orange square in opposite corners of the 4.5″ white square. Sew on the diagonal line. Trim 1/4″ away from your seam and press.


Repeat with the other two corners using (2) 2.5″ orange squares. Press.

Making the middle rectangles:
Sew the green rectangle to the light blue rectangle along the long side. Press these seams open. Make 4.

Finishing the block:
Lay out the block according to the photo. Begin by sewing the blocks into 3 rows.

**A helpful hint** while you’re sewing your blocks into rows.
To keep your corner square (Diamond) points aligned with the seam of the middle rectangles…
Place your corner unit and middle rectangle unit right sides together. Insert a straight pin into the intersecting point of the corner unit.

Making sure that the end of the straight pin goes directly into the seam from the other side.

Pin. This will prevent your blocks from shifting while sewing and keep the seam aligned with the Diamond point.

Using a 1/4″ seam allowance, sew over the intersecting point. Remember to go slowly if you’re like me and love to sew over your pins:)

After all of that careful pinning, you will be rewarded with beautiful points!

Sew the rows together.

You’ve completed your Rolling Diamonds Quilt Block! This is our block for Crystal Lake Modern Quilt Guild.

And this fabulous version is going into our BOM.


