
You are currently browsing the tag archive for the ‘BOM’ tag.

Tag Archive
Wow that’s a lot of initials. I’m all caught up on the guilds block of the month and I wanted to share how our progress was going.
These block tutorials are located on the Crystal Lake Modern Quilt Guilds blog. Just click the button on the left hand side of our blog and it will take you there if you’re interested in making one of your own.
Paige picked out all the fabrics and I’m doing the sewing. Together we’re going to have one fabulous quilt! She’s using a variety of Kaffe prints, modern plaids and hand dyed solids. I’ve already showed y’all 2 of the blocks so far but since it was such a beautiful day here and I had time to spare, I took some great shots of the blocks outside.
Block #1

Block #2 Modern Maple

Block #3

Block #4 Modern Movement

Block #5 “X And +”

Block #6 Anita’s Arrowhead

Block #7 Rolling Diamonds

And here they are showing off all together like jewels in the sun!

I’m back with my second CLMQG BOM tutorial. Our inspiration for this block came from Sara Peterson at KnottyGnome.com. Remember, if you want to play along too, you can find us at The Crystal Lake Modern Quilt Guild or download the BOM instructions directly from the CLMQG blog.
Gather your fabrics & lets get started!

Begin by cutting your fabrics.
(12) 2.5″ white squares
(8) 2.5″ orange squares
(4) 4.5″ dark blue squares
(1) 4.5″ white square
(4) 4.5″ x 2.5″ green rectangles
(4) 4.5″ x 2.5″ light blue rectangles

On the wrong side of your fabric, use a pencil to mark a diagonal line through your (12) 2.5″ white & (8) 2.5″ orange squares.

Making your corner squares:
Place one of the white squares and one of the orange squares in opposite corners of the dark blue square. Sew directly on the diagonal line.

Use your ruler to trim 1/4 inch away from your seam.

Press your block and repeat with the other two corners. This time using (2) 2.5″ white squares. Press. Make 4 of these units.

Making your center square:
Using the same method as you did to make the corner squares, place a 2.5″ orange square in opposite corners of the 4.5″ white square. Sew on the diagonal line. Trim 1/4″ away from your seam and press.


Repeat with the other two corners using (2) 2.5″ orange squares. Press.

Making the middle rectangles:
Sew the green rectangle to the light blue rectangle along the long side. Press these seams open. Make 4.

Finishing the block:
Lay out the block according to the photo. Begin by sewing the blocks into 3 rows.

**A helpful hint** while you’re sewing your blocks into rows.
To keep your corner square (Diamond) points aligned with the seam of the middle rectangles…
Place your corner unit and middle rectangle unit right sides together. Insert a straight pin into the intersecting point of the corner unit.

Making sure that the end of the straight pin goes directly into the seam from the other side.

Pin. This will prevent your blocks from shifting while sewing and keep the seam aligned with the Diamond point.

Using a 1/4″ seam allowance, sew over the intersecting point. Remember to go slowly if you’re like me and love to sew over your pins:)

After all of that careful pinning, you will be rewarded with beautiful points!

Sew the rows together.

You’ve completed your Rolling Diamonds Quilt Block! This is our block for Crystal Lake Modern Quilt Guild.

And this fabulous version is going into our BOM.

My last birdie block is complete and on its way to a good home! I had a lot of fun stitching these and adding my own twist to some of the blocks. Thanks again Little Miss Shabby!


I can’t wait to see how Vicki puts all the blocks together!

I wonder what new and fun blocks await us for 2012?!
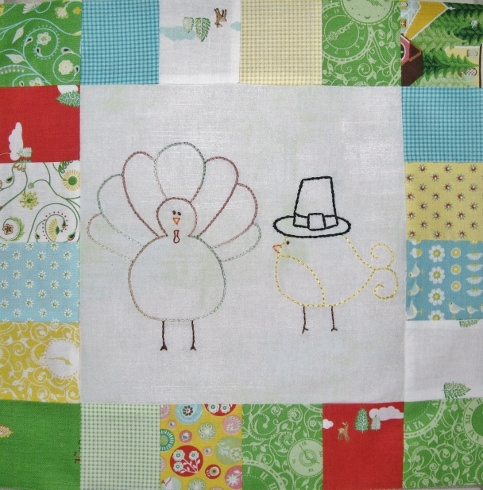

November Birdie block is finished. Only a few minor additions to the block this month. Birdie has a new pilgrim hat and a fat turkey for his feast, although Mr. Turkey is too pretty to eat! I stitched him in my Cosmo Seasons variegated floss. And birdie eating Mr. Turkey might be considered cannibalism…hmmm.
A big Thank you to Andrea’s husband Tom for helping us out with our extra Birdie drawings this month. And as always a big thanks to Little Miss Shabby for such a fun BOM. Only one more to go…Christmas Birdie!
Have a Happy Thanksgiving everyone!
October Birdie is finished and I’m back on schedule. I do have to admit that my stitching was a little shaky trying to do both of these so blocks so close together. But I think it turned out cute.

I switched the moon to the other side and added a witch’s hat to Birdie. She had to have a costume for all that trick or treating she plans on doing!

What kind of candy is she hoping to get the most of this year? Reese’s cups seem to be my, um, her addiction right now!
I finally finished the September block from Little Miss Shabby’s BOM. September to me is apple picking time and back to school. And what kind of school does a Birdie attend? Well, Flight School, of course!

We have an elementary school in the neighborhood that rings the “bell” at the beginning of the school day. I enjoy hearing that while taking Daisy for her morning walk, so I had to incorporate the bell also.

Thanks again for another cute block! Can’t wait to get started on the October one now.

The buzz is summer’s almost over…bummer:(
Russell’s already registered for school and then before you know it, I’ll be getting up at the crack of dawn. No more sleeping in. I LOVE to sleep in!
I’m actually ready for fall, like I’m sure most of the country is, since we’ve had extreme temperatures this year.
Birdie’s still hanging in there though. I love the sunflower idea and my mom suggested a bumble bee. That was a great addition to an already cute block. Thanks again Little Miss Shabby!

I hope everyone had a great holiday. It was pretty relaxed here. Some sewing, some embroidering…..what better way to celebrate Independence Day than stitching up these cute patriotic birdies.

I definitely should have used a muslin backing before stitching this block because you can slightly see my threads traveling behind the fireworks and that kinda bugs me…ugh. I changed the Birdies from holding sparklers to holding flags. Then put smaller sparklers on their breasts instead of the stars and stripes.

Thanks for a great 4th of July block Little Miss Shabby!
Birdie Block #6, finished!

While, I thought Little Miss Shabby’s June block was cute, I wanted to stick to a June theme. And what better thing to do in June than go to the beach. Birdie loves to surf and soak up the sun.

I continued with the summer theme by whipping up some summer tea towels. Umbrellas in the sand, flip flops and palm trees.

But you wanna know where I really like my umbrellas? In my drinks:)

susan enjoying her drink
It’s time to relax on the patio now with a Lemon Drop Martini and some black bean salsa. I hope y’all enjoy your sunny summer day…talk to ya tomorrow friends!
LEMON DROP
1 part Absolut Citron
1 part Triple Sec
1 part fresh lemon juice
Mix ingredients, shake and strain into sugar rimmed glass
My Birdie block for May is finally finished! I snagged one of my sewing machines and other necessities from under the paint tarp and set up shop “old school” on my kitchen table. It doesn’t bother me to sew there, except the table’s too high and my back starts to ache from stretching…or maybe it aches from having to use the proper posture to reach the machine.

But any who, it doesn’t matter how it was finished as long as it was. I must say it turned out cute! I don’t even think this pic does it justice. I weeded out some of the smaller flowers and used the Cosmo Seasons variegated floss. A different one for each flower.

Thanks again Little Miss Shabby for another cutesy, fun block!


