

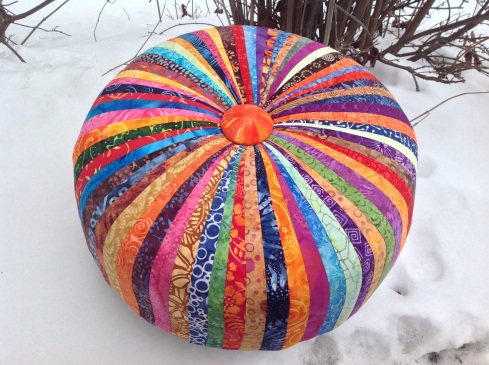
Tuffet Demo: Tips & Tricks…A Foundation Piecing Tutorial
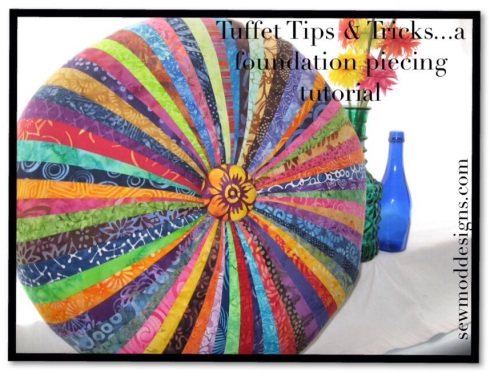
I get pretty dang excited when I sell a Tuffet pattern. Especially when I sell several of them to the same part of the country. Which means most likely, that a quilt shop is having a class. Somebody’s having a Tuffet Party!
I get all kinds of questions about the innards and the how-to on assembling the Tuffet, where to buy supplies, what fabrics to use, etc. So today, I’m gonna kill two birds with one stone. I’m going to finish up my UFO Tuffet and answer some of my customers pressing questions.
Because let’s face it, this list of supplies might seem a little daunting. But don’t fret, everything can be easily found at your LQS, craft or hardware store. The only thing you might have trouble finding, is your handyman.
I put a supply chart together showing the Supply, The Use, Where To Buy, Cost, & any Comments I have that might help. **This is for guidance purposes only** You can buy whatever you want from whomever you’d like. I’m only stating what I purchased and from where to try to help anyone making the Tuffets. If you’re taking a class at your LQS, there will likely be a Tuffet kit available for purchase. I highly recommend buying the kit. Unfortunately, for our party, we weren’t that lucky and we had to figure it out on our own. I hope this helps and you enjoy making your Tuffets as much as we did!
So let’s get this party started, shall we?
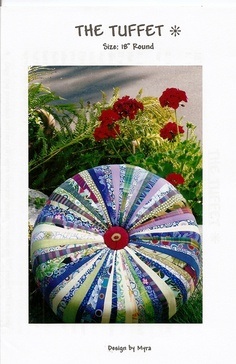
First you need The Tuffet pattern by Myra Mitchell. The foundation piecing demo and tips provided does not, in any way, replace the fact that you still need the pattern! I’ve only provided you with TIPS for building your Tuffet, not instructions on assembly. You don’t want to invest all your time and $$ in this project, only to realize that your missing key steps and correct templates. Even I still refer to my pattern for each Tuffet I assemble!
UPDATE: 01/04/18 SewMod is sold out of the Tuffet patterns. Please visit Etsy.com to purchase a tuffet pattern from a sewing or quilt store.
UPDATE 3/8/16: Myra has changed the board dimensions on the most RECENT patterns from a 18″ round plywood to a 17″ round plywood. All other supplies remain the same including the 18″ foam pieces. PLEASE NOTE this when printing off the PDF below.
SUPPLIES:Click on the table below to enlarge OR download the PDF as a reference HERE
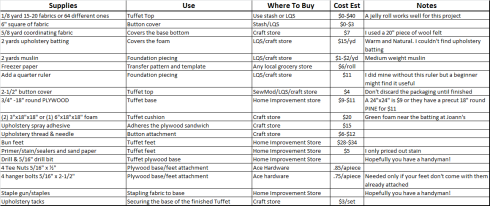
**Remember that if you’re buying items from your local big box fabric & craft store, to use your coupons to significantly reduce the prices on select items.
**Items such as needles, adhesive spray, stain, & freezer paper can be shared if you’re making Tuffets with your friends!
FOUNDATION PIECING:The method of stitching your fabric pieces directly onto a foundation fabric such as muslin.
Foundation piecing onto the muslin will provide support and stability to this project and keep the fabrics from stretching when you begin to attach them to the base. Muslin will not pull apart.
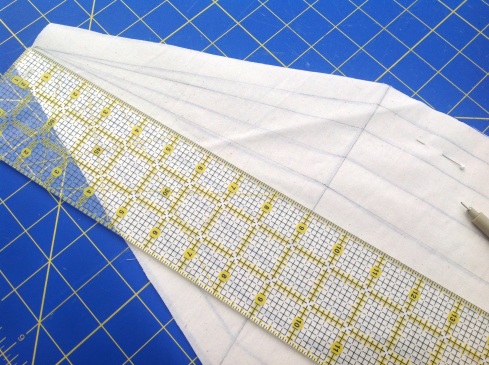
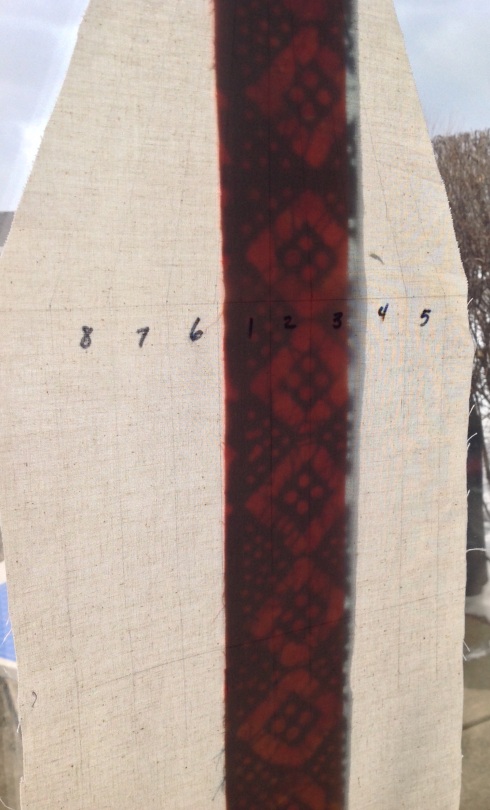
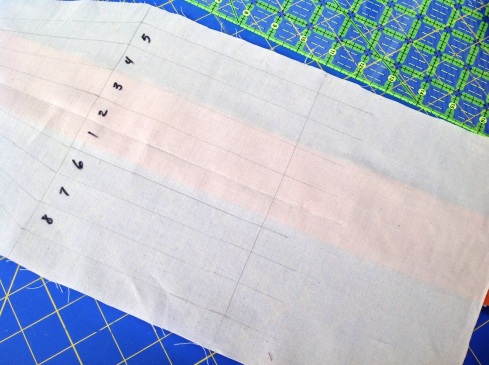
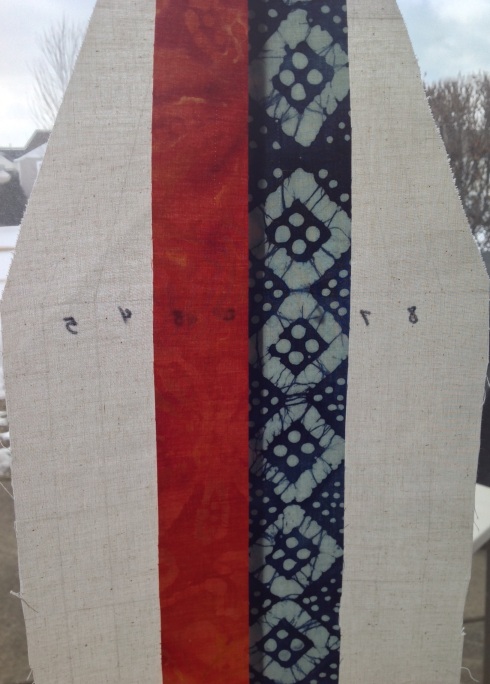
Once you’ve traced your foundation template onto freezer paper and cut the muslin fabric pieces, trace the stitching lines. You can see from the pic that if you use a Sharpie to trace the stitching lines onto the freezer paper, you will be able to easily see through the muslin for tracing. I used a ruler and a Pigma pen to trace my lines onto the muslin. Make sure to trace the numbers from the pattern onto the muslin.
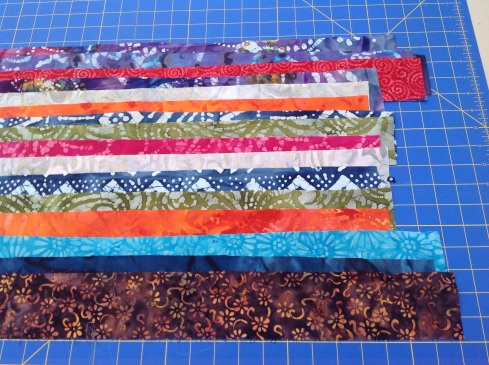
I used my leftover Batik scraps from various projects to make this Tuffet. I like using scrap pieces that are at least 2-1/2″W x 22″L . It makes my foundation piecing a lot easier!
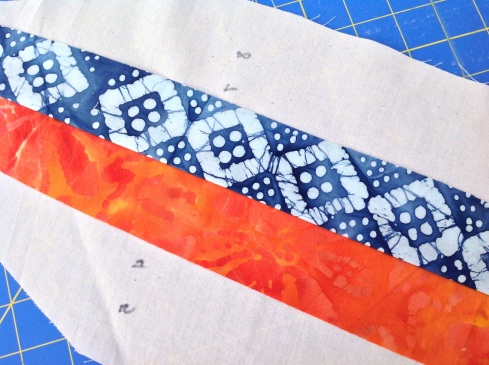
Take your first two strips and layer them right sides together. These will be #1 & #2. Now take your muslin piece and with the drawn lines facing you, hold it up to a light source. I used my patio door as my light source for these pics. Place the layered strips behind the muslin. Make sure that these two pieces cover the stitch lines for #1 & #2. Pin in place to secure.
Shorten the stitch length on your machine. I set mine at a 1.8. Starting at the widest end of the strip, sew towards the narrow end through all of the fabrics. When you foundation piece, your fabrics are on the back of the muslin foundation and you stitch on the drawn foundation lines. Remember to back stitch.
Flip the muslin over and press the two strips open. You can see that they both completely cover #1 & #2.
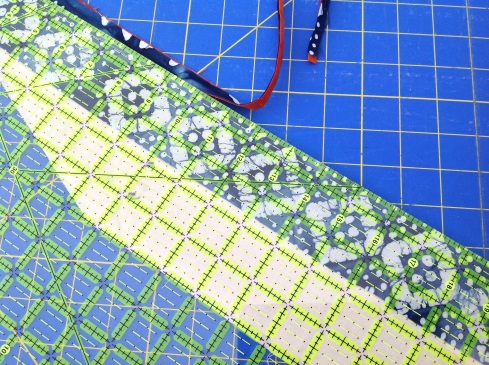
Now the tricky part is trimming your seam. **I mentioned earlier in my Supply Chart notes that I did not use the Add-A-Quarter ruler so you won’t see me demonstrating cutting my seam with it. Instead I used my large cutting ruler. To trim the seam, fold all of the fabric, including the muslin, to the left, exposing only the raw edges the two fabrics you just stitched. Take your ruler and trim to a 1/4″ from the stitch line.
Press open again and head back over to your patio door!
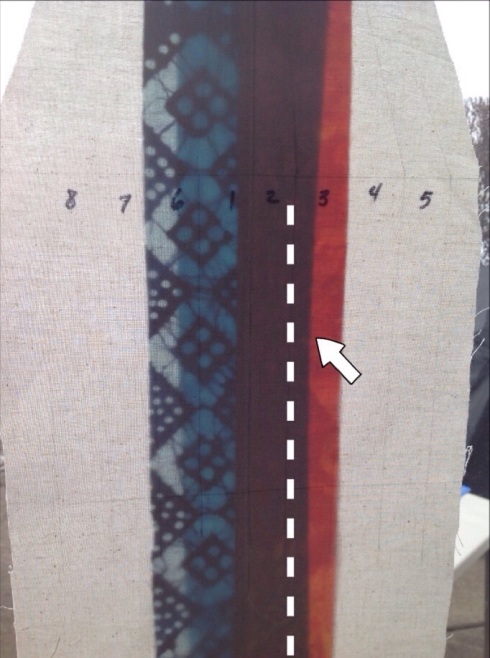
Position the #3 fabric behind first two sewn strips. Notice that in the pic below that the #3 fabric is at least a 1/4″ beyond the #2 line that I will be stitching on. Pin in place and sew on the #2 line. Once again, starting from the bottom up towards the narrow end and back stitching. Trim seam. Press well!!
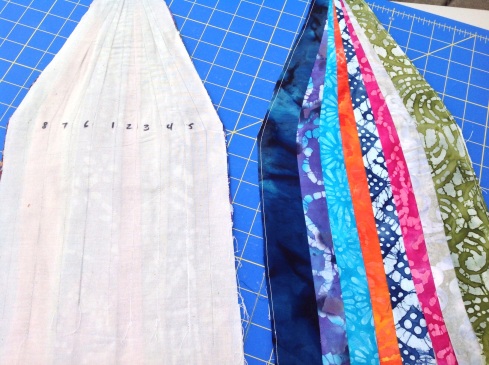
Repeat this process until all 8 strips are added. The last stitch line on each side of the muslin foundation are the stitch lines for piecing all 8 sections together. You only add 8 strips to each foundation piece.
Trim the block up to the muslin foundation. It’s ok to leave the bottom edge untrimmed. It will help when you are covering the Tuffet and can be trimmed after it’s stapled to the base. Sew 1/8″ around the edges to secure.
Here’s a pic of two completed sections…one from the front and one from the back. Refer to your pattern to complete the assembly of your pieced top.
TUFFET BASE:
Trace your template onto the foam and cut out 2 round cushions.
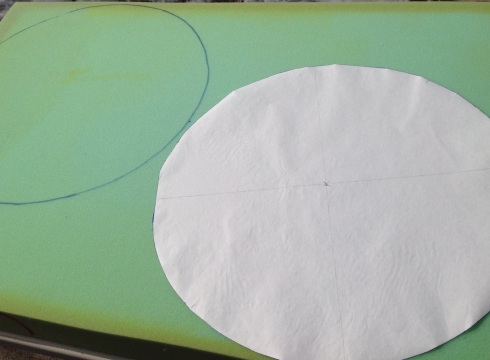
To make cutting easier, use an electric knife..you know, the kind Grandma cuts the turkey with? It’s perfect for this job too!…but I never cut meat with mine lol!

It’s ok that they’re not pretty cakes. They will be covered with batting and fabric to smooth out the rough edges.
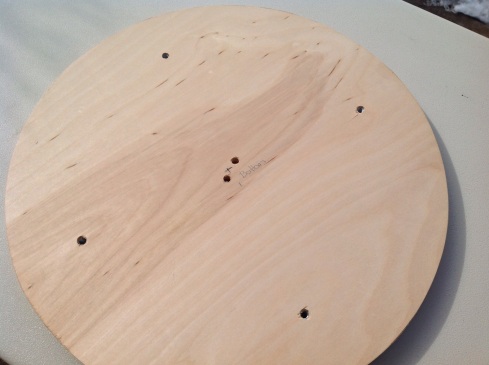
Before using your spray adhesive, make sure that you are adhering the foam to the Tuffet top. I marked them as shown in the pics below.
The top of the Tuffet is where you will see the Tee Nuts.
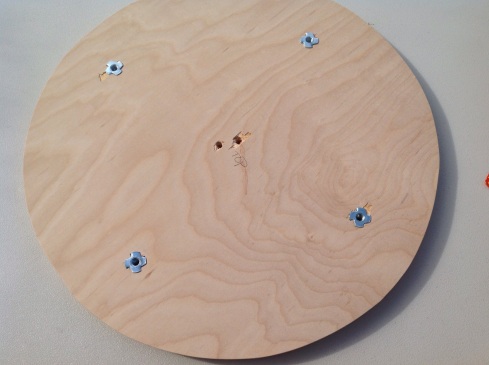
The bottom of the Tuffet is where you will attach the Bun feet after you’re finished. The 2 small holes in the center are for the button attachment.
COVERING THE TUFFET: From the lyrics of Rob Base and DJ EZ Rock…🎶🎶”It takes two to make a thing go right“🎶🎶…you need a partner!
As I noted previously, I used leftover Warm & Natural batting because I couldn’t find upholstery batting. Upholstery batting is supposed to be more durable and won’t break down but I figured how bad can it be? It’s not like I’m going to be letting the kids jump on it or anything.
After your batting is on, ease the pieced top over it, keeping it centered. It helps if one of you stretch the pieced Tuffet onto the base while the other staples. Work from one side to the opposite. Pull tightly, add about 4 staples, turn 180 degrees , add a few more staples. Keep stapling until your top is securely attached. Try to staple about 3/4″ away from the edge of your base. If you go any further in, you risk getting too close to the drilled holes where the feet screw in. Keep working at it from opposing sides until you’re finished. Use lots of staples. Your arm will get tired! Check, double check, and even triple check to make sure that you’re keeping the piece centered. The last thing you want to discover after all your hard work is that your Tuffet is tipsy to one side. Trust me, I know..
ATTACHING THE BUTTON:
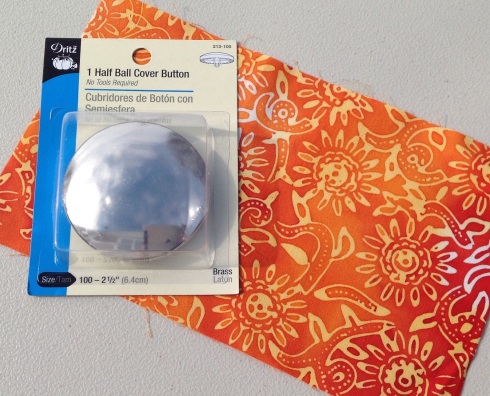
Follow the instructions in your Tuffet pattern to cover and attach your button using the upholstery thread. Pull tightly to secure and staple underneath.

COVERING THE BASE:
Using your 18″ freezer paper template, cut out a piece of coordinating wool felt to cover the wood base for the finishing touch. This step is completely optional but well worth it! Center your felt on the base. I used a bit of the upholstery spray to keep it from shifting too much while I worked. Using a mallet, hammer the tacks around the edge of the felt. Locate the drilled holes for the feet by touch and use small scissors to clip the holes where your Bun feet will be attached. I did this last because your felt may shift/stretch a little while your attaching it. Trim the felt close to the Tuffet edge if necessary.
For a more professional look, it’s best if you buy 2 boxes of the tacks. You’ll only use about 1/2 of the second. I misplaced my second box and as you can see from my photo, my Tuffet could have used a few more tacks. But that’s an easy fix for later, right!
Screw your Bun feet into the base.

And you’re all set!
🎶🎶It takes two to make a thing go right
It takes two to make it outta sight🎶🎶


57 comments
Comments feed for this article
April 2, 2015 at 3:21 am
Kim DeMent
This looks like fun! Thanks for the tips. Now, how to get that song out of my head…
April 2, 2015 at 10:47 am
Lorrie
I know, right?! I was at Target yesterday and some guy had that blaring on his radio and I just had to chuckle a bit! Lol Thanks for stopping by Kim!
April 9, 2015 at 10:10 pm
pamelajs56
I love this tuffet! I can afford the supplies and a pattern if I do it myself. Thank you so much for the tutorial. I am going to do this! My sunroom really needs this touch.
April 9, 2015 at 10:18 pm
Lorrie
That’s great Pamela! If you run into any hiccups, let me know. I’m happy to help!
Lorrie
November 5, 2015 at 3:44 pm
MJ
My only question at this point is this: it seems like, when you are sewing your strips on, that you need to pivot a third of the way down the line and bend your fabric…at least that what the pictures seem to suggest…can you shed some light on that? Thanks, MJ
November 5, 2015 at 10:24 pm
Lorrie
Hi MJ
Yes. There is a gentle pivot while sewing the strips on. Pressing well after each strip is sewn on is important.
Lorrie
November 6, 2015 at 8:07 pm
MJ
thanks! ok, one more questions: why wool felt? do you feel its better than just an upholstery fabric?
November 7, 2015 at 6:28 am
Lorrie
Hi MJ
Upholstery fabric would work too on the bottom. I just didn’t want to turn under any raw edges and the wool felt is less expensive.
January 7, 2016 at 3:42 pm
Laura Swinney
Thank ou for this tutorial.
January 14, 2016 at 4:52 am
Lorrie
You’re very welcome Laura. Thanks so much for stopping by!
January 14, 2016 at 4:31 pm
kathleen
Would this same technique work for a rectangular tuffet? I have an old rectangular footstool I want to makeover.
January 14, 2016 at 9:43 pm
Lorrie
Hi Kathleen
I’m sure the same technique would work but the dimensions would need to altered since this is for an 18″ square or round tuffet.
January 15, 2016 at 2:25 pm
kathleen
I’m sure I could play around with some muslin first to get it just right. Thanks for the encouragement.
March 20, 2016 at 2:32 pm
Nichole A
I just got my 8 panels together. I am looking for the foam and wood now. Question, thougn . . . I know it says up top that the newer instructions (like mine) changed from 18″ round to 17″ round . . .but, why? Just for it to be a tad bigger on the top? Thanks
March 20, 2016 at 7:21 pm
Lorrie
Hi Nichole
I believe Myra changed the board dimensions so that the pieced tuffet will fit easier over the base.
Lorrie
May 1, 2016 at 10:22 am
Euna Sansoucie Ridenour
How much are the buttons? What size are they?
May 1, 2016 at 10:34 am
Lorrie
Hi Euna
The buttons are 2-1/2″ and are $4.50 plus shipping.
If you’re interested, I can set you up a paypal invoice for it.
Thanks!
Lorrie
July 4, 2016 at 2:43 pm
sue jagello
If I go slow and carefully, can I finish this in a 6 hr. class?
July 5, 2016 at 8:47 am
Lorrie
Hi Sue
From my experience this is a two day class unless you’ve started your foundation piecing before class to get a head start. Hope this helps..
Lorrie
August 5, 2016 at 3:05 am
Selina
O.M.G!! Thank you SO much for this! I was so confused by the written instructions on the pattern, but this visualisation makes it SO clear! One tuffet, coming up!!
August 5, 2016 at 7:38 am
Lorrie
Fantastic Selina! I’m so glad this helped you. Happy sewing!!
August 14, 2016 at 3:11 pm
Vicki Ruark
will one jelly roll make this tuffet or do you need 2? Thanks Vicki
August 16, 2016 at 12:58 am
Lorrie
Hi Vicki
One jelly roll should do it!
Lorrie
August 19, 2016 at 9:50 am
Charlie W
Would you send me the ” how to” instructions on how to cover the button. The instructor we have is saying we can’t use the dome buttons, yet like in your instructions you show exactly that. I have purchased a couple different buttons. Sure would appreciate if. You would help us on the details of using and covering the 2 1/2″ metal button and how to insert it into the tuftet. Thank you for your time.
August 19, 2016 at 9:49 pm
Lorrie
Hi Charlie
I am unable to give the button insertion directions. If you’re taking a tuffet class with Myra’s pattern, you will find the instructions in the pattern.
August 19, 2016 at 3:32 pm
Carol
When stapling the batting on, do you pull it tight, leave it loose, or somewhere in between? Also how far from the edge do you staple the batting, which is done twice for the 2 layers?
August 19, 2016 at 9:44 pm
Lorrie
Hi Carol
Pull everything tight!
I stapled mine about 1/2″ away from the edge. If you’re adding a base cover you need to leave room to push in your decorative push pins.
August 21, 2016 at 12:09 pm
Kelly Ziccarello
Hi! Bought your pattern and have looked through tips here. Regarding the bottom, (wide) area of the pattern. Pattern for foundation states “add “4 extension at dotted line…” Are those extended areas also to be drawn onto muslin foundation and sewn together?
August 22, 2016 at 8:33 am
Lorrie
Hi Kelly
You do not have to sew past the extension. It’s mostly to help you pull the fabric tight under the base. It gives you a bit more leverage.
September 3, 2016 at 12:55 pm
Kelly Ziccarello
Help! Im having a heck of a time with my feet! I have searched every hardware store in my area plus online. Cannot find Tee- nuts bigger than 5/16 x 3/8″ . I can tell just by looking that if I use those the bolt and nut will not meet in the middle of my board. Any ideas? My feet came with bolts inserted….maybe if I tried to remove and see if I can use a longer bolt?
September 4, 2016 at 8:05 am
Lorrie
Hi Kelly
I forwarded your question to Myra Mitchell. I’m hoping she has a solution for you…
Thanks!
Lorrie
March 24, 2017 at 11:58 am
Laura Spillane
I’m still in shock from looking for foam to finish my tuffet. 50.00/yd at Joann’s and i need 2 yards.
March 27, 2017 at 2:29 am
Lorrie
Hi Laura
Yes it’s pretty expensive so don’t forget to use a coupon or try to catch it on sale!
March 27, 2017 at 5:04 pm
sue jagello
Most local quilt shops (at least in Michigan) sell an 18 inch round for under 18 Dollars, 6 inch deep to make one round tuffet.
April 3, 2017 at 7:44 pm
Shannon Hooper
Your instructions and pictures were very helpful compared to many you tube videos where you can’t hear what they are saying or even see what they are doing.
Thank you!!!!!
Shannon
April 3, 2017 at 7:54 pm
Lorrie
Oh you’re so sweet Shannon. Thank you so much!!
Lorrie
April 9, 2017 at 1:33 pm
Bunny Rogers
I would like to make a mini one about 8″ for doll sized. What dimensions would I use to cut my fabric. Many thanks.
April 11, 2017 at 10:49 am
Lorrie
Hi Bunny!
I’m not sure what dimensions you’d need to resize that drastically but I do know that there is a tiny pincushion tuffet pattern out there that you may be able to refer to if you can find it on the internet.
Good luck!
Lorrie
April 11, 2017 at 9:31 am
Melinda
I found a small tuffet at a yard sale it was dirty and only a dollar. I came home and took it apart and proceeded to check out what was on line. OMG I made a pattern and will be doing foundation piecing for the 1st time. I decided to do only half the amount of strips so only 32 around. I’m good at geometry so the pattern isn’t a big deal. I only have to buy the button. Here goes nothing!
April 11, 2017 at 10:46 am
Lorrie
Good luck Melinda! Once you get the hang of foundation piecing, it’s fun:)
I hope this tutorial helps.
Lorrie
October 14, 2017 at 3:59 am
Melinda
I finally feel bushed my tuffet well almost going to put a little trim on this morning to complete it came out awesome I spent total of $6 I’m putting it in the store for sale I get 60% any ideas of what I should ask?
April 14, 2017 at 3:05 pm
Evelyn
I love the tutorial,thanks for sharing
April 22, 2017 at 4:53 pm
Shirley
I sent for Myra’s instructions for a square tuffet. Can I use the basic pattern to make a round tuffet?
April 22, 2017 at 5:21 pm
Lorrie
Hi Shirley
Im not sure how that would work as the templates for the square tuffet and round tuffet are different.
You are always free to ask Myra if that is possible. Her contact info is on the back of the patterns.
Thanks!
Lorrie
April 22, 2017 at 5:24 pm
Shirley
Thanks Lorrie. I was afraid of that and was just going to send Myra an email.
May 10, 2017 at 2:03 pm
Aleeda
Do these instructions apply to the square tuffet? Why do you not cover the bottom of the square tuffet with foam, and how many layers of upholstery batting did you use? Thanks!
May 11, 2017 at 9:04 pm
Lorrie
Hi Aleeda
Thanks for your questions. These instructions are specifically for the round tuffet since I have not yet made the square one. I’m not sure that you’d need to use foam on the bottom of the tuffet. I covered mine with a piece of wool felt and some upholstery tacks. As for the batting-I used two layers of regular quilt batting instead of upholstery batting because I knew it would only be used as a decorative piece in my house. I hope I’ve answered some of your questions. If you have any specifically about the square tuffet, Myra’s name and contact info can be found on the back of the pattern and she is always willing to help as well!
Thanks! Lorrie
May 11, 2017 at 10:58 am
Sheryl Prochnow
I have watch many YouTube and very disappointed. this is the best set of directions I have come across. thank you.
May 11, 2017 at 9:05 pm
Lorrie
Hi Sheryl
Thanks so much for your kind words! I’m glad I could help.
Lorrie
November 24, 2017 at 12:27 pm
Renate McGovern
just beautiful, i do not see anywhere how much your pattern is, can you please let me know
Thank You, Rena
November 24, 2017 at 3:21 pm
Lorrie
Hi Rena
The pattern is $12.00 plus $2.00 in shipping.
Thanks!
Lorrie
February 24, 2018 at 1:25 am
Marie van Rensburg
I am currently on holiday on The Gold Coast, Australia. I live in Durban South Africa and can’t wait to get home to start this tuffet with my 72 Liberty Lawn Fabrics 🤗🤗🤗
February 24, 2018 at 10:57 am
Lorrie
Oh my Marie! That will be fabulous!
October 8, 2018 at 8:01 pm
Debra Winter
Do You Have A DVD Or Video I Can buy.
October 8, 2018 at 8:57 pm
Lorrie
Hi Debra
I’m not sure if Myra came out with a dvd or YouTube video. I will send you her email in a separate convo so that you can contact her personally. Thanks so much for your question!
Lorrie
October 19, 2018 at 7:38 pm
Sharon Mclauchlan
Hi just wondering where i get the pattern from . i am in Australia i no it will cost the earth to have it sent. Oh and great job on the Tuffet.. cheers Sharon
October 19, 2018 at 10:55 pm
Lorrie
Hi Sharon! Thanks for visiting the post. You can find a pattern by going to Etsy.com and typing ‘tuffet pattern’ in their search engine. I believe there are a couple of shops that still sell it.
Lorrie