
You are currently browsing the tag archive for the ‘fun ideas for quilt guilds’ tag.

Tag Archive
So I know you’re wondering what prettiness I came up with for my 2nd border. Well…I wanted to do 2 rows of clamshells for my curves but once again I became distracted and time got away from me. So I put my medallion on the design board and walked away. Then I would walk back again, audition a few things, then walk away again. Only to do this, what seemed like a few thousands times, and end up with one row of clamshells which inevitably ended up looking like a scrappy scalloped border lol. Whew. All that to end up with scallops!!

Curves ✔️ Carnation Pink ✔️

Anyway, the end result is still fabulous in my eyes and that’s all that counts. This challenge, even though it’s time consuming, is sparking a bit of creativity in me. I knew when I started it, that I wanted scrappy, embroidery, beautifulness. And so far I think I’ve achieved my vision.

Like everything else I design, I kinda fly by the seat of my pants at first and my ‘scallops’ didn’t end up meeting where I wanted in the corners. But I’m not gonna fret. Embellishments can fix that! I have cute buttons to add as a ‘distraction‘ after the quilting is complete. Do not add embellishments like buttons and sequins before sending to the quilter. That’s a big no-no!!

And obviously I’m taking my sweet ass time on the embroidery work…I’ve still only finished the two corners. Time seems to escape me these days, between family, the guild commitments, SewMod, and all of the wonderful opportunities so far this year. I wish I could clone myself!
March’s task is dresdens and the color is red. Dresden blocks are a plenty! If you Google dresden quilt block you will find so many creative ways to make one. I’m looking forward to this one for sure!

A new year with the CLMQG means new projects, block lotteries, and Secret Pals! I’m really excited. We have the entire year planned and I’m positive it’s going to be fun & exciting. I’ve never played Secret Pal so I’m pretty giddy over this one. Although, I’m sure I’ll blow the surprise. Or she will instantly know it came from me because chances are there will, at some point, be a crocheted flower, embroidery work on her gift or I’ll have no self control and show it all over the blog and instagram. If you figure me out early Secret Pal, I apologize now lol.
The other program we started in January is a Medallion Border challenge. We start with a center square of our choice and each month a new set of guidelines will be chosen for us to complete a border.
For example..this is my center square I showed in January. It’s a retro dress design from a Sizzix die that I traced to turn into a pattern I could hand appliqué. I wanted to work with lots of florals so I chose to focus on some of the LakeHouse and Flower Sugar fabrics I’d been hoarding. I appliquéd them onto a white tone-on-tone dotty background. It took on a dresden like effect when I decided to lay them out in a circular pattern.

My favorite is the navy blue with the big cherries on it!

A recurring theme I’m planning on having is cherries, strawberries, dots, and florals. And of course I’m going to add lots of hand embroidery. To start, I embroidered a purse in the center of my medallion. Every great dress deserves a beautiful purse! This is an embroidery design by CrabApple Hill from her Sundress pattern. I’m going to be incorporating several of those designs into this challenge. Hopefully more along the center corners and into the borders as well.

Each month a design task and a new color is randomly chosen for us to incorporate into the next border. In January the task was a Snowball block and the color was red-violet. Here’s a few Google images so you can visualize my task this month…we can use as many or as few blocks in our row and as much or as little of the red-violet. We just need to to be able to identify it to the challenge coordinator.

For the February meeting I will need to come prepared to show my finished row attached to my medallion or risk being expelled from the program or worse…having some sort of fitting punishment. Oh my. That sounds worse doesn’t it? The unknown is ALWAYS worse!
So I’d better get moving if I want to make my deadline. I’ll be back soon to show you my progress!

SewMod has been invited to host our Handmade Littles presentation…‘Small ways to create fun things with fabric’.
We will be doing a presentation on a variety of small projects designed by SewMod and other artists. We love to make quilts but it’s also rewarding to sprinkle in some of the Littles along the way. We will have quilt examples and sewing patterns showing how we use up scraps, feature our favorite fabrics, and create unique, fun items for gifts.
We’d love to have you join us Thursday, February 4th at the Country Quilters Of McHenry Guild from 7-9pm for the program and vending at…
Shepherd Of The Hills Church
404 N. Green Street
McHenry, IL 60050
We hope to see you there!
I’ve been swapping for about 4 years now through various social media sites and within our local sewing group and guild.
Different types of swaps may include specific blocks, sizes & color combos. Handmade items such as pincushions and zippy bags. Some have strict rules that must be adhered to and some only have a theme to follow, such as butterflies, in which anything can be swapped as long as it has a butterfly.
Overall, I find this quilting activity rewarding and enjoyable and I’ve made many online friends doing it. I have had a few swaps that have proven to be challenging. For example, the color scheme is ‘off’ or the blocks I receive may be shy of the dimension requirements, but this never stops me from saying…”yes” to the next one!
Today I’m going to share with you a few tips, mainly focusing on block swaps, to help make your next swap successful for you and your partners.
Use quilt store quality fabrics for your swaps.

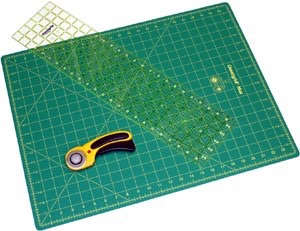
Use precise cutting. This is where it all starts. Accurate cutting will help ensure the desired block size. Here’s a quick refresher on Craftsy for tips on using your rotary cutter and mat.
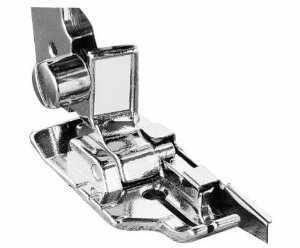
Double check your seam allowance. A 1/4″ seam allowance is typically required for quilting. If your 1/4″ is off, your block will not finish the correct size. Invest in a 1/4″ foot for your machine. The 1/4” foot has a guide designed to help you achieve perfect 1/4” seams when piecing. The distance between the needle and the right guide is a true 1/4”. Or, stack painters tape as a reference along the plate to guide you.
Don’t sacrifice quality for quantity. Slow down your pace, it’s not a race! Take your time with each block.
Measure your block before swapping. A good Sewista is most likely to be able to work with about 1/8″ of your block being off . After all, we are not perfect.
1/8 + 1/8 = 1/4″ total.
But, if your block is 1/4″ off on each side…
1/4 + 1/4 = 1/2″ *this is not workable. No amount of “stretching” can resolve this problem y’all!

As you can see, my block is slightly off. Mostly, because I can’t seem to sew a straight line to save my life even while using my fancy pants 1/4″ foot but it is still well within an accepted allowance…within the 1/8″ allowance.
Press your work well after each addition. Press your seams flat, whether it be open seams or pressed to one side. Do not “iron”. This will cause stretching. Use Best Press or other solutions to “starch” your finished project. Nothing makes me smile more than a well pressed block. It’s my finishing touch. If your block is pressed, you will be able to make an accurate determination of whether it is the correct size.

One of our guild members, Trish, was kind enough to share her recipie for a homemade pressing spray if you’d like to make your own.
Mix a ratio of 4 parts water with 1 part POTATO vodka.
Add to a spray bottle. It’s important that it be POTATO vodka. Ask your local wine & liqueur store if they carry it.

Follow the design elements required for the block swap. For example, if your swapping for Halloween, and your swap partner or leader asks for a certain block size or color palette, try to accommodate those requests as closely as possible. This will ensure a cohesive final quilt for whoever is making it.

Don’t hesitate to ask for guidance. Like I mentioned, we are all here to learn from each other. I literally need Paige to explain paper piecing every. single. time. I do it! It’s ok to ask for help. Everyone has their own level of experience and what they are skilled in.
Use good judgement. Ask yourself…”Is this something I would want to receive“? Make something you don’t want to give away. Because if you love it, so will someone else.
Mail your project on time. If you have joined an online swap through sites such as Flickr or Instagram, make sure to mail your project or block out in time. Your swap partner will anxiously be awaiting it’s arrival. You wouldn’t want to dissapoint her!
Have fun! Use quilt swaps to make new friends, expand your sewing skills and be creative. But remember, the most important part, is to have fun!


