How many quilts have we “Tweeted”?

Our newest version of our popular quilt pattern, Summer Tweets, is made using Folk Tale by Cinderberry Stitches.

Welcome a new baby in with a fresh new quilt! Brighten up a child’s decor, use a throw on the floor for baby to play on, or take it and baby to the park for playtime. The Folk Tale fabric line features flying fairies, cute birdcages, hexagons & hedgehogs. And did I mention those sweet, adorable little deer…oh dear.

Summer Tweets has been so popular because it’s a great beginner pattern made to showcase your favorite large scale prints. Easy piecing and clear concise directions allow you to assemble this quilt quickly! It only takes me a day to make one of these. The finished quilt measures 61″ x 61″. It’s a great size for a holiday throw, picnic, or wall hanging.

We have the Folk Tale baby quilt available now as a kit in the shop.
Quilt kit includes pattern, enough fabric for the top, and binding. Backing and batting are NOT included. If you have any questions, please don’t hesitate to ask. We’re happy to help!

Here’s a few of our other samples made with Summer Tweets if you have the pattern and are looking for more inspiration.

Spooktackular

Wrenly

Alpine Wonderland

Josephine We also have 2 kits left of this Sweet Josephine.

Happy summer! Memorial Day weekend is the official kick off party to celebrate the good life that’s been given us and bring in summer. Time for homemade ice cream, burgers, beer, & watching the Cubs lose miserably.

Me & Paige thought it would be a great idea on Friday night to head out to Marengo Ridge With a few friends for a picnic and watch the sunset.

I’m sure guys actually hate doing all this girly crap. They’d rather stay home, catch the game and have us bring them beers!

Turkey wraps, grapes and homemade macaroni salad are on the menu tonight. And of course wine and dessert.

I made Dump Cake in mason jars. Three ingredients and jars and you’ve got yourself a perfect picnic dessert…White cake mix, pie filling, and melted butter. Fill the jars 3/4 full with filling, spoon dry cake mix on top, drizzle with melted butter and cook @350 till you have a bubbly, crispy goodness. Top the jars with cut fabric and tie with raffia for crafty effect.
Proceed to raffia everything now because it’s just so darn picnicky!

Paige’s basket is filled with goodies and obviously daisy thinks it’s hers!

About a 1/4 of a mile down the road road we figured out the trip was a colossal mistake. Fighting Chicago traffic…well, just plain sucks. At this rate we’d be there by sunrise…and nobody likes to wait to eat y’all. So we headed back to the house for a little indoor picnic.

Don’t fret. Make do with what ya got! Throw the quilt on the “picnic” table and pretend we’re at our destination and have a great time with friends, laughing, eating and playing cards. We even saw the sunset during our stroll after dinner.

Lookie what I found rummaging through Paige’s garage one day!

A little retro soda shop table and 2 chairs. It was hideous. Rusted. The seats were literally crumbling and I was pretty sure ‘things‘ were living in it…but I knew there was potential. It could be darn adorable. We couldn’t throw it away. Will she be upset if we do a little redo? We could use these in the quilt shows we attend or for photo shoots. We could make them… SewMod Style.

Acquire a partner in crime: Wendy will spray paint anything so I knew she’d be up for the task. So one day while Paige was at work, we got busy on our surprise.

Materials: 2 cans of spray paint, a disguise in case she comes home early, I mean a mask and sunglasses for protection, fabric and new wood for the seats, & a sheet to protect the grass.

Babysitter for Daisy: this tree will work nicely.

Go for it: Ignore all the neighbors staring at us and spray away. Then when that projects finished find something else to spray paint because it’s really fun now!

We spray painted so much that day, we had to make another run to Home Depot! But it was fun and totally worth it!

Her reaction: Surprise!! She loves it. Yay!

My Partner in crime and I will be back soon to show off those ugly gold lamps and how we made them SewMod Style with a re-purposed shade to match!

Just jokin y’all. I did not accomplish all of this in one week. But I did manage to write 3 blog posts this week so I’m counting that alone as a win!

I’m just here to do a bit of show ‘n’ tell for you. Maybe it’ll provide you with some inspiration to get moving on some of those projects that you’ve been wanting to check off your list.

My Glimma bag is complete. I quilted it myself with very few naughty words. And you wanna know how? When you free yourself from the idea of traditional perfection and become inspired by the works of Jacquie Gering, you’re able to create without boundaries. She recently visited us at the CLMQG. I’ve been lucky enough to have had the pleasure twice now and I’m amazed at her work each time. If you get the chance to see her in person, take it. You won’t be disappointed!

I quilted it with free motion lines. I didn’t draw them on first. I didn’t measure anything. I just went for it! And guess what? I’m in love with my new bag!

The pattern is a design by Paige called the Sophie Bag and will be released shortly so that you can make one for yourself! It’s big enough to use for your overnight stays. It can carry your favorite quilt, pillow and girly accessories. Wouldn’t this be great for all those stay over parties your teen goes to?

I made this pillowcase for a big Detroit Lions fan using this tutorial from Twiddle Tails. This fabric is a bit hard to find in Bears territory!

I finally..luckily…found some on my last trip to OKC. Hard to believe that I had to travel 700 miles when Detroit is right up the bend! Anyway, just glad I did!

Do you MineCraft? Seems to be all the rage for the kiddos on Xbox. This quilt was a birthday gift. It’s called a creeper. He blows things up of course:)

I used money fabric for the back. It has nothing to do with MineCraft but I knew the little guy would like it. And I was right because when his mom took it off his bed to wash it, she discovered he was hoarding actual money under it! …kids, right? :)

This is a duvet that me & Wendy made for a toddler bed. Yes, another sample of what to do with Glimma…

Check out this shortcut using snap tape that can be found at your local Joann’s. It’s twill tape with snaps on it to use in place of buttons or Velcro. I’ve used it twice now to make duvets. A little expensive but that can be helped with a 40% coupon!

And last..this travel notepad and crayon holder for your little one. An easy tutorial provided by Modern Maven. Took us only about an hour and she loved her special gift.

So tell me girls…What have you made lately? Have you made anything using our SewMod fabrics? Or maybe something that I’ve shown a tutorial for? Send me your pics at sewmod at hotmail.com. I’d love to share them on the blog. We could have a customer creates blog day!

Why?…For more fabric of course!

To help me stay on budget and keep track of my spending, I thought I’d use a cash envelope system. Bigger expenses are debited straight from my checking account, but for $$ spent on hobbies, entertainment,  groceries and things like Daisy and hair/salon appointments, I decided to make fabric envelopes so I didn’t overspend. 

No one said that being more responsible couldn’t be stylish and crafty. I found a tutorial on Moda Bake Shop and, being more responsible, dug into the scrap fabric bin to make me & the girls a set of fabric envelopes.

So simple. Using just two 7.5″ scrap pieces, white fabric for the label & fusible interfacing per envelope, I made 13 envelopes in a couple of hours time.

For mine I picked the Home Grown DIY panel from Blend Fabrics.

I wanted to use the words “Sew”, “Ride” & “Bake” for the front of the envelopes and use the pictures for the back. I cut the piece in half and sewed them back together so that when I was finished, the “word/picture” would be right sides up.

I used a black Sharpie to write my labels.

I made my set last and actually ran out of interfacing on the “Bake” one so I left it out since the instructions say it’s optional. Don’t skimp on the interfacing. It’s so much better with the extra firmness.

I believe they are adorable if I do say so myself!

I tried to pick fabrics from the bin that I thought each of the girls would like. I choose Heirloom by Joel Dewberry for Wendy.

And used coordinating Oval Elements for the inside of these.

For Paige, I chose Art Gallery prints. She loves Blue!

Now we just need to put these to good use. Head over to the Moda Bake Shop tutorial and start sewing up a plan to save for yourself so that you can save more money for fabric too!

Who? Hot? What? 

Hot Who Hot Pads is our all time best selling pattern. Customers love these! We love these! Our little Hoo samples follow us from quilt show to quilt show and of course the first question by everyone who buys the pattern or kit is…are these hard to make?

My answer is they’re easy of course! But really…they are. I’ve made a minor adjustment in how I choose to make mine that is different from the pattern instructions and I’d like to share with you how and why I’ve done that.

Why? Because I try to find the easiest and most efficient ways to make shop samples while keeping my quality of work intact simply because I only have so much time to make so many things. And I’m really bad lazy at reading instructions so initially I had just assumed it was to be completed like this.

How? Instead of taking the time to turn the eyes and nose inside out, I appliqued them on with a small zig zag stitch. This made the sewing process…easy peasy…and I’ve also tested this technique by washing and drying these owl babies to ensure that my method doesn’t fall apart or fray away. They came out just like new.

First things first…you’ll need the pattern. We have it back in stock in the Etsy shop. So don’t waste time time hootin’ around. Go get that pattern!

I picked out my fabrics. This is the fun part and the part that takes me the most time!

Trace all of the eyes, nose and wing parts to the paper side of a piece of Heat ‘n’ Bond.

Fuse to the back of your fabrics according to the manufacturers directions.

Cut out your shapes on the drawn line.

Peel away the paper backing making sure the fusible is still attached to the fabric. Sometimes it’s sneaky and likes to peel away too. You’ll notice your fabric is nice & shiny on the back now.

Position your pieces on the front body of the hot pad and fuse into place.

Zig-Zig around all of your fused pieces with coordinating thread.

Layer your fabrics as shown… Insul-Bright, Warm & Natural Batting, back body of owl face up, and front body of owl face down.

Pin.

Sew a 1/4″ seam around the body, leaving about 2-3 inches for turning.
Turn right side out through the opening. Press the opening seam in, insert your ribbon holder and top stitch around the owl. There are a lot of layers to go through. I also recommend a heavier needle.

Now that I’ve shown you a simple shortcut to making this hot pad easier, you can get started on some of your own. They make cute gifts for teachers, friends, bakers and your Mama might appreciate some too!

Or, if your shortcut consists of purchasing a pair of hot pads then your in luck too! These cuties are available in the SewModDesigns Etsy shop under the Handmade category.

Things my Mom taught me…
1. There’s always room for dessert..cookies, jello, chocolate mousse, cake…
2. How to create.
3. If someone’s bad mouthing you, at least they’re given’ someone else a rest!
4. It must be true…Because she said so, that’s why!
5. Not to jump off bridges because everyone else was…
6. That if I didn’t stop whining, she’d give me somethin’ to cry about.
7. If I didn’t stop rolling my eyes, they’re gonna stick that way.
8. She doesn’t care who started it, cause were both gonna get it!
9. That one day I’d have kids and they’d turn out just like me.
10. How to care for a family and that kid who turned out just like me…

Happy Mother’s Day. I hope you have a great day today…miss you!

Wow that’s a lot of initials. I’m all caught up on the guilds block of the month and I wanted to share how our progress was going.

These block tutorials are located on the Crystal Lake Modern Quilt Guilds blog. Just click the button on the left hand side of our blog and it will take you there if you’re interested in making one of your own.

Paige picked out all the fabrics and I’m doing the sewing. Together we’re going to have one fabulous quilt! She’s using a variety of Kaffe prints, modern plaids and hand dyed solids. I’ve already showed y’all 2 of the blocks so far but since it was such a beautiful day here and I had time to spare, I took some great shots of the blocks outside.

Block #1

Block #2 Modern Maple

Block #3

Block #4 Modern Movement

Block #5 “X And +”

Block #6 Anita’s Arrowhead

Block #7 Rolling Diamonds

And here they are showing off all together like jewels in the sun!

I’m back with my second CLMQG BOM tutorial. Our inspiration for this block came from Sara Peterson at KnottyGnome.com. Remember, if you want to play along too, you can find us at The Crystal Lake Modern Quilt Guild or download the BOM instructions directly from the CLMQG blog.

Gather your fabrics & lets get started!

Begin by cutting your fabrics.
(12) 2.5″ white squares
(8) 2.5″ orange squares
(4) 4.5″ dark blue squares
(1) 4.5″ white square
(4) 4.5″ x 2.5″ green rectangles
(4) 4.5″ x 2.5″ light blue rectangles

On the wrong side of your fabric, use a pencil to mark a diagonal line through your (12) 2.5″ white & (8) 2.5″ orange squares.

Making your corner squares:
Place one of the white squares and one of the orange squares in opposite corners of the dark blue square. Sew directly on the diagonal line.

Use your ruler to trim 1/4 inch away from your seam.

Press your block and repeat with the other two corners. This time using (2) 2.5″ white squares. Press. Make 4 of these units.

Making your center square:
Using the same method as you did to make the corner squares, place a 2.5″ orange square in opposite corners of the 4.5″ white square. Sew on the diagonal line. Trim 1/4″ away from your seam and press.


Repeat with the other two corners using (2) 2.5″ orange squares. Press.

Making the middle rectangles:
Sew the green rectangle to the light blue rectangle along the long side. Press these seams open. Make 4.

Finishing the block:
Lay out the block according to the photo. Begin by sewing the blocks into 3 rows.

**A helpful hint** while you’re sewing your blocks into rows.
To keep your corner square (Diamond) points aligned with the seam of the middle rectangles…

Place your corner unit and middle rectangle unit right sides together. Insert a straight pin into the intersecting point of the corner unit.

Making sure that the end of the straight pin goes directly into the seam from the other side.

Pin. This will prevent your blocks from shifting while sewing and keep the seam aligned with the Diamond point.

Using a 1/4″ seam allowance, sew over the intersecting point. Remember to go slowly if you’re like me and love to sew over your pins:)

After all of that careful pinning, you will be rewarded with beautiful points!

Sew the rows together.

You’ve completed your Rolling Diamonds Quilt Block! This is our block for Crystal Lake Modern Quilt Guild.

And this fabulous version is going into our BOM.

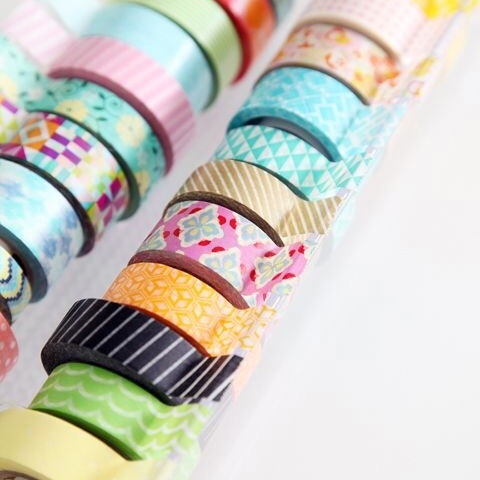
What the heck is Washi Tape you ask? Washi tape is basically a type of decorative masking tape from Japan made from rice paper that can be applied to all sorts of surfaces and repositioned.

What should I do with Washi Tape? It’s all the crafty craze on Pinterest. I even have an entire board dedicated to the idea. Any surface is pretty much up for grabs! Decorate any glass or wood, light switches, vases etc. And since it can be repositioned, it doesn’t leave residue behind. We’ve even put different tapes on wine glasses at parties so we can keep up with whose is whose.
Get the kids involved too. They love this stuff! Let them decorate a journal or wrap it around their school pencils.

Where can I buy Washi Tape?
We’ve found it on Etsy, Target, Michaels and specialty scrapbooking stores. The last tape I bought was from Target and the price was about $2.99/roll. Michaels was 3.99/roll but we’ve been using our 40% off coupon to reduce the price. The variety in the stores is growing each time I look.

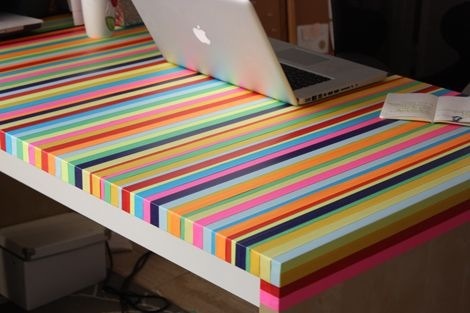
I do find Washi to be a bit expensive depending on the project. I can’t even imagine someone actually decorating a table or a wall with it. Aside from the cost can you imagine the time it took to do this? It’s awfully cute though, right?

Organize your Washi!
To keep your tape organized and handy, you can make your own dispenser made from a Saran Wrap box and tension rods. Find this clever tutorial at iHeart Organizing.

This set was purchased at Costco during Christmas and comes with it’s own dispenser!

And some of the tapes will fit your traditional desktop tape dispenser.

What have we made with Washi Tape you ask?
We’ve spruced up dollar store tea lights for the home and decorated some for Valentines Day.

Clear votive candles. These were so pretty while they candle was burning.

And even added some style to our Apple chargers!

Check out my Pinterest board for more creative uses for Washi Tape.

So tell us..What would you Washi?

Enter your email address to follow this blog and receive notifications of new posts by email.

Email Address:

MineCraft Tutorial

Crayon Embroidery Tutorial

Machine Binding Tutorial

Blog Archive