

Free Motion Monday – Part 3: Doodle Sandwiches
Well, how is the doodling practice going? Easy? Difficult? Lorrie is doing a wonderful job – thanks for sharing your doodles! It’s fun to watch your progress.
Hopefully you all were able to squeeze in some practice over the holiday if not plan to dedicate at least a couple times a week going forward! Doodling consistently will help train the muscles in your hands/arms to work together with your brain to draw straighter lines and smoother curves and to fill up a space without having to think too hard.
This week we will prepare some Doodle Sandwiches. These should go fairly quickly but there is some practicing involved. You will need the following materials:
2 yds muslin or solid color fabric
1 yd cotton batting (medium loft)
Contrasting Thread – choose a cotton 40wt or 50wt
Walking Foot
Darning / Free Motion Foot
Safety Pins (or whatever basting technique you prefer)
Rotary cutting knife/ cutting board/ ruler
Scissors
1) Start with your workspace – remove all clutter around your machine, set up plenty of lighting, adjust your chair so your arms are at a 90 degree angle to your machine’s work surface.
2) Prepare your sandwiches by layering the fabric and batting and cutting into 6 @14″x18″. Baste by pinning every 6-8″ or whatever basting technique you prefer. Set aside 2 sandwiches for future practice.
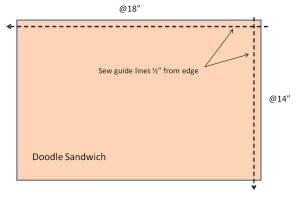
3) Attach the walking foot. On each sandwich sew across one short side and one long side about 1/2″ from the edge to provide guidelines and to further secure the sandwich. See drawing below.
4) Remove the walking foot and place on the darning foot. Be sure to drop the feed dogs otherwise the fabric will not move around freely.
5) Now for the fun part – free motion parallel straight lines! This is a good technique to practice stitch length. During free motion quilting each stitch will not be exactly the same length but the goal is to have an overall consistent look. The way to achieve this is to find the balance between the speed of your hand movement and the speed of the needle. The stitch length you are striving for should resemble the stitch length on the guidelines you initially sewed to secure the sandwich.
Remember the following:
*Stitches too long – increase the speed of the needle or decrease the speed of your hand movement
*Stitches too short – decrease the speed of the needle or increase the speed of your hand movement
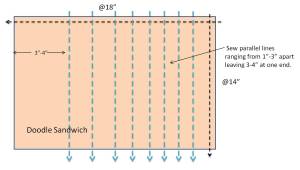
6) Start sewing parallel lines approximately 1″-3″ apart using the initial guide line sewn as a guide to help keep lines as straight as possible. See drawing below.
*You may have the tendency to push or pull the fabric faster than the needle can complete its cycle and end up breaking a needle so take your time.
*You can stitch up and down or left to right better yet try both ways to see if one way feels easier.
7) Complete 4 sandwiches. Next week we’ll work on filling in the spaces!


2 comments
Comments feed for this article
November 30, 2010 at 9:31 am
Gail Lewis
Hi Paige, I have never done this before and it is something that I really wanted to learn. I’m working on my first sandwich and it is going much better than I thought it would.Today I was able to explain to my DH what all of my doodling is about.
December 2, 2010 at 8:56 pm
Paige
Hi Gail, I’m so glad these steps are going well for you please send us some pictures we’d love to see your progress. Monday we will fill in the lines with more practice! Keep doodling!