

Hexies How To
The Wonky Wildflowers sample has been on my list of to-do’s so yesterday I got myself in the mood to make it happen.
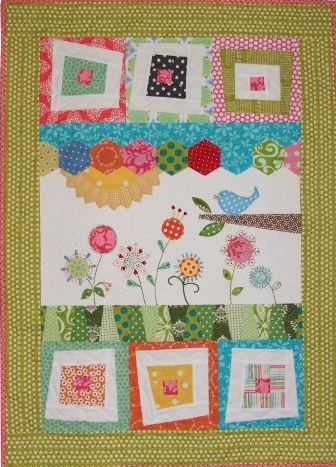
I dragged out my 2 tubs of scraps, convinced I could make this entire quilt from what I already had. Scraps need homes too!

First up was to make the hexagon strip that separates the sun from the sky. Now, I’ve done many, many hexies so, I thought I’d give you a little how-to.There are lots of different ways to do these. Some with glue sticks, some with plastic templates and so on, but I’m going to just give you the way I prefer best after trying some of the other methods over the years.
1.) Trace the template provided on a sheet of regular copier paper.

Mine called for a 1-1/4″ hexie. The way to measure a hexagon is from point to point along one side as shown.

2.) After you’ve cut the paper templates out, gather your fabrics and cut at least a 1/4″ around on all sides of the template for easy turning. Use a small pin to secure the paper to the fabric.

3.) Either finger press or if it makes you feel more comfortable until you get the hang of it, iron down all the sides. Once you’ve mastered the hexies you’ll no longer need to iron.

4.) Thread your needle and make a small knot. Starting on one of the points work your way in and out around the hexagon and through the paper.

5.) It’s as easy as that! Hexagons are a great project to pre-cut, stash in a small bag and take with you while your waiting for the kids or to take on a trip!

6.) To attach the hexagons, layer right sides together and whip stitch, grabbing just enough fabric to keep them together, but not going through the paper this time.

Tiny whip stitches make all the difference to make sure your stitching is barely visible from the front. Practice, practice:)
7.) Once your hexagons are attached to one another, clip the threads and release the paper. Iron back into shape.

And here’s the progress I’ve made so far. Hopefully this weekend I’ll have the embroidery done and on my way to another finish!

Have a great weekend everyone!


13 comments
Comments feed for this article
February 17, 2012 at 5:19 am
Lesley
Your project is so very beautiful. It makes me smile! Your tutorial is also very well done!
February 17, 2012 at 7:06 am
Shelley
Yep, I knew it – yours will be sooooo cute! And after I’d convinced myself that I didn’t need one more thing in progress. Darn you! That sun is fabulous – tiny dresden blades? And the circles – fused or turned under?
February 17, 2012 at 7:40 am
Lorrie
I love making tiny dresdens! The circles are fused. I didn’t want to spend too much time on handwork, especially since I want to make them all!
February 17, 2012 at 7:19 am
Jeanne
Oh Gee I LOVE THIS!!!! I’m going to have to get out the pattern. Are you selling this in your shop?
February 17, 2012 at 7:42 am
Lorrie
Hi Jeanne. The pattern is available in the shop. Here’s the link
February 17, 2012 at 9:08 am
deloreswall
Hi Lorrie,
What a cute quilt! I love it. I also really like the plastic container with your already cute out squares. What a great idea.
February 17, 2012 at 7:20 pm
Dee
I so enjoy quiltst that aren’t your “everyday-run of the mill” quilts and this is one of those! How happy, fresh and original! Sew glad you decided to bring it out of the “to do” pile!
February 19, 2012 at 1:01 am
Kathy P
This is SOOOO cute. I love it!
March 7, 2012 at 6:13 am
Jo
such a gorgeous quilt!
July 18, 2013 at 8:13 pm
Julie
Thank you for this tutorial. I can’t wait to try this! I want to sew a hexie patterned border on kitchen towels.
July 18, 2013 at 9:44 pm
Lorrie
Watch out Julie! It’s addicting:) lol
May 8, 2015 at 7:27 am
Conniecrafter
I have always wanted to make a hexagon quilt, thanks for sharing!
May 8, 2015 at 8:52 am
Lorrie
You’re very welcome Connie!