
You are currently browsing the tag archive for the ‘hexagon tutorial’ tag.

Tag Archive
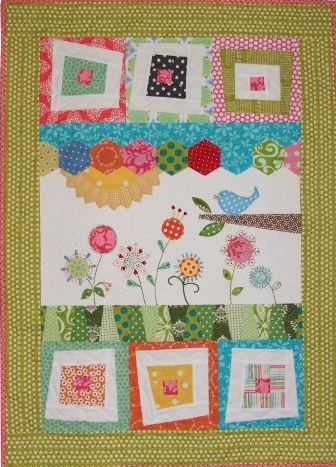
The great things about hexagons are that they only require scraps and you can work on them anywhere…at the orthodontist visit, after school pick up, or road trips! The Molecular Hexies quilt block is the final block for the CLMQG BOM. I hope to complete my remaining 4 blocks (8,9,10,&11) next week so that I can begin putting the quilt together soon! This is a 12.5 inch(12″ finished) hexagon block based on the craftsy.com BOM and tutorial by echinopsaster.blogspot.com.  Supplies: 12.5″ background fabric Scraps of fabric for hexies Paper template Scissors Needle & thread *read all directions before starting your project… For the original CLMQG block, I used a 1-1/4″ hexie template and arranged them in rows of 5 & 4. If you’re working on the CLMQG BOM, but are unable to do handwork, I’ve provided the link to Jacquie Gering’s blog tutorial on Sewing Hexagons By Machine Without Marking for an alternative to English Paper Piecing. For the block variation, I used a variety of the hexagon templates to create a Molecular Hexie block and laid them out in a fun pattern. You get to choose which design you’d like to add to your quilt. Be creative! Print your templates and cut out the hexagons. Template downloads 3/4″ Hexie 1″ Hexie 1-1/4″ Hexie 1-1/2″ Hexie 2″ Hexie After you’ve cut the paper templates out, gather your fabrics and cut your scrap at least a 1/4″ around on all sides of the template for easy turning. Use a small pin to secure the paper to the fabric.
  Either finger press, or if it makes you feel more comfortable until you get the hang of it, iron down all the sides. Once you’ve mastered the hexies you’ll no longer need to iron.
  Thread your needle and make a small knot. Use any thread to baste your hexagons. I like to use up some of my older, less expensive spools here. Starting on one of the points, work your way in and out around the hexagon and through the paper.
  To attach the hexagons, layer right sides together and whip stitch, grabbing just enough fabric to keep them together, but not going through the paper this time. For this step I use a coordinating YLI silk thread which can be found at your LQS. It glides right though the fabrics without knotting, is strong, & buries your stitches making them barely noticeable! I use YLI silks for all of my hexies and appliqué projects.
  Tiny whip stitches make all the difference to make sure your stitching is barely visible from the front. Practice, practice:) Once your hexagons are attached to one another, clip the basting threads and release the paper. Starch and press back into shape. But don’t toss those papers out yet! You can reuse them for other hexie projects.
  Decide on the hexie placement of your block and pin into place on the background fabric.
  Appliqué your hexies with a top stitch close to the edge onto your background fabric.
  My Molecular Hexie was made using a variety of Kaffe and other modern prints and machine appliquéd onto a hand-dyed background fabric. I enjoyed this block and I hope you do too!
 Now wasn’t that easy? The hardest part was just deciding which Hexie block to make!
The Wonky Wildflowers sample has been on my list of to-do’s so yesterday I got myself in the mood to make it happen.
I dragged out my 2 tubs of scraps, convinced I could make this entire quilt from what I already had. Scraps need homes too!

First up was to make the hexagon strip that separates the sun from the sky. Now, I’ve done many, many hexies so, I thought I’d give you a little how-to.There are lots of different ways to do these. Some with glue sticks, some with plastic templates and so on, but I’m going to just give you the way I prefer best after trying some of the other methods over the years.
1.) Trace the template provided on a sheet of regular copier paper.

Mine called for a 1-1/4″ hexie. The way to measure a hexagon is from point to point along one side as shown.

2.) After you’ve cut the paper templates out, gather your fabrics and cut at least a 1/4″ around on all sides of the template for easy turning. Use a small pin to secure the paper to the fabric.

3.) Either finger press or if it makes you feel more comfortable until you get the hang of it, iron down all the sides. Once you’ve mastered the hexies you’ll no longer need to iron.

4.) Thread your needle and make a small knot. Starting on one of the points work your way in and out around the hexagon and through the paper.

5.) It’s as easy as that! Hexagons are a great project to pre-cut, stash in a small bag and take with you while your waiting for the kids or to take on a trip!

6.) To attach the hexagons, layer right sides together and whip stitch, grabbing just enough fabric to keep them together, but not going through the paper this time.

Tiny whip stitches make all the difference to make sure your stitching is barely visible from the front. Practice, practice:)
7.) Once your hexagons are attached to one another, clip the threads and release the paper. Iron back into shape.

And here’s the progress I’ve made so far. Hopefully this weekend I’ll have the embroidery done and on my way to another finish!

Have a great weekend everyone!


