
You are currently browsing the tag archive for the ‘scraps’ tag.

Tag Archive
Do you have a tea lover on your Christmas list?
I do too and these little tea wallets are perfect for them. The wallets hold up to 4 packaged tea bags.

It only takes (4) 5″x 7″ pieces, 5″ x 7″ fusible interfacing, button and elastic or ribbon. These were really easy to whip up. I actually made all of these last night. It would have gone much faster too if my machine wasn’t being so angry with me! We had a couple of fights last night:)

I made myself one too. Since I’ve given up soda/caffeine, I’ve been drinking a lot of water. That gets old real fast so this seemed like a great idea to take with me when I’m on the go. Especially since there are a lot of teas out there that are decaf.
Here’s the tutorial I used for these if you’re interested.
Toss this in your purse and you might just find yourself asking for a mug of hot water instead of soda the next time your out for lunch!
Can you believe it’s November?!
I’m a bit in denial, although I do Love my holidays. I’m usually ahead of the game by this point. At the beginning of every year I make a Christmas list of all friends and family I’m buying for and add ideas next to their names throughout the year that I think they would like. That way, I’ve at least given some thought to the gift and I’m never rushed to just pick something up. There’s nothing worse than a gift without a little thought behind it, right?
I have started my list but I’m definitively behind on my handmade items. One of my SewMod friends is doing a handmade holiday. It’s so hard for boys and men though! Any suggestions out there? I’d love to hear some ideas.
I’m going to have to kick it into high gear over the coming weeks before Christmas and hopefully by following our blog, we will be able to inspire you as well with some ideas!
Our 1st handmade item is from Stitch Craft Create magazine. I picked this up at Joann’s the other day. I love it! Lots of ideas for stocking stuffers for your favorite quilter and crafty project ideas. I love to craft!
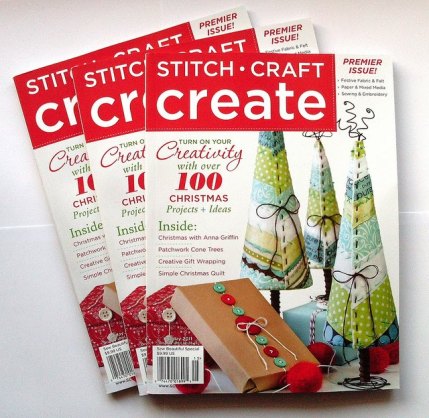
The 1st thing we had to make was those adorable trees on the cover. Paige chose whimsy blue and green Christmas fabrics from the stash and we were off from there onto our 1st Christmas craft. Don’t ya love being able to use scraps for a project?
The directions were easy to follow and I found all the ingredients at Joann’s. The wire is available in the jewelry making section of the store and available in a variety of colors too. The only issue I had making these was the wire is not sturdy enough to balance these trees, so I just left that part out.

The trees are strip pieced, then decoratively stitched at the seams with embroidery floss pinned to the cones and whip stitched up the back. Add a snowman scene as the backdrop and we have our 1st Christmas display:)

And I must say…super cute, right? A little time consuming but most of the work is in the hand stitching, which can be done while watching your favorite holiday movie! Well worth it!
Keep checking back with us. My goal up until Christmas week is to provide a Handmade Holiday craft or sewing project every Friday and sometimes during the week too.
Have a great weekend everyone!
We’ve added some new patterns to our Etsy Shop this week that we’ve tested and think you’ll enjoy! We’ve also placed our first fabric order and hope to have that soon:)
You may remember my demo on the Lil’ Twister table runner I made last November.

Here’s the link if you’d like to review. We got the book Let’s Twist and the Lil’ Twister Pinwheel Tool.


We also have the pattern Flower Welcome from Bloom Creek. This is one of my all time favorite things to make! It sews up fast and is so easy to quilt.

You can use a charm pack or your scraps. I’ve done both. Here’s the scrappy one I made. I added little flower pot buttons to the ends of the flower stems for an extra touch.

And a couple I did using charm packs.

I’ve given them as gifts for Mother’s Day and Birthdays. I even gave one to my quilter one year for Christmas.
Last is the Knotty Baskets Pattern.

This is going to be my project this week. I really want to make one of these, so check back later this week and see what I’ve come up with!
I went from this………
To this……….
I cut all my scraps into usable sizes, 5″ and 2-1/2″ squares. I decided on this because I seem to use these the most and these sizes will still allow me to use these as applique scraps.
I thought a lot about this and knew I would have a considerable amount of waste. But what’s even more wasteful is the fact that I’d collected all these scraps and wouldn’t even open the bin because it was so unorganized and overflowing. It was too overwhelming to go through. At least now I can see what I have.
I bought a container at Joann’s but ideally I want to make a trip to the Container Store for a better one because I think I would prefer to not only have the squares organized by size but also color. If I need a red square for applique, I would know exactly where it is. But this will have to do for now.
Someone told me once to save all of my extra bindings and if I was to ever make a scrap quilt, I could just sew them all together. You wouldn’t believe how many strips of those I had.
And if there is any doubt that a scrap quilt can be amazingly awesome, just check out the one my mom made from her scraps a few years ago.


I decided to tackle the overflowing scrap bin and it has taken me longer than I anticipated. I swear, every time I’d grab a handful of fabric from it, it would get bigger. I guess it was so compacted that i didn’t realize how much was actually in it.
This is what I’m working with….

What a mess, huh? So, I’m going to give myself a couple of more days to work on this. I’m almost there.
I would like to share something I’ve been working on with you. I began working at the LQS and was asked to make a sample for an applique class I might be teaching in April. I came up with a cute little design for a wall hanging. I used “It’s a Hoot” charm pack for this and a linen looking background. I seem to have a thing for turquoise lately.

I’ve never had to do something like this before and I didn’t want to disappoint and I think that’s when things start to go wrong. I didn’t trust my instincts that I’m good at this and was forcing my process.
It’s definitely not my best work and had many “issues”. I’m not a quitter though. I know that my next project will be better and I’ll find my confidence. I’m working on a cute bug quilt for a store sample that I hope to show ya’ll later this week.
I’m very excited to be a part of a team again!
I find that the bad thing about starting a project that lasts quite a while, actually years, is I may have liked it when I began, but now not so much. You take too long and your taste in fabric changes or you’ve past that point where it doesn’t have priority anymore.

I swear this thing is probably 7 years old. My Grandmothers Flower Garden quilt was the perfect thing to do when I was waiting at the orthodontist, waiting for school to let out…waiting, waiting. You know…all those chunks of time where you think…..I could be doing something. Well I was….making about a gazillion little hexagons.
So, what do I do with them now? It occupies 2 drawers that has different projects just dying to take its place. The Flickr group I belong to is hosting a “Git R Done” quilt along and this was the first thing I thought of. I’m committed to freeing this poor project from its lonely home.
I found this pic online that looks like they have set the blocks in a quilt. This would be less daunting than finishing it the way I had started.

I could also use some of them for the sewing boxes in the Etsy store.

Paige found this cute pillowcase idea.

I feel sooo guilty about this project so I have to do something with it.
What do you guys think….suggestions?


