
You are currently browsing Lorrie’s articles.

Author Archive
Riley Blake’s “In The Ocean” is back in stock and I spent the good part of a day making more kits. This is another fun part of my job at SewMod. I think I could make kits all day!

So are you looking for an adorable quilt that is quick and easy to put together? Click on the cute quilt above to begin your project. Kits are currently available!
“In The Ocean” is Riley Blake’s underwater adventure featuring all things Beachy!..schools of fishes, octopus, starfish, seahorses, bubbles and more!
The center fabric is a panel, which takes all the time out of the piecework required for a fast, adorable handmade baby quilt.

The border fabric features all the little sea friends and the backing is your choice of fun multi color bubbles, blue ocean waves or orange fish. When you visit the Etsy shop, you get to choose to make it your own.

This quilt is perfect for a new baby, the nursery, as a wall hanging or a blankie for the carrier.
Quilt is a perfect for the beginner & measures 40″ x 40″ .
Everything is included with your quilt including, backing, binding, quilt front and a free pattern!
The only thing needed is the batting.
“In The Ocean” has complete step by step instructions to ensure you have a great time creating a one of a kind baby heirloom that’s handmade by you.
Please convo me if you have any questions.
And don’t forget to pick your favorite backing during checkout!
If you love this fabric but want to make your own designs with it, we also have it available in yardage and half yards. Visit the SewModDesigns Etsy shop and I’ll be happy to help you!


Retro, vintage, or fashionably nostalgic, Riley Blake has brought the Chic to Geek with old school records, cassettes, and TV’s.

I thought we’d revisit these shop favorites at SewMod and add a few of their newest novelties to the mix. Cat eye sunglasses and 50’s style dresses have me swooning.

I have this romanticized vision of what it would be like to buy Pyrex for my robin’s egg blue kitchen, do all my household chores in a dress and heels, and bake cakes all day.
I’m almost certain I was born in the wrong decade. I’m over 40 years late for a 50’s date! But that’s ok, a girl can still dream. I can collect my vintage Pyrex, bake cakes, and vacuum, although, it’s not as fun while I’m in my yoga pants:)

If you’re having a tough time visualizing what modern projects can be made with the retro prints, let’s see if I can help.
How about picking two and making some Gum Drop Pillows for someone heading to college? They’d be cute in a dorm room!

Maybe a few fabric baskets? Here is a free tutorial from Birch Fabrics.

Or a cute apron, like the one from the Etsy shop Boojiboo will have you baking sweet treats for your love in no time!

Visit SewModDesigns for more patterns, project ideas and all of the retro Riley Blake fabrics!
New patterns have arrived and are in the SewModDesigns Etsy shop.

1.Lunch Boxes by LakeHouse Dry Goods 2.Icicle Days by Bunny Hill Designs 3.Deep Blue Sea by Sarah Jane 4.Effie & Ollie by Heather Bailey 5.Crimson and Clover by Sara Lawson 6. Scrap Happy Purse by Crazy Mom Quilts 7.Social Tote by Carolyn Friedlander

And…I’m restocking Art Gallery’s Oval Elements. Check the shop often for updates and new listings. Art Gallery released 4 new colors coming this June!

Be sure to Like us on FaceBook. I’ve been posting some pics of potential fabric choices. I like to hear your opinions on the fabric I stock in the shop. Or if you have suggestions, I’d love to hear that too.
But until all those newbies arrive, there’s plenty of patterns and fabrics in the shop…so let’s get sewing!!
I know you love the the round Tuffet but did you know there’s also a square one! Yes, it’s true. It’s hip to be square!

Reqiring basically the same supplies and techniques. Except, of course, it needs a square board! Pattern comes with 5 pages of detailed instructions and full size templates.
Click on the pattern pic above to order your tuffet today!

Google images
SewMod is on Spring Break. I’m headed to sunny weather, blue skies and looking forward to wearing flip flops for a bit:) Hopefully I’ll have a tan and a few quilt shop visits to share with you after I return. If you’ve made a purchase from the blog or the Etsy shop, I will be shipping your packages ASAP on Monday morning, March 30th, 2015.
Here’s to some relaxin’ & chillaxin’! Now, I’m off to find the best margarita in town y’all…cheers!
Thanks so much for stopping by & for your patience. Have a Happy Spring!
Lorrie:)
At the March guild meeting we announced a new swap . A swap like no other swap. It’s all or nothing ya’ll. It’s risky, I know…and typically, I’m not lucky.
I’m participating in the CLMQG block lottery.
- The block lottery has rules and rules must be followed!
- The block must be a 12-1/2″ unfinished.
- It needs to be a star. Not just any star.
- A polka dot star with a low volume background.
Any polka dot. Any low volume.
If I make 2 star blocks, I get two chances to win. If I make three blocks, I get three chances. And I bet, even if I made 10, I still probably wouldn’t win…like I said…not lucky. But I’m doing it anyway, because it’s fun!

My first block pattern was a freebie from Craftsy and I had enough different Kaffe dots to make it scrappy. Scrappy dots. One low volume print.

My second block was a really good tutorial from LaineyBugDesigns. This time I used a variety of orange dots for the star and mixed up all of my fun, low volume prints. I fussy cut the little “good works” birdie. Cute, huh? Orange dots. Scrappy low volume.

If you’re a member and need some quilty star inspiration to join in on the fun, check out my Pinterest board! I’ve collected a few for the girlies in the group.
I’m going to take my chances…are you?
The March guild meeting was all a Buzz with excitement! Our first UFO prize was this awesome fat quarter stack of chevrons sponsored by Riley Blake. I would’ve died to win this and it looked so cute on my fabric shelf but sadly I had to part with it. It went to a good home and not to worry…there’s plenty more goodies to be had at our next UFO drawing this June. If you’re putting off finishing up one of those forgotten projects, you have three months to get your rear in gear…get it done!

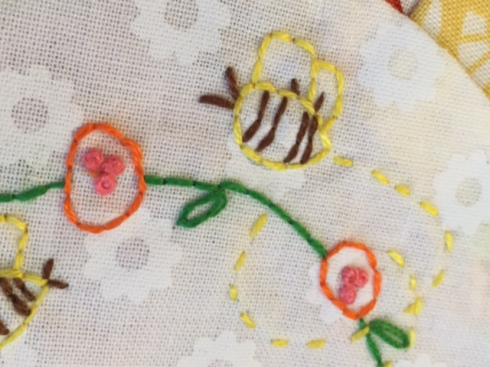
Are you ready to Bee wowed by the cuteness factor of our March door prize? I used an orphaned dresden block, Ring a Ring a Roses Candlemat dresden, from one of my demos and whipped up this little bit-o-honey.

I’m kinda obsessed with small projects lately.

Just a few matching fabric scraps, trim and some embroidery.

TBT..I didn’t wanna part with this either:) But that’s what it’s all about right? Whether I’m making projects, participating in swaps or giveaways, I always strive for my best work. After all, it’s a reflection of myself in each project. My goal is to make something I don’t want to give away. Because if I love it, so will someone else!
Bee your best. Bee-lieve in yourself. Bee Creative!

Disclaimer: feelin’ sassy
Project: CLMQG March swap using decorative sewing stitches.
I struggle with this name..mug rug. Why does my mug need a rug and why for heavens sake would I spend all day making something this adorable to potentially spill coffee on it!?!
It’s not something your beverage should have the pleasure of resting its little ass on top of.
The idea of your buttery bits of morning toast falling all over this cuteness makes me shudder.
I even thought about adding washing instructions to the back, with just a simple “don’t”…because why would it ever get dirty!
Let’s call it “My Sweet Ride”.

Lorrie’s
Let’s call it quilt art.

Lorrie’s backing
Let’s call it a personality project because I see us in each one of them.

Paige’s
Let’s call it a mini reflection of our style…all in a teeny size of approximately 7″x 9″.

Wendy’s
But don’t call it a mug rug!
I have to say I’m pretty excited for our upcoming March Guild meeting! March will be our first quarterly drawing for our UFO prizes. Now while I cannot, and will not, tell you what the prize will be until after our meeting, I am certain our members will be pleased! Our sponsors for the guild this year have been extremely generous and we are so thankful for their gracious donations.
Not only is the Guild hosting a UFO Challenge, we have lots of other ideas, projects & guest speakers planned this year!
Keeping the Guild running smoothly is a team effort. Not just by the executive board, but also the members. So one of the fun things we do monthly is thank our members for all the wonderful things they do by passing out tickets.
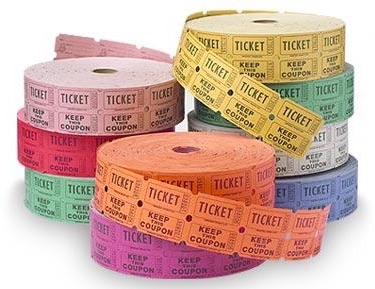
For example, volunteering for a demo, bringing a friend or a treat, helping to clean up, and wearing a name tag will earn you tickets! Each ticket increases one Lucky member the chance to win a door prize.
The door prizes are typically handmade items from either myself or Shelley. January’s prize was a Henrietta Turtle kit with a handmade crochet flower.

February was the coffee cozy..

And March?… It’ll have to bee a secret for now! But I’ll be showing all the fun door prizes for the year so stay tuned each month.
We have a guest speaker in March. Lynn from A Different Box Of Crayons is coming! Lynn continues to inspire us with her use of mixed media into her designs. She incorporates alternative fabrics into her work such as silk, wool, embroidery, and decors. Her newest BOM is Cathedral Doves. Is that a beauty, or what?

She recently moved her studio to 121 West Wesley in Wheaton, IL . If you happen to be down there, check it out. I’m going to make a special trip to Wheaton just to see it. How can you resist!? The studio has regular, but not typical hours. Thursday & Friday 10 – 4, & ODD NUMBERED Saturdays are 10 – 2 during the winter. Head over to her FB page, give her a ‘like’ to check for studio updates and see what she’s up too.

March is also our first swap for the year…the Mug Rug Swap. We’ve posted a couple of sneak peaks on the guild FB page. If you’re already a guild member, I hope you’re planning on participating. The ones I’ve seen so far that are finished, are swaptastic! Lol, yes, I said that.

Remember, that if you’re in the ChicagoLand area and would like to join us for a meeting and give it a test run, we’d love to meet you! We are a welcoming, friendly group and we encourage you to come have some fun too. The CLMQG typically meets the 2nd Sunday of every month at the Crystal Lake Mortgage Center on Rt. 14 but check the CLMQG blog before attending for any updates. Guests fees are $5. I hope we see you there!
Who knows? Maybe you’ll get Lucky!

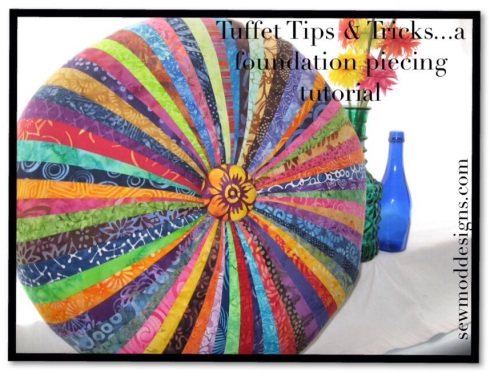
I get pretty dang excited when I sell a Tuffet pattern. Especially when I sell several of them to the same part of the country. Which means most likely, that a quilt shop is having a class. Somebody’s having a Tuffet Party!
I get all kinds of questions about the innards and the how-to on assembling the Tuffet, where to buy supplies, what fabrics to use, etc. So today, I’m gonna kill two birds with one stone. I’m going to finish up my UFO Tuffet and answer some of my customers pressing questions.
Because let’s face it, this list of supplies might seem a little daunting. But don’t fret, everything can be easily found at your LQS, craft or hardware store. The only thing you might have trouble finding, is your handyman.
I put a supply chart together showing the Supply, The Use, Where To Buy, Cost, & any Comments I have that might help. **This is for guidance purposes only** You can buy whatever you want from whomever you’d like. I’m only stating what I purchased and from where to try to help anyone making the Tuffets. If you’re taking a class at your LQS, there will likely be a Tuffet kit available for purchase. I highly recommend buying the kit. Unfortunately, for our party, we weren’t that lucky and we had to figure it out on our own. I hope this helps and you enjoy making your Tuffets as much as we did!
So let’s get this party started, shall we?
First you need The Tuffet pattern by Myra Mitchell. The foundation piecing demo and tips provided does not, in any way, replace the fact that you still need the pattern! I’ve only provided you with TIPS for building your Tuffet, not instructions on assembly. You don’t want to invest all your time and $$ in this project, only to realize that your missing key steps and correct templates. Even I still refer to my pattern for each Tuffet I assemble!
UPDATE: 01/04/18 SewMod is sold out of the Tuffet patterns. Please visit Etsy.com to purchase a tuffet pattern from a sewing or quilt store.
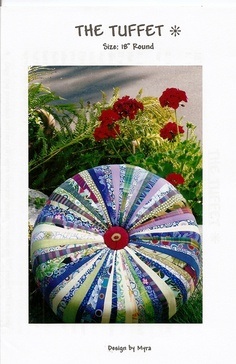
UPDATE 3/8/16: Myra has changed the board dimensions on the most RECENT patterns from a 18″ round plywood to a 17″ round plywood. All other supplies remain the same including the 18″ foam pieces. PLEASE NOTE this when printing off the PDF below.
SUPPLIES:Click on the table below to enlarge OR download the PDF as a reference HERE
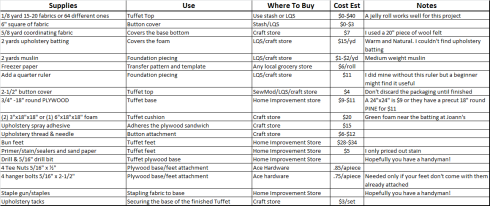
**Remember that if you’re buying items from your local big box fabric & craft store, to use your coupons to significantly reduce the prices on select items.
**Items such as needles, adhesive spray, stain, & freezer paper can be shared if you’re making Tuffets with your friends!
FOUNDATION PIECING:The method of stitching your fabric pieces directly onto a foundation fabric such as muslin.
Foundation piecing onto the muslin will provide support and stability to this project and keep the fabrics from stretching when you begin to attach them to the base. Muslin will not pull apart.
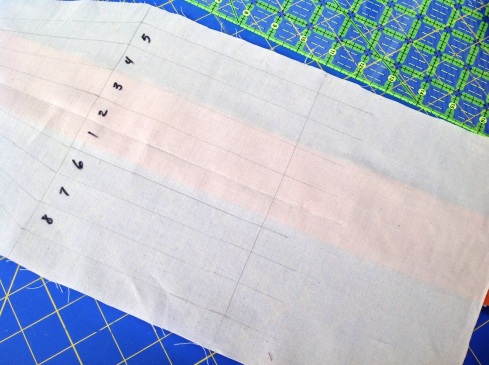
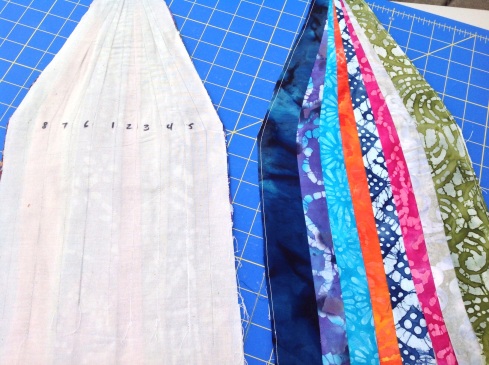
Once you’ve traced your foundation template onto freezer paper and cut the muslin fabric pieces, trace the stitching lines. You can see from the pic that if you use a Sharpie to trace the stitching lines onto the freezer paper, you will be able to easily see through the muslin for tracing. I used a ruler and a Pigma pen to trace my lines onto the muslin. Make sure to trace the numbers from the pattern onto the muslin.
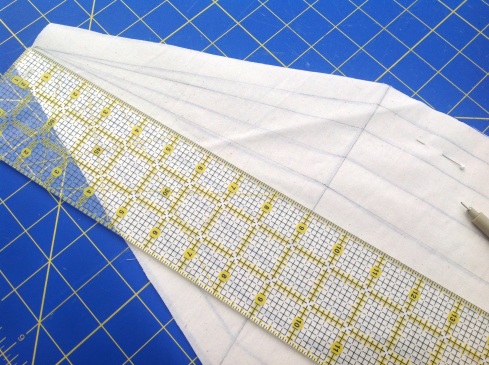
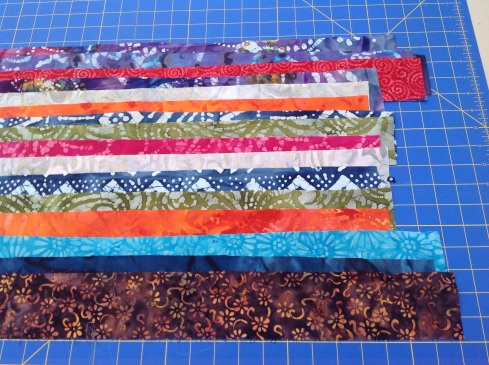
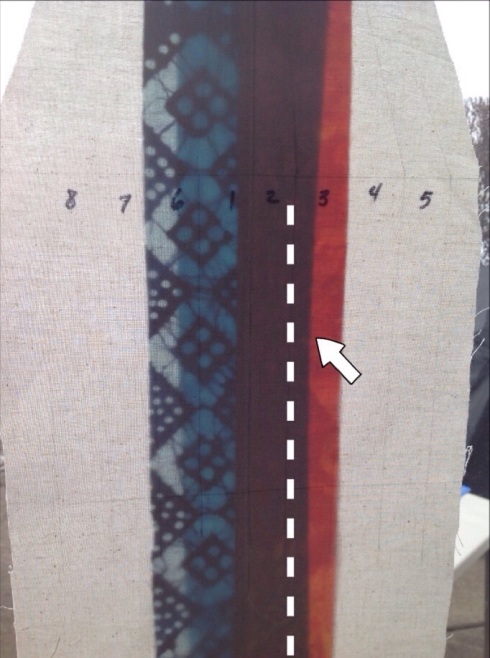
I used my leftover Batik scraps from various projects to make this Tuffet. I like using scrap pieces that are at least 2-1/2″W x 22″L . It makes my foundation piecing a lot easier!
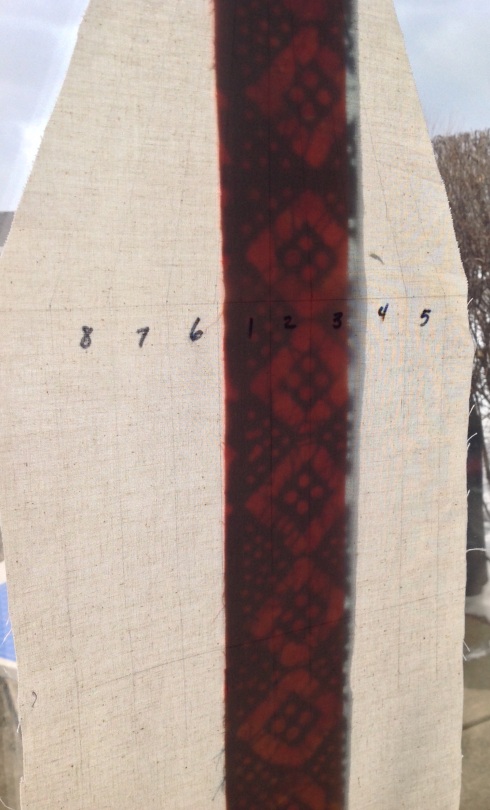
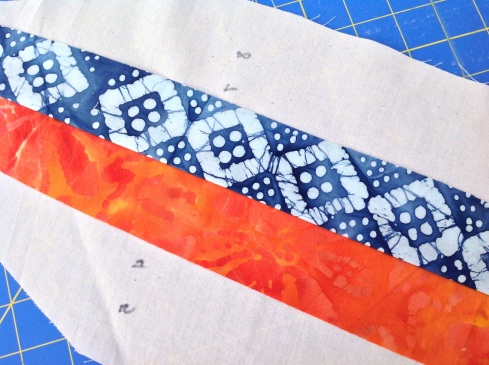
Take your first two strips and layer them right sides together. These will be #1 & #2. Now take your muslin piece and with the drawn lines facing you, hold it up to a light source. I used my patio door as my light source for these pics. Place the layered strips behind the muslin. Make sure that these two pieces cover the stitch lines for #1 & #2. Pin in place to secure.
Shorten the stitch length on your machine. I set mine at a 1.8. Starting at the widest end of the strip, sew towards the narrow end through all of the fabrics. When you foundation piece, your fabrics are on the back of the muslin foundation and you stitch on the drawn foundation lines. Remember to back stitch.
Flip the muslin over and press the two strips open. You can see that they both completely cover #1 & #2.
Now the tricky part is trimming your seam. **I mentioned earlier in my Supply Chart notes that I did not use the Add-A-Quarter ruler so you won’t see me demonstrating cutting my seam with it. Instead I used my large cutting ruler. To trim the seam, fold all of the fabric, including the muslin, to the left, exposing only the raw edges the two fabrics you just stitched. Take your ruler and trim to a 1/4″ from the stitch line.
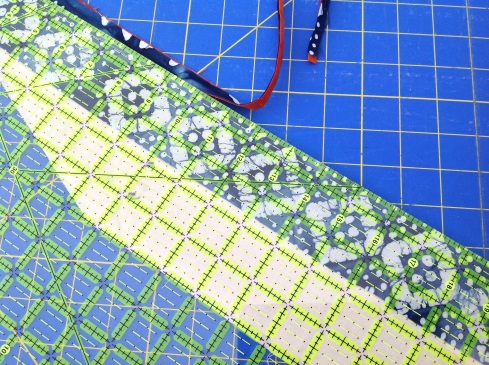
Press open again and head back over to your patio door!
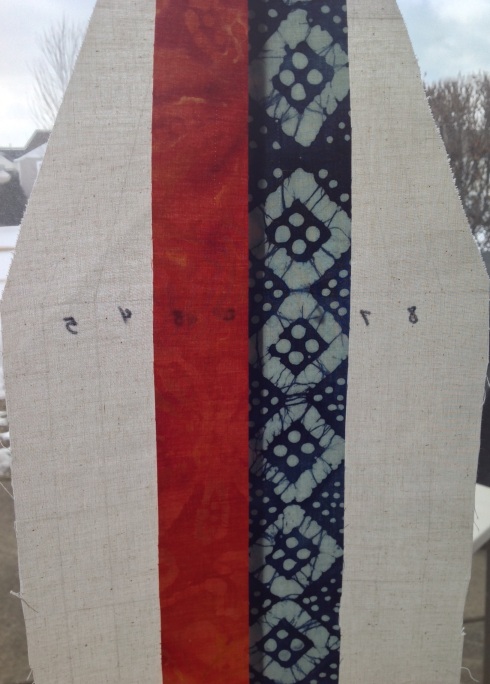
Position the #3 fabric behind first two sewn strips. Notice that in the pic below that the #3 fabric is at least a 1/4″ beyond the #2 line that I will be stitching on. Pin in place and sew on the #2 line. Once again, starting from the bottom up towards the narrow end and back stitching. Trim seam. Press well!!
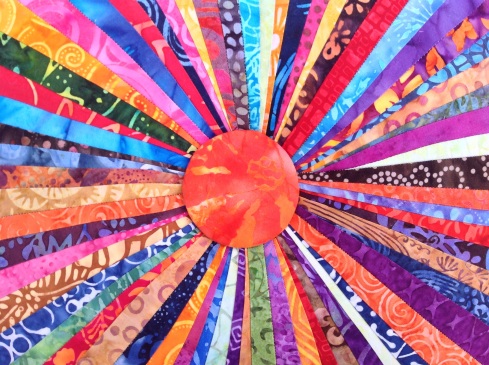
Repeat this process until all 8 strips are added. The last stitch line on each side of the muslin foundation are the stitch lines for piecing all 8 sections together. You only add 8 strips to each foundation piece.
Trim the block up to the muslin foundation. It’s ok to leave the bottom edge untrimmed. It will help when you are covering the Tuffet and can be trimmed after it’s stapled to the base. Sew 1/8″ around the edges to secure.
Here’s a pic of two completed sections…one from the front and one from the back. Refer to your pattern to complete the assembly of your pieced top.
TUFFET BASE:
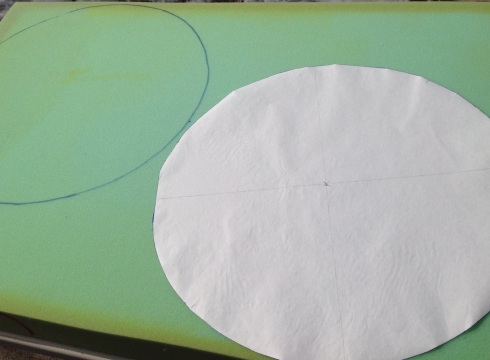
Trace your template onto the foam and cut out 2 round cushions.
To make cutting easier, use an electric knife..you know, the kind Grandma cuts the turkey with? It’s perfect for this job too!…but I never cut meat with mine lol!

It’s ok that they’re not pretty cakes. They will be covered with batting and fabric to smooth out the rough edges.
Before using your spray adhesive, make sure that you are adhering the foam to the Tuffet top. I marked them as shown in the pics below.
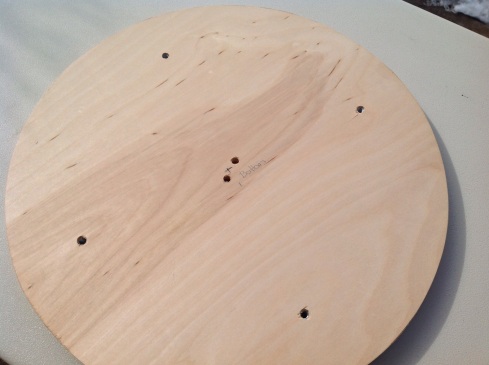
The top of the Tuffet is where you will see the Tee Nuts.
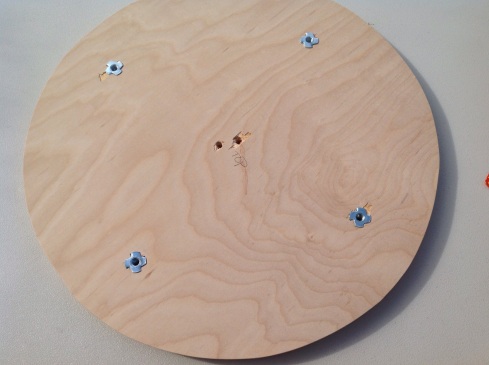
The bottom of the Tuffet is where you will attach the Bun feet after you’re finished. The 2 small holes in the center are for the button attachment.
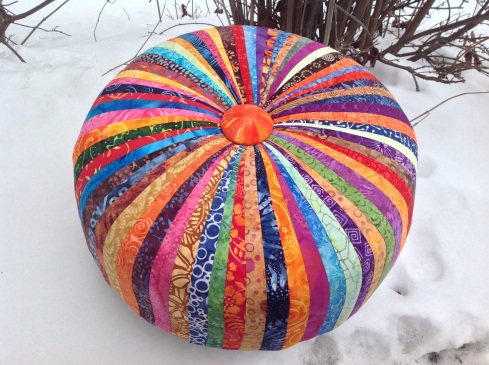
COVERING THE TUFFET: From the lyrics of Rob Base and DJ EZ Rock…🎶🎶”It takes two to make a thing go right“🎶🎶…you need a partner!
As I noted previously, I used leftover Warm & Natural batting because I couldn’t find upholstery batting. Upholstery batting is supposed to be more durable and won’t break down but I figured how bad can it be? It’s not like I’m going to be letting the kids jump on it or anything.
After your batting is on, ease the pieced top over it, keeping it centered. It helps if one of you stretch the pieced Tuffet onto the base while the other staples. Work from one side to the opposite. Pull tightly, add about 4 staples, turn 180 degrees , add a few more staples. Keep stapling until your top is securely attached. Try to staple about 3/4″ away from the edge of your base. If you go any further in, you risk getting too close to the drilled holes where the feet screw in. Keep working at it from opposing sides until you’re finished. Use lots of staples. Your arm will get tired! Check, double check, and even triple check to make sure that you’re keeping the piece centered. The last thing you want to discover after all your hard work is that your Tuffet is tipsy to one side. Trust me, I know..
ATTACHING THE BUTTON:
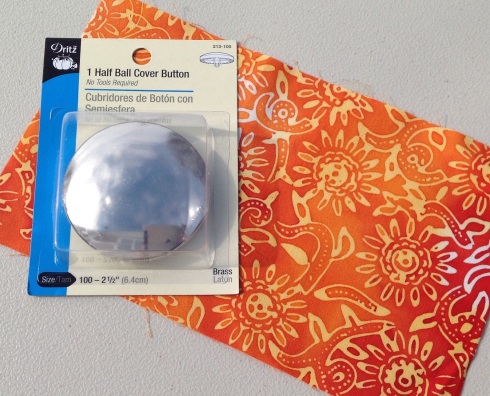
Follow the instructions in your Tuffet pattern to cover and attach your button using the upholstery thread. Pull tightly to secure and staple underneath.
COVERING THE BASE:
Using your 18″ freezer paper template, cut out a piece of coordinating wool felt to cover the wood base for the finishing touch. This step is completely optional but well worth it! Center your felt on the base. I used a bit of the upholstery spray to keep it from shifting too much while I worked. Using a mallet, hammer the tacks around the edge of the felt. Locate the drilled holes for the feet by touch and use small scissors to clip the holes where your Bun feet will be attached. I did this last because your felt may shift/stretch a little while your attaching it. Trim the felt close to the Tuffet edge if necessary.
For a more professional look, it’s best if you buy 2 boxes of the tacks. You’ll only use about 1/2 of the second. I misplaced my second box and as you can see from my photo, my Tuffet could have used a few more tacks. But that’s an easy fix for later, right!
Screw your Bun feet into the base.

And you’re all set!
🎶🎶It takes two to make a thing go right
It takes two to make it outta sight🎶🎶


