I love wool!

But I have a confession to make. I kinda hate working with it.  It’s just not my favorite thing. So I pawn all my projects off on my mom. This is the latest project she made for me. It turned out sooo cute!

And this is where I’m displaying it this Christmas…..thanks mom!

So, I came across this thread that’s made for your machine especially for wool. It’s Aurifil Lana thread. I’m going to give mom a break and work on a wool project by myself.

I’m excited about it and I’ll update everyone on how the new thread works.

Now, for my doodle sandwich….so far so good! Can’t wait to see what Paige has for us next Monday.


Here’s some more ways I use my Christmas quilts…Folded at the end of the guest bed

In the kitchen (because, well, I’m running out of space everywhere else)

draped over the arm of the sofa and laid on the ottoman…

and hanging from the armoire door

Don’t forget to practice your doodle sandwich. I’m showing mine off tomorrow.

Have a creative day everyone!

I make about 2 or 3 Christmas quilts a year. I just know my quilter has to be sick of seeing them. I have 2 waiting to be quilted, one at the quilter, one almost completed, and one that’s in planning. And that doesn’t include the table toppers or other Christmas items I also make. I can’t help it though. I love Christmas fabric! So, I thought I’d share some of my quilts and how I display them through Christmas.

This  is my favorite one and probably sparked my obsession.

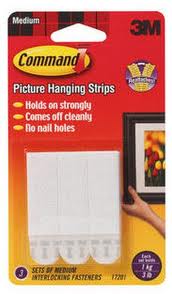
I was recently in a class with a quilter who suggested hanging quilts with the 3M picture hangers. They are amazing…no nails, easily removable, and it hangs perfectly flush with the wall.Which is how I hung this one…


Here’s a table topper I made with Sheri Berry’s Christmas line last year.

More quilts tomorrow…

Well, how is the doodling practice going? Easy? Difficult? Lorrie is doing a wonderful job – thanks for sharing your doodles! It’s fun to watch your progress.

Hopefully you all were able to squeeze in some practice over the holiday if not plan to dedicate at least a couple times a week going forward! Doodling consistently will help train the muscles in your hands/arms to work together with your brain to draw straighter lines and smoother curves and to fill up a space without having to think too hard.

This week we will prepare some Doodle Sandwiches. These should go fairly quickly but there is some practicing involved.  You will need the following materials:

2 yds muslin or solid color fabric
1 yd cotton batting (medium loft)
Contrasting Thread – choose a cotton 40wt or 50wt
Walking Foot
Darning / Free Motion Foot
Safety Pins (or whatever basting technique you prefer)
Rotary cutting knife/ cutting board/ ruler
Scissors

1)   Start with your workspace – remove all clutter around your machine, set up plenty of lighting, adjust your chair so your arms are at a 90 degree angle to your machine’s work surface.

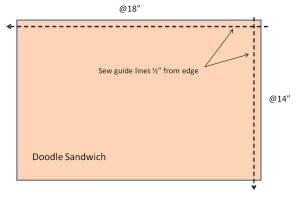
2)   Prepare your sandwiches by layering the fabric and batting and cutting into 6 @14″x18″. Baste by pinning every 6-8″ or whatever basting technique you prefer. Set aside 2 sandwiches for future practice.

3)   Attach the walking foot. On each sandwich sew across one short side and one long side about 1/2″ from the edge to provide guidelines and to further secure the sandwich. See drawing below.
4)    Remove the walking foot and place on the darning foot. Be sure to drop the feed dogs otherwise the fabric will not move around freely.

5)   Now for the fun part – free motion parallel straight lines! This is a good technique to practice stitch length. During free motion quilting each stitch will not be exactly the same length but the goal is to have an overall consistent look. The way to achieve this is to find the balance between the speed of your hand movement and the speed of the needle. The stitch length you are striving for should resemble the stitch length on the guidelines you initially sewed to secure the sandwich.

Remember the following:

*Stitches too long – increase the speed of the needle or decrease the speed of your hand movement

*Stitches too short – decrease the speed of the needle or increase the speed of your hand movement

6)   Start sewing parallel lines approximately 1″-3″ apart using the initial guide line sewn as a guide to help keep lines as straight as possible. See drawing below.
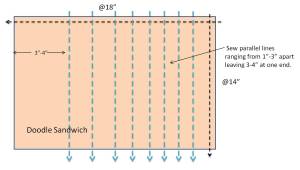
*You may have the tendency to push or pull the fabric faster than the needle can complete its cycle and end up breaking a needle so take your time.

*You can stitch up and down or left to right better yet try both ways to see if one way feels easier.

7)   Complete 4 sandwiches. Next week we’ll work on filling in the spaces!

Paige’s Pick – Those that know me know I love color and contrast even during the holiday season and even more so because of the lack of sun as the winter settles into the midwest. This selection is called  June Bug by Alexander Henry House Designer …ok I know we just had Thanksgiving but can’t we daydream of a nice warm sunny day in June!

*****

Did you know that Moda is carrying the Basic Grey Grunge line as one of their basics now! Love these “solids”. I used some of them in the Figgy Pudding and Fruitcake lines & now I want them all!….hint, hint to anyone needing a Christmas idea for me:)

So, I told you I’d show you my doodle progress…well, I don’t think I did too bad. Practiced every day on it and I did get better. I had a hard time keeping my pen on the paper and I constantly wanted to stop and think about where I was going next. I think my doodles look more like drawings than Paige’s awesome “doodle” but hopefully I’ll progress.  .

And this was my final result….

I had a hard time being creative so I decided to start with something I knew how to draw……the letter “L” from my name…can you see it? And I just kept drawing what inspired me from there.  Thanks Paige for pushing me into thinking outside my comfort zone! I definitely felt like I learned something from this challenge.

Happy Thanksgiving from Lorrie & Paige

I love pouring over all the quilting blogs out there and seeing what everyone is up to. I found a cute idea at abrandiecreation.com. These cute little coasters would be a great hostess gift if you’re going to someone’s house for Thanksgiving, so I made some up. And if you’re wondering what it is I have in the bowl, it’s Paula Deen’s french onion soup…It was so, so good!

I also worked on the April bag this weekend, from Sew, Mama, Sew. Paige and I are testing a couple of patterns out for a class we are going to teach during Christmas break for teens.  An “Underground Sewing Club” (Sounds mysterious doesn’t it:)

And….I did my homework…..but I hope Paige doesn’t expect me to show it to you today because its just plain embarrassing. I thought I had an imagination but my doodling design proves me wrong. Maybe I’ll be brave enough by the end of the week after much practice. I’m having a hard time freeing my mind.

Have a great sewing day everyone!

Well, how did the doodling practice go? Easy? Difficult? Hopefully you were able to squeeze in some practice each day if not plan to dedicate at least a couple times a week going forward! Doodling consistently will help train the muscles in your hands/arms to work together with your brain to draw straighter lines and smoother curves and to fill up a space without having to think too hard.

With the Thanksgiving holiday upon us it will be difficult to find time to focus on doodling but try to squeeze in a couple 15 mins sessions if you can. Below is a doodle I did in a meeting at work (shhh…don’t tell my boss) in less than 20 mins on 3×5 inch piece of paper. I started with the small hook shape in the center and kept building off that shape as I moved around the page. You don’t have to be perfect this is just a technique to fill space quickly without having a plan.

So, pull out a black marker pen (no erasing allowed) and a small piece of paper and start drawing circles, spirals, hooks, squares, diamonds, etc. then connect them with lines or curves, fill them in or echo their shapes…before you know it you with have a very unique design!

This can be fun so don’t think just let loose!

Fabric friday’s here again. WOW, I can’t believe another week flew by…next week is Thanksgiving! Here’s what we got for ya this week…..

Paige’s selection – A Stitch in Dye has caught my eye this week her hand-dyed fabrics are rich in color and modern in design. These would look great used in a bag, mug rug, laptop sleeve – it’s endless! Check out the full selection on her etsy site I’ve also added a link to her blog under our favorite blogs list.

*****

This week I chose Michael Miller’s Sanctuary by Patty Young.


My fave is the warm palette. I think it has an edgier feel. I love those espresso browns with pinks. I fell in love with her other line, Mezzanine, and I don’t want to miss this one. Check out her blog if you get a chance. Lots of stuff to see!

Have a great weekend everyone!

It’s almost that time of year, and I’ve been busy making up some Christmas goodies…but not the fattening kind:)

I seem to be a bit obsessed with these two lines from Basic Grey. Both having the same woodsy browns, icy blues, and and fir greens make combining these two collections effortless, which I love.

I’ve made the Plates for Your table, which is a Moda Bake Shop tutorial.
A hostess gift for the neighborhood Christmas party….

A quilt….

A wall hanging from the scraps of the quilt…..

And, last but not least… no, I can’t say that because I still have enough scraps for something else….. I just completed another Pillow Panache class from the LQS.

Hmmm…I wonder what I can do with the rest of those scraps?

Enter your email address to follow this blog and receive notifications of new posts by email.

Email Address:

MineCraft Tutorial

Crayon Embroidery Tutorial

Machine Binding Tutorial

Blog Archive