I have lots of felt scraps. One year when my mother-in-law’s house burned and she lost a lot of her Christmas decorations, I made her an advent calendar out of felt. It was supposed to be a replica of the one she lost.
I made me one too:) So, I have lots left over from this project.

I checked these two books out from the library to help out with that. If you don’t take advantage of your local library, you should! Mine has lots of quilt and craft books. Even if they don’t have the one you’re looking for, most likely they can bring it in from a different library in your area. This way you can see if you like them before buying them.

I made that cute little gingerbread ornament from the Fa La La La Felt book….so easy! This book might be a keeper. It had lots of great ideas.

I also made these cute gift card holders from The Farm Chicks Christmas book.

Using pinking shears, cut the felt 1/2″ wider than the gift card and twice as long plus 1 inch. Fold the bottom end up and the top down. You can hot glue the sides of the bottom to make the bottom pocket, but I just ran a running stitch around it. Cut a slit for the button and attach a pretty, fabric- covered button to the pocket and you have a great way to use some of your stash. Wouldn’t it be pretty with some embroidery on it too?

Hey, do y’all like my new Christmas dress?I’m just joking:) Shelley and I decided to do a little shopping yesterday. We visited the Red Barn Nursery. They turn the whole farmer’s market barn into a cozy Christmas place. They have a fire in the fireplace and even a kitty that was especially fond of Shelley.

Then we headed to the Woodstock town square where we went to Seasons by Peg/Cobblestones. Oh my that was Christmas heaven in there! So many awesome displays and gifts and ornaments. The whole store was Christmas.

That’s where we saw this cool “dress” displayed. And look at these cute elf shoes that I couldn’t resist buying.

They match my quilt perfect, right?

Of course we couldn’t go shopping without visiting at least one quilt store. So off to Material Girls. One of my projects for 2011 is to finish the rest of the New York Beauty quilt. My 1st block is the one that I use for my avatar.My focus is going to be  Kona cottons as the solids, Kaffe polka dots along with Kaffe prints. So, I picked some more of those up today. Here’s what I have so far. I”m thinking that me and Shelley may need to make a trip to Quiltology in Chicago this weekend to do some fabric shopping. They have a great selection of Kaffe.

Woooo-hooo party!

I usually throw this party for the kids but now they’re too “old” and some are away at college this year. It wouldn’t be Christmas without one, so I decided to do it for the SewMod group.

Oh boy, did I have a great time! Candy was everywhere! I just knew Daisy was going to puke that night because she waited patiently for any to fall to the ground and let me tell ya that when I got up the next morning the floor was spotless:)

Here’s the setup

Does it look like I’ve done this before? I’ve given these parties going on about 7 years now. I Love it! 

I hope your Christmas parties are lots of fun too.

Enjoy the season!

We had our SewMod Christmas party at my house this year. Lots of food, wine, and fun…oh and let’s not forget the presents.

We have a very talented group of girls here….We exchanged names and this is what I got from Andrea. Isn’t this fabric a hoot! I can’t wait to make something from this.

Shelley made Vicki this awesome pillow. Doesn’t she look excited…I want this pattern!

This is Pattie’s beautiful table runner from Vicki, and Pattie made Andrea a cute one also.


Paige made Kelly this cool quilted picture.

Paige got a Moda Candy Bar from Kelly and I made Shelley a set of tea towels.


Then we had a gingerbread decorating party!

OMG what fun. I’ll show those pics tomorrow!

And don’t forget to keep practicing your doodle sandwiches. Paige wants to give us a few weeks to get the hang of it before introducing us to our next step.

Colorful Christmas Flannel from Riley Blake

Speaking of flannel…..need a quick gift?

Every year I make about 10 rice bag warmers and keep them by my door for the neighbors and friends. Super quick, super easy and everyone LOVES them, especially here in the frozen Midwest. I gift myself a new one each year and the old one goes in the freezer because they are also great ice packs.  I probably heat mine up at least once a day in the winter.

All you need is flannel, long grain white rice, and the special ingredient is…apple cinnamon tea.It’s a great way to use your flannel scraps. You can make them any size you want…square or rectangle. After you’ve sewn the bag, fill it a little over half way with the rice, I just use my judgment here…there are no rules. Cut open 1 of the tea bags and pour in with the rice. Sew the opening closed and you’re done!

I attach simple instructions for those who’ve never used one….

Apple-Cinnamon Warmer

Heat in microwave 1min & 45 sec.

It will come out of your microwave smelling like apple pie…you’ll love it! Just the thing for a snowy night.

We still have some fine tuning with the header and our logo but we are up and running now. I listed some Christmas flour sack tea towels as our first items.


Aren’t they cute? I had so much fun working on these. And did you notice that I found another way to use my Figgy Pudding and Fruitcake scraps:)

Paige is also working on some things too. She’s going to have some big tote bags available and she loves to make baby items. I can’t wait to see those.

I’m working on this really cool sewing box that doubles as a pincushion. It’s made from an antique Singer sewing drawer. Hopefully I will have some of those available in January.

We also are working on having fabric and sewing supplies.

here’s the link to Etsy

http://www.etsy.com/shop/SewModDesigns?ref=pr_profile

We would love to hear what you guys think!

Every year, the day before Thanksgiving, we buy a 10ft Frasier Fir.  It fills the space in this room to the very top. I spend about 4 hours stringing the lights and about another hour or so decorating it. I love every minute of it….well, maybe not so much the lights because I really just want to get to the fun stuff…the ornaments. There’s just something about pulling out each ornament, remembering where it came from, and finding the perfect spot on the tree. Most all of our ornaments are mementos of something and a lot of them are handmade.  Every year Santa brings Russell a special ornament in his stocking….yes I said Santa! i know he’s 15, but in our house “you have to believe to receive”

I’d like to share some of our ornaments with ya’ll.

Here are some of the cross stitched ornaments on the tree.

This is Daisy’s 1st Christmas ornament. I used Bunny Hill’s pattern “Allie Dogs” and had a dog tag made for its “collar”.


This is one of the many snowflakes that my mom has made for me over the years. it’s crocheted and beaded and they are great fillers for all the spaces on the tree. Definitely my favorites.

Do we have any Christmas Vacation movie lovers out there? Love, Love Love that movie. Squirrrrellll! Remember when Clark says that? Hilarious! So, we hide a little squirrel in our tree too and every year when I put him in there I have to say squirrrellll:)

Another treasure is the Letters to Santa ornament.  Every year Russell would write Santa and before I would mail it off, I copied it and kept the original. All his letters are rolled up in this special little keepsake.

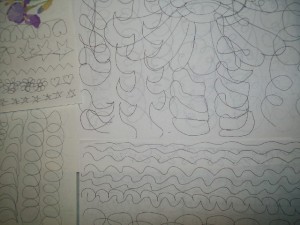
Ok, internet is up and running again! Thanks Lorrie for coming up with a last minute post! So, how did it feel to sew free motion straight lines? Was your stitch length consistent? Did you eventually adjust your hand speed or needle speed without thinking? Did you use your previous line as a guide -did it help keep the next one straight? Lorrie’s lines look great and I’m so glad Gail sent in pictures of her doodling (below). I see feathers – very ambitious – fun aren’t they? You are very close to achieving them too -great job! After we get thru the basics I will post three feather techniques from various designer I teach at the local quilt store, I’m sure you will find one that works best for you.

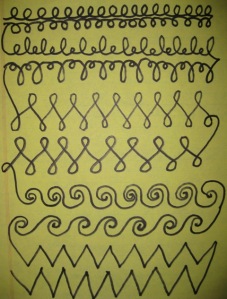
Now that you have 4 sandwiches prepared I bet you are wondering what’s next. Well, let’s start sewing doodles in between the lines. Imagine these lines as the outer boundaries of sashing in your quilt and start doodling the following shapes – practice each shape on two lines.

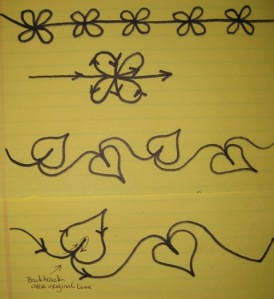
I started sewing left to right then continued down to the next line without stopping and sewed the next line from right to left. You can see in the drawing below I mirrored the loops on the second line to mixed up a bit and to get use to sewing shapes in different directions. Continue with the “L’s” and “e’s” , lace, waves, zigzags, flowers, then leaves on a vine. If you have extra space at the bottom create your own shape and repeat.

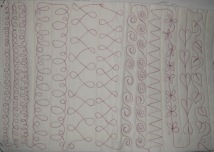
Here is one of my first practice samples…

As you sew each shape watch the stitch length and the overall consistency in the shapes. Depending on what you used to based the sandwich with be sure to watch for pins and remove them as you go. If you are finding it challenging to move your fabric around try using quilting gloves – I fought them for a long time because they made my hands hot but they’ve come a long way over the years and are much lighter in weight and more comfortable to wear. They will help reduce hand fatigue as well.

Use your 4 practice sandwiches and continue practicing throughout the week – if you get bored don’t limit your practice to just the shapes above definitely explore others – flip thru quilting magazines/books or images on the internet to find more examples. Many times I find inspiration from catalogs with metalwork designs.

Here are a few tips:

1) I highly recommend keeping a stash of practice sandwiches by your sewing machine so when you have the urge to doodle everything is ready to go!
2) Make sure you work space is clutter free so your fabric will move freely.
3) Adjust your chair height or sit on pillows to insure your elbows are at a 90 degree angle this will reduce wrist and shoulder fatigue.
4) Set up plenty of light so you don’t strain your eyes.
5) Watch your thread tension during free motion quilting you will find you may have to adjust. Start by adjusting your top thread tension as needed then bobbin thread.
6) Don’t quilt if you are stressed or have other things on your mind you won’t enjoy the process!

Remember, this is practice so don’t be hard on yourself. As you progress thru the steps you will look back at your first few sandwiches and smile at what you have accomplished! Practice Practice Practice!

So, for all of you expecting Paige’s Free Motion Monday, I have some bad news….the internet was down yesterday. I told her I’d fill in for her this morning.

I got my elves quilt back from the quilter and it is sooo cute!

It’s a Halloween pattern called Which Witch by Crazy Old Ladies that can also be made into a Christmas quilt by adding the elves shoes with it. I used Kate Spain’s 12 Days of Christmas line.

My quilter did this cool heat setting embellishment on the tips of the toes and the edges of the dresses by using a tool like this.

It sparkles now and really adds that something extra to the quilt.
Check back tomorrow and hopefully we will have Paige’s post ready for you.

Here is a couple of fabric lines that are hopefully on their way into a quilt shop near you…

Suburbia by Caleb Gray

Don’t ya think the kitchen ones would be great made into potholders!

And  Metro Cafe 2 by Suzanne Ultman. Cute coffee cups and beans!

I thought I would share some pics of Daisy May today also. She thinks she’s human. Here she is sleeping on a pillow under the covers last night.

And I love her in this cute sweater!Have a great weekend everyone!

Enter your email address to follow this blog and receive notifications of new posts by email.

Email Address:

MineCraft Tutorial

Crayon Embroidery Tutorial

Machine Binding Tutorial

Blog Archive