Page 5 of Journal: (for Pages 1-4 click here)
This journal page we will be filling in a defined space like a 1/2 square (or triangle) which is very commonly used in block designs.
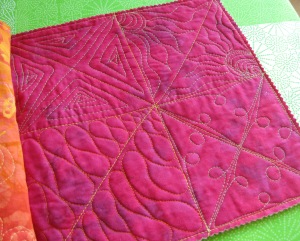
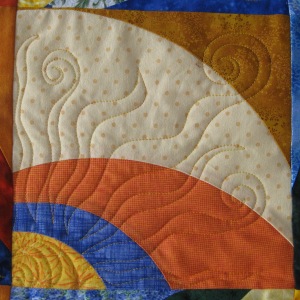
Set up the sandwich with a vertical and horizontal line to create a 4-patch then in Square 1 & 4 add a second line to create an “X” in the square as in my sample below.
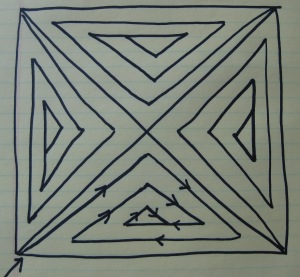
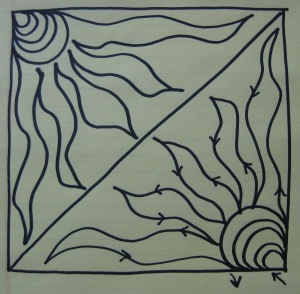
The following images can be printed then placed under a white sheet of paper to practice, I used a heavy black marker so it would show through.
Square 1 – Spiral Lines –Starting with the bottom left corner sew a line somewhat paralleling the seam line to just below the top point of the triangle then down paralleling the right seam line but not all the way into the corner and move back left continuing to spiral into the center finishing with a small triangle. The goal here is to create equal spacing as you spiral inward so you end up with the small triangle fairly centered. Use your seam lines as visual guides for spacing and line straightness.
You can use this technique in large 1-piece square blocks if your challenged with filling a large blocked space. (Beginners -try using this on a Yellow Brick Road pattern!)
Square 2 – Sunburst – Start at the right angle corner of the triangle here I started at the bottom right with a tear drop shape echoed multiple times (or clam shell design) same as in Page 3 Square 2 tutorial. Echo out about 5 times or however many times needed to produce the center of a sun. As you move outward start rounding the curves a bit so your sun center doesn’t get elongated in shape.
Once your sun center is done, without stopping move right into the rays of the sun by sewing a wavy line outward away from the center toward the corner and the long side back to the opposite corner of the triangle. Depending on the size of the block you can adjust the number of sunrays. In this block I used 5 – an odd number of rays tends to look better. This design fills space quickly and is quite forgiving – have fun with it, I use it a lot!
Be daring and add a swirl at the end of some of the sunrays!
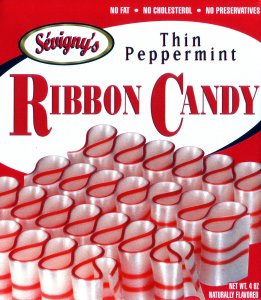
Square 3 – Ribbon Candy – The next pattern reminds me of Peppermint ribbon candy and can fill a triangle space very nicely or sashing around blocks. It definitely will take practice if used in a triangle because the length and width of the curves vary with each pass (or fold in the ribbon) and to determine which way is more comfortable moving thru the space -left to right/top to bottom. I started from the upper right corner and worked to the bottom left then flipped the sandwich over and repeated the other side.
If you have to stop to adjust your hands it is best to stop when you touch the previous line or in the seam area to avoid any bumps in the curves.
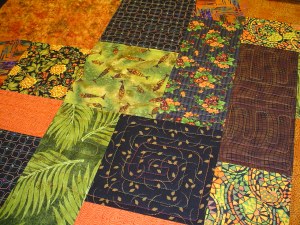
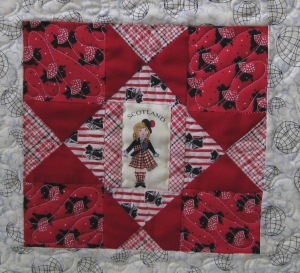
I used this design in the star block below in the pieces around the star to enhance and make it pop. I slightly opened up the spacing for a more casual relaxed feel. Since this was a small 6″ block if I would have quilted tighter and more densely it would have made the star pieces pucker too much – a very important tip to remember…make sure your quilting is always balanced across the block and quilt otherwise the non-quilted areas will look too puckered and wavy.
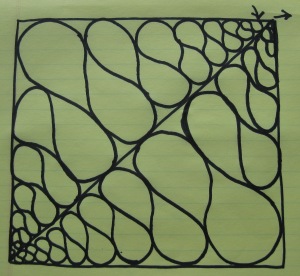
Square 4 – Not sure what to call this design but sort of reminds me of a section of an old wrought iron fence -check out this link for all the free-motion design possiblilites!
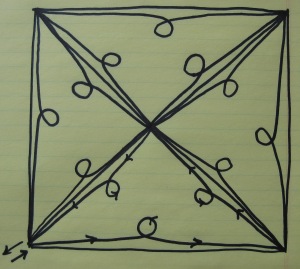
For this design, start in the lower left corner and begin moving right slightly increasing the space from the seam line then create a loop at the center of the line then decreasing the space until you end in the corner of the triangle. Repeat this design in each of the other triangles.
The loops can be big like in the actual quilted page at the top or smaller like in the drawing below. Keeping the loops consistent size and in the centers of each leg of the triangle will create a pretty overall block design.
A few tips:
1) Practice doodle each design on paper first.
2) Watch your tension and adjust as needed.
3) You may find quilting gloves helpful with maneuvering the fabric.
4) Strive for consistency in stitch length, spacing and loop sizes and you will find the overall quilting impact will be very satisfying!
We’re in the homestretch, one more page to go!




3 comments
Comments feed for this article
April 11, 2011 at 7:14 am
mimi'sdarlins
Paige and Lorrie, these FMQ tutorials are great! They’re well written and explained I think, even for the novice quilter! I love the idea of keeping the practice pieces in a journal for reference, too, plus later you can look back and see how you’ve progressed. Great work, girls and thanks!
April 11, 2011 at 3:20 pm
Gail Lewis
Paige, I finally have some time to work on my free motion quilting again,I just love this weeks designs !! I have done a lot of practicing these last few days and I have just completed my first wall hanging ,23 inches square,using free motion quilting. I found that it is very challenging my me to visualize the effect that different patterns will have on a project.The one I just finished had been a great learning experience.I am so excited to get started again. I found that doing the free motion quilting is very therapeutic and relaxing for me. I will send some pictures in a few days. I also really enjoyed reading about the fantastic Pasta Party. Thanks for this weeks Lesson.
April 12, 2011 at 12:08 pm
PaigeAlaine
I’m SO glad you are enjoying the tutorials…I have more fun projects lined up to challenge you and keep you practicing! :)