Have you noticed the Quilting Bloggers button on our sidebar?

They are a resource for finding blogs in your state, or what’s going on in the blogging world. They offer quilting tips and tricks and tutorials. Every week they have a themed contest. This week is Easter quilts. I added my Rabbits Prefer Embroidery to it this time. It’s a Bunny Hill design that is redwork but I decided to use pastels for Easter.  The prize is Christmas fabric! You know I couldn’t resist that:)

Voting starts today and ends Sunday at midnight. So head on over and vote if you feel like surfing the internet on your holiday.  This link will take you to the site or simply use the sidebar button.

We hope everyone enjoys their holiday weekend. I hope to get some serious sewing done!

Happy Easter!

I belong to a Flickr group called Tea Buddies. You’ve probably seen me mention Jeanne, our group admin. And I’m sure you’ve read some of the awesome comments left by my buddy friends on the blog. This year Jeanne had this great idea to let each one of us host a month. The hostess chooses topics for discussion, keeps us all engaged, and even gives us a little something to-do.

April was Diane’s month, some of you know her by Mimi’sdarlins. She designed this cute flower applique that can be made into a pillow or whatever you choose. I chose to machine applique the flowers, embroidery the stems and add a Pick-a-Bunch saying.

Another inspiration piece for my studio. Wouldn’t this be cute framed? Thanks Diane! This was a lot of fun:)

I’m always on the lookout for studio decor. Our SewMod logo colors are a turquoise and green and our tagline is Need To Create.  So while I was  in Wal-Mart yesterday picking up a prescription, I came across these tubs that are our colors. I can store stuff in them..supplies.

They even have Daisies on them! Cuteness!

Then I noticed these candles in the same prints and one of them has sayings written on them. One of the words…create! Well, I had to have these too.

I also got this white wire basket that I think is perfect to display fat quarters….$5!

I really think it’s Wal-Mart’s purpose to keep you in the store to spend money. I even called the prescription  in ahead of time but it was still…”that will be another 10 minutes”. So during that 10 minutes, I managed to see all these goodies, gather Easter Basket gifts, and ink for my printer. I fell into the trap. All to the tune of 100 extra $$.

I’m telling myself that these studio goodies are my Easter Basket gifts:)

We purchased several bolts from Riley Blake last week.

Some Sugar and Spice. We ordered the main piece to this which has all the red and blue daisies on it but it was already gone. We are learning that the process for buying fabric from manufacturers is ….you snooze, you lose!

And some Happier.

These 2 bolts are so cute. The Happier main has a whole scene going on if you look closely. Birds, butterflies, caterpillars. I just knew when this arrived that I had to embroidery something. I immediately thought how nice it would be to ride my bike along this fabric, so I jotted down some ideas and used the tree and critters as inspiration.


I used some scraps cut into different sizes to raw edge applique at the top. It’s a scrappy sky!

Just a little wall decor for my new studio. It’s going to be so nice to surround my sewing room with inspiring things, like this, fabric, or random pics. You never know what might set you in the right direction to make something unique. I even collected some Halloween scrap-booking papers the other day. I know something creative will come from those. Especially since we expect the Riley Blake Trick or Treat line soon.

Vicki is collecting those little cards that are on the front of Moda’s Layer Cakes packaging. I thought that was a cute idea to inspire her and decorate her studio as well. I’m sure, knowing Vicki, that her collection will be quite large:)

So, tell me do you randomly collect anything besides fabric that inspires you?

Yes, we’re still on comfort food here. Yesterday I woke up to a white ground. Sure it melted by noon but still, it’s the middle of April!

Last Sunday, neighbor Susan cooked dinner. She makes a really good chicken pot pie. We had some pink lemonade to go along with it.

And I made Paula’s Strawberry Cake.

It turned out pretty, didn’t it? At least this piece did. I had a cake malfunction when I removed the wax paper from the bottom after icing it. The paper pulled the bottom of the cake off:(

It was an ugly, lopsided, tasty mess !! I wouldn’t take ugly to a party but I sure will eat it:) Here’s the link for the recipe if you wanna give it a try. It has 5 stars & you won’t be disappointed.

And if you do decide to make this, I did make a few changes to the recipe though.

It definitely only needs 4-1/2-5 C powdered sugar for the icing and one 16oz. tub of the frozen strawberries in syrup from Target.  Use 10 oz for the cake and 1/4 C for the icing. Using 15 will make the batter too runny.

Also use parchment paper in the pans to get the cakes out easily without them sticking.

And it takes about 30 min. instead of the 20 to bake.

Give it a try y’all. As I’m writing this it’s already 1/2 gone. And no, I didn’t eat it all:) We share in this neighborhood. Don’t worry Paige…I’m saving you a piece!

I thought I’d share some of the machine quilting books in my stash that I reference often when needing ideas for my next project. I would recommend them for beginners through experienced machine quilters – they are chockfull of ideas, patterns to utilize and tips to get you started!

Quilting Possibilities…Freehand Filler Patterns by Sue Patten  – In this book, Sue takes various blocks (@ 40) like 4-patch, 9-patch, Kansas Star, Pinwheels, Dresdens, borders, etc. and provides alternate designs to quilt the same block. She focuses on the primary or secondary pieces in the block to create dramatic variations in look and textures. There are many flower and feather designs I would say for a more intermediate/experience quilter but definitely will provide inspiration for any beginner!

Machine Freehand Patterns by Nan Moore – I highly recommend this book for all levels. Nan starts you with the basics by guiding you through an overall or continuous-line block design with the use of arrows all the way to elaborate feathers designs including  borders. The pages are full of patterns you can shrink or expand to fit any block you are working on.

Follow-the-line Quilting Designs Volume 3 by Mary M. Covey – I believe there are 3 volumes in this series with full-size patterns for blocks and borders which makes it simple to trace, transfer and stitch continuous-line quilted motifs. I like the variety of designs and the how-to instruction booklet that is included.

Creative Classics – 250 Playful Continuous-Line Quilting Designs by Laura Lee Fritz – Laura takes basic shapes like the clamshell, waves, serpentines, Baptist fan and feathers and fills the pages of this  book with endless variations of each to utilize as an overall designs, blocks or  borders.

 250 Continuous-Line Quilting Designs for Hand, Machine & Long-Arm Quilters by Laura Lee Fritz  – This book is filled with fun themed designs such as Home& Garden, Birds, Flora & Fauna, Domestic Animals, Woodland Animals, Under the Sea, and Textures. She includes some tips on planning and transferring the designs to help you get started.

Foolproof Machine Quilting by Mary Mashuta – For those of you struggling to get started or having trouble with free-motion quilting with a darning foot, Mary teaches you how to machine quilt using your walking foot and going beyond stitching in the ditch. She also utilizes paper templates to expand your design options.

As always, have fun with machine quilting and remember it takes practice! So keep  trying different techniques until you find one that works best!

The Sweet Pickins’ club at Quilt In Joy is a year long club that features the This And That Pattern Company. They meet every month for a demo on a pattern taught by Laura, one of Quilt In Joy’s talented employees.

Meet Laura….and the pickins’ club

The projects they work on in this club are so darn cute. If I wasn’t already committed to a million things, I think this would be on my to-do’s.

They’re also working on a mystery quilt along with their monthly pattern pick. Kathy’s off to a great start with her 1st block.

Here’s a few of the projects. A cute wallet clutch, a basket for your desk, and aren’t those notebook covers adorable!

This month’s project is the Lazy Daisy bag. Laura made it out of the Bliss charm pack with some Michael Miller handles.

And Kathy is using  Max and Whiskers from Basic Grey.

Paige made  a pattern of the cute kitty in the fabric line for Kathy to applique on the front of the bag instead of the daisies.

Kathy, you’ve got to bring your bag into the shop when your done so I can get get pics. It’s gonna be seriously cute!

Have a great weekend y’all!

I soon discovered when Paige and I decided to do Etsy that I had out grown my small loft as my sewing space. I was in denial for quite awhile. But as I was making the OU quilt it became apparent that I couldn’t sew a quilt that is actually bigger than the space I’m sewing in.

So, I made the decision to turn my master bedroom into a studio. I hired my neighbor Nick to help me out with the project. First things first….the design wall. We removed all the furniture and hung a 8′ x 8′ design wall on the largest wall. It’s 2 4′ x’4′ insulation boards taped together and covered in batting and screwed into the wall.

I bought 2 6′ tables for sewing. Now the SewMod girls won’t be squished around the kitchen table when we get together at my house. I still need to find some chairs for the tables. And when sewing machines aren’t occupying the table I can use it as an extra cutting space for the bolts.

This wall will soon have bookshelves for the fabric that are coming in.

I did have to leave the treadmill in here but tha’s ok. Daisy uses it to jump into her favorite spot on the window ledge. She likes to sit on her quilt and terrorize the neighborhood:(

I moved my dresser, which didn’t even have any clothes stored in it, onto the loft. I’m using it as a desk for Etsy, designing, and storing some of the Etsy merchandise in. It fit so perfectly there. It was like it was meant for that space. And I’m definitely replacing that awful chair. I’m stalking something at Ikea:) Just haven’t committed yet.

My Aviary quilt looks so awesome on the banister.

Now my bedroom is downstairs in the tiny “office”. Iv’e adjusted pretty well. We painted my bed, which was the color of the dresser that’s on the loft, black,  and I ruffed it up a bit to look worn. I think it turned out really nice. I wanted to that for some time now. I’m glad I went for it.

Everything I needed ft in here, including Daisy’s bed, and most importantly my flat screen. I don’t think I would have made this move if my most loved tv wouldn’t have fit in here:)

The tuffet is being used as my nightstand.

I even had room to display a few quilts.

I think it’s time to have the girls over for a little sewing, don’t you?

Page 5 of Journal:  (for Pages 1-4 click here)

This journal page we will be filling in a defined space like a 1/2 square (or triangle) which is very commonly used in block designs.

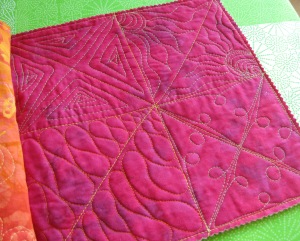
Set up the sandwich with a vertical and horizontal line to create a 4-patch then in Square 1 & 4 add a second line to create an “X” in the square as in my sample below.

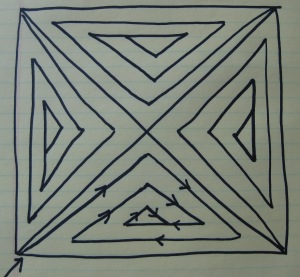
The following images can be printed then placed under a white sheet of paper to practice, I used a heavy black marker so it would show through.

Square 1 – Spiral Lines –Starting with the bottom left corner sew a line somewhat paralleling the seam line to just below the top point of the triangle then down paralleling the right seam line but not all the way into the corner and move back left continuing to spiral into the center finishing with a small triangle. The goal here is to create equal spacing as you spiral inward so you end up with the small triangle fairly centered. Use your seam lines as visual guides for spacing and line straightness.

You can use this technique in large 1-piece square blocks if your challenged with filling a large blocked space. (Beginners -try using this on a Yellow Brick Road pattern!)

Square 2Sunburst – Start at the right angle corner of the triangle here I started at the bottom right with a tear drop shape echoed multiple times (or clam shell design) same as in Page 3 Square 2 tutorial. Echo out about 5 times or however many times needed to produce the center of a sun. As you move outward start rounding the curves a bit so your sun center doesn’t get elongated in shape.

Once your sun center is done, without stopping move right into the rays of the sun by sewing a wavy line outward away from the center toward the corner and the long side back to the opposite corner of the triangle. Depending on the size of the block you can adjust the number of sunrays. In this block I used 5 – an odd number of rays tends to look better. This design fills space quickly and is quite forgiving – have fun with it, I use it a lot!

Be daring and add a swirl at the end of some of the sunrays!

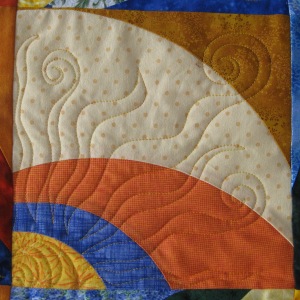
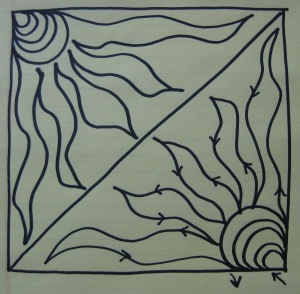
Square 3 – Ribbon Candy – The next pattern reminds me of Peppermint ribbon candy and can fill a triangle space very nicely or sashing around blocks. It definitely will take practice if used in a triangle because the length and width of the curves vary with each pass (or fold in the ribbon) and to determine which way is more comfortable moving thru the space -left to right/top to bottom. I started from the upper right corner and worked to the bottom left then flipped the sandwich over and repeated the other side.

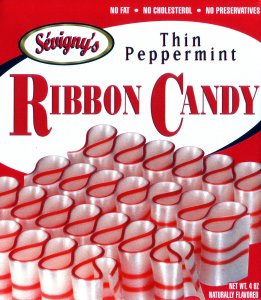
If you have to stop to adjust your hands it is best to stop when you touch the previous line or in the seam area to avoid any bumps in the curves.

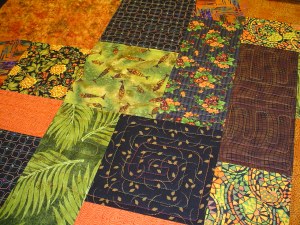
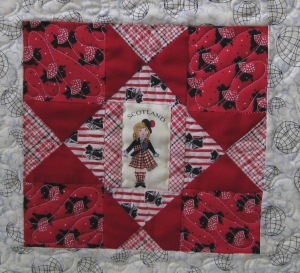
I used this design in the star block below in the pieces around the star to enhance and make it pop. I slightly opened up the spacing for a more casual relaxed feel. Since this was a small 6″ block if I would have quilted tighter and more densely it would have made the star pieces pucker too much – a very important tip to remember…make sure your quilting is always balanced across the block and quilt otherwise the non-quilted areas will look too puckered and wavy.

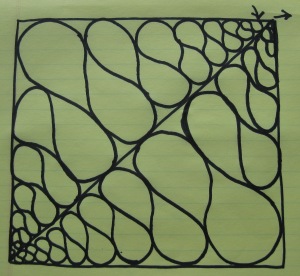
Square 4 – Not sure what to call this design but sort of reminds me of a section of an old wrought iron fence -check out this link for all the free-motion design possiblilites!

 For this design, start in the lower left corner and begin moving right slightly increasing the space from the seam line then create a loop at the center of the line then decreasing the space until you end in the corner of the triangle. Repeat this design in each of the other triangles.

The loops can be big like in the actual quilted page at the top or smaller like in the drawing below. Keeping the loops consistent size and in the centers of each leg of the triangle will create a pretty overall block design.

A few tips: 

1)       Practice doodle each design on paper first.
2)       Watch your tension and adjust as needed.
3)       You may find quilting gloves helpful with maneuvering the fabric.
4)       Strive for consistency in stitch length, spacing and loop sizes and you will find the overall quilting impact will be very satisfying!

We’re in the homestretch, one more page to go!

Paige’s tuffet was featured in digaliggins Treasury on Etsy titled “Sugar Rush“. Isn’t it a bright a cheery collection? A Treasury is a grouping of favorites in a certian style that a member chooses and creates. Being on a Treasury means added exposure on Etsy, so we’d like to send a big thanks to digaliggins for choosing us!

We would also like to announce last call for the Tuffet Class Sign -Up.  Next week we are going to set the dates for the classes. We have one full class and almost a second. If anyone is in the Chicagoland area and would like to have a fun day of sewing and leave with an awesome footstool that you can impress all your neighbors with, then let us know. We would love to meet you!

We’re so excited!! Our first fabric line came in yesterday!…Yay…happy dance around the living room. Paige came right over after work so that we could share the excitement of opening the package together.

It’s the Heather Mulder Peterson line called Artful Home from Henry Glass.

Paige already has a million ideas running through her creative brain on what to make with this. I can’t wait to see what she comes up with.

I think my favorite is the green and blue daisy “bubbles”.

Thanks for all your support and comments. We love sharing our journey with our blogging friends:)

I hope everyone has a chance this weekend to relax and create something special!

Enter your email address to follow this blog and receive notifications of new posts by email.

Email Address:

MineCraft Tutorial

Crayon Embroidery Tutorial

Machine Binding Tutorial

Blog Archive