I was definitely in the Easter mood while stitching Birdie & I wanted her to have a “Pastel Paas” thing going on. So I stitched her in pastel variegated floss & I found these cute little Easter egg buttons at my local cross stitch store to decorate the tree with.

Thanks for another cute block Little Miss Shabby. I’m having lots of fun stitching these!

Saturday, Kelly coordinated an awesome pasta making class over at Cooking Fools in Chicago. She happens to be friends with the owner, Nick, who we were very lucky to have teach the class!

We learned how to prepare pasta dough, fill raviolis, cut pappardelle noodles and make two sauces -Vodka and a walnut Pesto —YUM YUM YUM!

There were 30 eager pasta makers in the class but Nick gave us the VIP treatment with front row work stations and refreshments -want a workout…knead pasta dough for 8-10 minutes! Those refreshments sure quenched the thirst! ;)

Here on the left – Shelley, Vicki and Andrea are manuevering their pasta sheets and Vicki’s friend Emily on the right was filling her raviolis.

Loved the label on this wine bottle, which by the way was a nice tasty red to start the afternoon off…the flowing design looked just like the pasta dough swirling around everywhere!

Check out Shelley’s wrist action…her pasta sheet ended up longer than her work table. 

Here’s our group from left to right -Emily, Vicki, Andrea, Kelly, Paige (me), and Shelley…my sister, Wendy, was taking the picture.

Here’s Wendy, she helped Nick make the walnut pesto…first time for her using a food processor!

Once everything was prepared we dusted off the flour and headed over to the dinner tables and filled our tummies with salad, Pappardelle with Vodka sauce and the ricotta/mushroom/garlic Raviolis with walnut pesto sauce.

And to finish off the evening we heading over to Kelly’s house for more wine and make-your-own sundaes! Great party, girls!  …we definitely missed you Lorrie!

Andrea and Vicki came over on Monday to do some sewing, eat, gossip, lust over some new lines of fabric. You know, all those things girls do when we get together:) We can always count on Vicki to have the latest and greatest and if you haven’t seen Fig Tree’s new line, Strawberry Fields, then you must run to the quilt store. Sooo pretty and we’ve determined that it matches my kitchen perfectly…hmmm another project? Yikes!

So, back to my title. I was so easily distracted by the sweetness of those fabrics. Now onto the sweetness of gumdrops.

Can’t stop making gumdrops. So easy, so fun. So cool looking!

Andrea made the 24″ one out of Amy Butler fabric and polka dots and mine of course is the OU one:)

Holy tower of gumdrops!

The cubs one is my fave! It’s going on the Esty site along with the kiddie one.

At least these don’t make you fat.

Enjoy the weekend everyone. I’m going to be busy, busy. I’m rearranging and changing so check back next week to see what I’ve been up to!

Since I have never quilted with metallic thread I tapped into our creative friend Vicki over at AccioFabrics and owner/designer of Bugglet Quilts.

Metallic thread is not as difficult as people generally say it is to work with if you follow these simple guidelines.

1) Use a needle designed for metallic thread. They are readily available at your local crafting stores.

2) Quilt slowly. I have to constantly remind myself to slow the foot and hands down w/metallic thread. If you go to fast, you will break it.

3) Adjust your tension. You will need to do a little practicing to find the right tension, it will most likely need to be lessened.

4) Use cotton in the bobbin. I use a 50wt Aurifil and it works well. I have tried the recommended rayon thread in the bobbin, but I could never get the tension to work correctly.

5) Put your metallic thread spool farther away from the tension disk, in a straight line, to give it more time to uncurl. I put mine on a pencil propped in the pocket of a bin on the table to the right of my machine.

Come on y’all sing along! This is something to sing about.  We whipped up one of the OU quilts for a friend.

Paige did the quilting and oh my, she did an amazing job!!

Would you just look at how the OU stands out with all those whimsy swirls.

And when you turn it over the OU pops off the backing since she used a white bobbin.

The quilt is really easy to get together since its a log cabin.

I think this makes my 3rd OU quilt. Just spreading the Sooners love y’all!

Page 4 of Journal:  (for Pages 1-3 click here)

This journal page we will be filling in the space with slightly more challenging designs with a masculine feel for men and boy quilts.  A couple are also great on art quilts for landscape textures such as pond water, tree bark, or mountain ranges.

Set up the sandwich with a vertical and horizontal line to create a 4-patch as in my sample below.

The following images can be printed then placed under a white sheet of paper to practice, I used a heavy black marker so it would show through.

Square 1 – Starting with the top left square of the 4-patch meander around the space with a jagged / haphazard motion. Add variety by varying the length of the lines and angles. This is a great basic overall pattern to fill in small areas or on borders. I love using this on black fabric with black thread for lots of texture or variegated thread to add interest when the black area is too bold.

Square 2 – Start at any corner you are most comfortable I tend to work this pattern from top left to bottom right. Basically this is a swaying motion back and forth as you meander across the space. This pattern gives you the effect  of a water if you follow my lines you will see how that works. I have used this design on a landscape panel with a pond -the water came alive. It can also be used in a sky to create a eerie stratus type cloud perfect in those Halloween panels!

Square 3 – This pattern  is very similar to the water design above it has the same back and forth motion but instead of a soft curve as you change directions you create a sharp point. I found this pattern easier to quilt by going up and down rather than side to side.

 The design reminds me of flames or tree bark. You will create more interest by varying the length of the flame and width. I love the positive space the quilting lines create.

Square 4 – This pattern reminds me of mountain ranges and can be quilted fairly quickly. I started in the upper left corner and moved right then dropped down to the next line echoing the previous line as I moved back left. I didn’t mimic each line exactly to create more interest but if you do I would recommend varying the spacing between the echo -this will create a controlled modern feel. If you are having trouble seeing your previous line start from the bottom instead and work to the top.  

A few tips: 

1)       Practice doodle each design on paper first.
2)       Watch your tension and adjust as needed.
3)       You may find quilting gloves helpful with maneuvering the fabric.
4)       As you fill a space with any of these designs and find yourself in an awkward location with no way out – stop, you can always take out some of the stitches back to a point where you can easily start up again like a point, where one line crosses another or where a change in direction occurs. If you are near a seam just bury your stitches in the seam and start over at another area where you can start up your pattern again.

My goal here is to help you get over the fear of quilting and tackle all those wonderful tops you made that are sitting lonely and folded in your closet for no one to enjoy! Your quilting does not have to be perfect once you quilt everything you will see the overall consistency in your quilting not each individual imperfection. Keep practicing!

If you’re looking at the time stamp for this post…yes, I was up that early writing. I only had about 45 minutes of sleep. Lots on my mind tonight, or should I say today now. Paige and I have had a rough go of it lately.

I’m sure you’ve heard the song Unwritten by Natasha Bedingfield. If not the lyrics are here. To me, this seems to be the journey that Paige and I are on. Uncertain, unplanned, 2 girls trying to write a future for ourselves.

Family, friends, jobs, ex’s, tough decisions…all these thing tend to weigh heavily, especially when you try to close your eyes…ugh.

Life will try to kick you in the teeth if you let it. So, after about an hour, through the tears and pain, I came up with my short list of things that make me happy right now. Random thoughts, actually…this seems to be the way I deal lately.
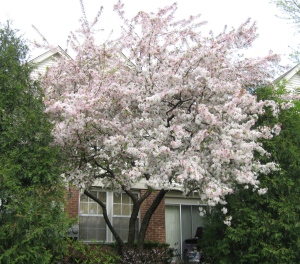
1. I’m awaiting the Crapapples to bloom. The world never smells so good.

2. Listening to the Doves coo outside my windows.

3. Crack of the bat when the ball hits it. It’s almost baseball season y’all!

4. Paige talking about her mom. To me there’s a sweetness about it that lingers long after:)

5. When someone favorites our Etsy shop. Baby steps, but gratifying.

6. The way Daisy licks her lips when I’m making her dinner & when Paige’s Kitty rubs against me because I miss mine so.

7. Telling “baby” stories about when Russell was little. Some are totally inappropriate.

8. Paige’s story about how she, accidentally, gave a bunny fermented fruit and he basically passed out drunk. Don’t worry he hopped away later:) Paige don’t hate me for telling that…k. It just cracks me up every time I think of it!

9. That 70’s Show. I’m still addicted to it. And frankly, I don’t think I would have made it through my divorce without the laughter this show provided me.

10. My brother telling me he loves me every time I talk to him or text him. I don’t know why, but I always do a double take on that one. Its kinda funny that you torture each other for so long as kids but still love each other:)

11. Friends, Friends, Friends. I can’t image a day going by that I don’t talk to a friend.

Think of any random things that make you smile right now? I wanna hear it.

Ok…it’s 4:30…you think I can sneak in an hours worth of sleep before I have to get up?

The SewMod Gumdrop Party was Sunday. We met at Vicki’s house and I wish I had taken a pic of the food bar she had set up where we each made our own calzone and sodas. Kelly brought chocolate chip cookies and Pattie brought gourmet chocolate cupcakes stuffed with marshmallows. I know, you’re hating on me right now for the lack of pics. I’m so sorry!

We had a great time, as usual! Thanks Vicki for being a great hostess!

Meet SuperCool Kelly. She made her gumdrop in a black and tan with a cute polka dot top.

Vicki made a kids one for her nephew Kenny.

Looks like Auntie Vicki is taking a break on your gumdrop Kenny:)

And finally, mine and Paige’s. I used Central Park by Kate Spain and Paige used some calming green prints from her stash. I found hers to be very soothing colors.

These were so easy to  make! I’m definitely making more. I think maybe a Cubs one for Russell and an OU Sooners one for the Etsy shop. Wouldn’t that be a fun one!

What’s next you say? How can we top tuffets in February and Gumdrops in March? Well, April’s party is going to be cooking lessons from Kelly’s friend, the chef at Cooking Fools, in downtown Chicago. Unfortunately, I won’t be attending this party but I look forward to Paige’s post and seeing what foods everyone learned to make. I’m sure I’ll be missing a great party…bummer:(

Good morning everyone! I thought I’d share a few pics from the quilt show Kathi and I worked in Morris, IL.

This is the Quilt In Joy booth. Sorry about the glare. We had to add our own lighting because it was so dark in the banquet room. There’s Beetle Boy right in the middle. Everyone loved him!

We had really great neighbors. This is Backyard Quilt Shop from Fort Atkinson WI. Kathy and Butch have this shop in their basement, run an auto workshop next door, and she also does custom quilting. Can you say super busy couple! They’re working on 7 years now being in business. She had some really good stuff in the booth. A Yellow Brick Road quilt done in Rouenneries fabric. Yellow Brick Roads bore me to death and I said I’d never make another, but I couldn’t take my eyes off it.

Quilter’s Destination, from Arlington Heights, IL was on the other side of us. Specializing in Crapapple Hill embroidery and beautiful fabrics, so you know I was hooked there. They had tons of embroidery samples made up. And Pattie and Wendy were sooo nice!

My fave’s from the show…

Lifesavers

And of course a Crapapple Hill quilt.

This is the backing fabric for a Christmas quilt I had to get a pic of.

And guess what. There was a bed turning event at the show and the quilter was showing her wholecloth white quilt that had been marked in blue that wouldn’t come out….shocking, I know…ugh. I’m feelin her pain! I think hers is worse though. Hand quilted and it had silk batting..uh oh!

Ok, I’m off to work now! Have a great spring weekend!

Cleaning..no, but I seriously need to. Spring is much harder on my house than winter especially with a dog in the family.

Remember this vision of Christmas goodness?

Just got it back from the quilter and she used a blue marking pen on it. Need I say more? I really hate those things. They are very unpredictable! For starters, I’m not the girl who washes a quilt when I get it done. I like crisp and fresh. So that’s a little disappointing, but what’s a bigger disappointment is that I’m going to end up trashing something I worked hard on, cost a lot of money, cause let’s face it people fabric is not cheap, and it’s from my favorite lines of all time…ugh. I’m sooo frustrated. These are the pics of the quilt after it’s been washed a zillion times using a zillion methods. You may need to enlarge them for the blue to show up.

The blue is all over the borders also. Any suggestions would be much appreciated!…help:(

On a more positive note, I have been working on some bindings and a cute little baby quilt from the Just Dreamy line from Riley Blake.

Adorable! Can’t wait to finish this one! I see giant rick rack in this quilts future.

Enter your email address to follow this blog and receive notifications of new posts by email.

Email Address:

MineCraft Tutorial

Crayon Embroidery Tutorial

Machine Binding Tutorial

Blog Archive