
You are currently browsing the tag archive for the ‘free motion quilting’ tag.

Tag Archive
A quilt I worked on during our SewMod sewing day was this quilt called Taza Baby. I cut all my Taza scraps into 4″ squares and sewed them together. The Kona Ash gray arrived in the store last week and was the perfect addition to calm this quilt and allow your eyes to rest.
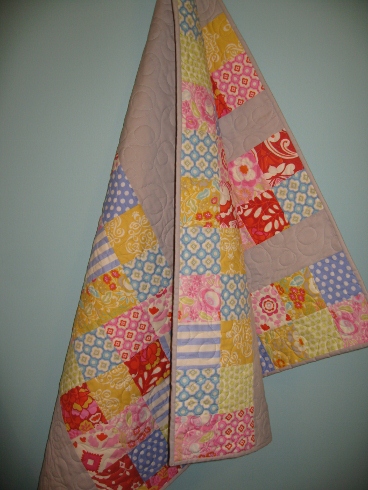
Get your scraps out and use them, play with them. This quilt was on my design wall for a about a week before I finally realized it needed the gray. I knew it was missing something. I’m glad I didn’t give up. It turned out great! Paige did an all-over playful loop with the quilting. It doesn’t need anything more than that and this quilting can easily be done on your machine as well.

I even used the rest of the scraps on the backing.
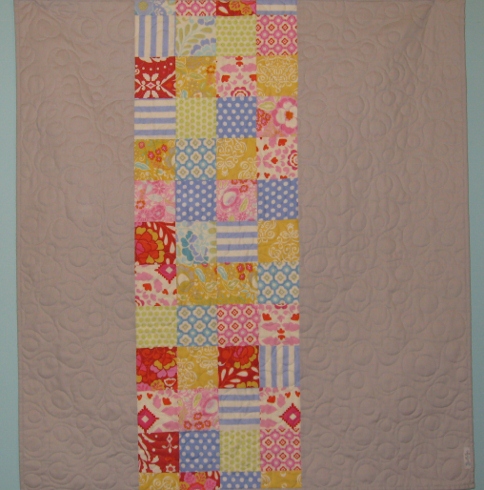
Now, all baby has to do is pick which side she likes best!
Page 4 of Journal: (for Pages 1-3 click here)
This journal page we will be filling in the space with slightly more challenging designs with a masculine feel for men and boy quilts. A couple are also great on art quilts for landscape textures such as pond water, tree bark, or mountain ranges.
Set up the sandwich with a vertical and horizontal line to create a 4-patch as in my sample below.

The following images can be printed then placed under a white sheet of paper to practice, I used a heavy black marker so it would show through.
Square 1 – Starting with the top left square of the 4-patch meander around the space with a jagged / haphazard motion. Add variety by varying the length of the lines and angles. This is a great basic overall pattern to fill in small areas or on borders. I love using this on black fabric with black thread for lots of texture or variegated thread to add interest when the black area is too bold.

Square 2 – Start at any corner you are most comfortable I tend to work this pattern from top left to bottom right. Basically this is a swaying motion back and forth as you meander across the space. This pattern gives you the effect of a water if you follow my lines you will see how that works. I have used this design on a landscape panel with a pond -the water came alive. It can also be used in a sky to create a eerie stratus type cloud perfect in those Halloween panels!

Square 3 – This pattern is very similar to the water design above it has the same back and forth motion but instead of a soft curve as you change directions you create a sharp point. I found this pattern easier to quilt by going up and down rather than side to side.
The design reminds me of flames or tree bark. You will create more interest by varying the length of the flame and width. I love the positive space the quilting lines create.

Square 4 – This pattern reminds me of mountain ranges and can be quilted fairly quickly. I started in the upper left corner and moved right then dropped down to the next line echoing the previous line as I moved back left. I didn’t mimic each line exactly to create more interest but if you do I would recommend varying the spacing between the echo -this will create a controlled modern feel. If you are having trouble seeing your previous line start from the bottom instead and work to the top.

A few tips:
1) Practice doodle each design on paper first.
2) Watch your tension and adjust as needed.
3) You may find quilting gloves helpful with maneuvering the fabric.
4) As you fill a space with any of these designs and find yourself in an awkward location with no way out – stop, you can always take out some of the stitches back to a point where you can easily start up again like a point, where one line crosses another or where a change in direction occurs. If you are near a seam just bury your stitches in the seam and start over at another area where you can start up your pattern again.
My goal here is to help you get over the fear of quilting and tackle all those wonderful tops you made that are sitting lonely and folded in your closet for no one to enjoy! Your quilting does not have to be perfect once you quilt everything you will see the overall consistency in your quilting not each individual imperfection. Keep practicing!


