
You are currently browsing the category archive for the ‘embroidery’ category.

Category Archive
My last birdie block is complete and on its way to a good home! I had a lot of fun stitching these and adding my own twist to some of the blocks. Thanks again Little Miss Shabby!


I can’t wait to see how Vicki puts all the blocks together!

I wonder what new and fun blocks await us for 2012?!

Here’s an easy gift to make. A button tree pillow. I make these easy little pillows and give them as hostess gifts, to friends or someone special. Give your pillow with a box of chocolates tied with a pretty ribbon.

Supplies:
pattern
White background fabric 9-1/2” x 9-1/2”
FQ for the backing
Buttons
Embroidery floss
Fiberfill
1-1/2” wide scraps of fabric
Trace the tree design onto your background fabric. Embroidery using 3 strands of floss. Add your buttons.
Just like making a log cabin block, piece the strips of fabric around the background until your satisfied with the size of your pillow. Mine was about a 13” square.
Lay your backing FQ fabric right side up. Lay your tree face down on top of backing. Cut out the backing fabric to the same size as the top and pin. Sew around all the edges leaving a space for turning, about 4 fingers length. Clip your corners and turn right side out. Stuff with the fiberfill and sew the opening closed with a whip stitch.
I’ve made several of these before. Here’s one I made with a leftover applique block.

And a couple of embroidered Santa pillows..

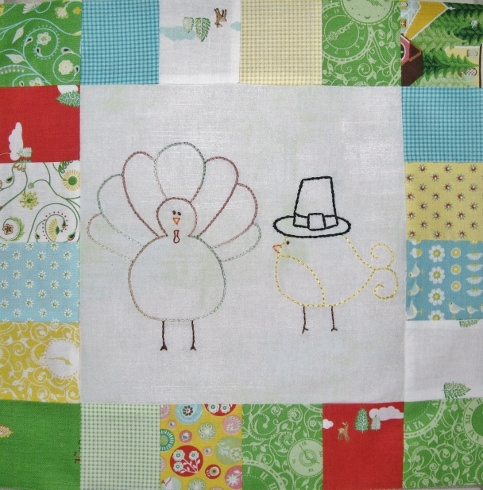

November Birdie block is finished. Only a few minor additions to the block this month. Birdie has a new pilgrim hat and a fat turkey for his feast, although Mr. Turkey is too pretty to eat! I stitched him in my Cosmo Seasons variegated floss. And birdie eating Mr. Turkey might be considered cannibalism…hmmm.
A big Thank you to Andrea’s husband Tom for helping us out with our extra Birdie drawings this month. And as always a big thanks to Little Miss Shabby for such a fun BOM. Only one more to go…Christmas Birdie!
Have a Happy Thanksgiving everyone!
**UPDATE 5/1/15 To make the coffee cozy without embroidery stitches and view the updated tutorial click here.
Welcome back to Handmade Holidays on Friday! We’ve got just the project to keep you busy this weekend. Coffee sleeves and cozy’s to fit your favorite cup or mug. Or maybe you have someone you’d like to give this to as a gift,… a teacher, a neighbor, or your favorite coffee lover?
We’ve made this sleeve unique by adding simple embroidery stitches to the seams. If you prefer not to embroidery, that’s fine too. Embellish any way you like. Have fun with it by making it your own!
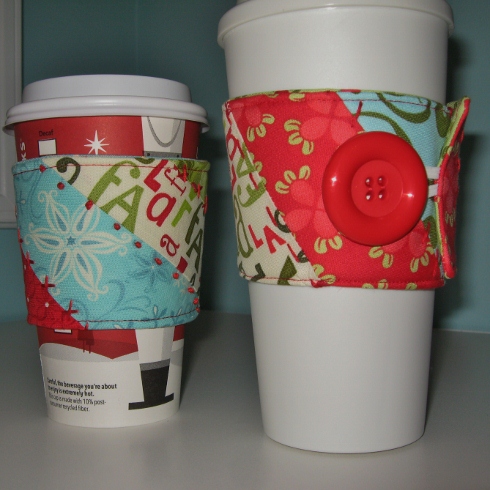
This pattern fits a Starbucks disposable coffee cup. We’ve also made one to fit an Eco-friendly one as well. If you’re making the Eco-friendly sleeve, add 1/2″ seam allowance all the way around the pattern lines.
You will need….
Pattern
7 to 8 scrap fabrics varying in width from 1-1/2″ to 3-1/2″ and approx. 13″ long
Fabric for the backing
Scrap piece of batting
Elastic hair tie, Button and Embroidery floss
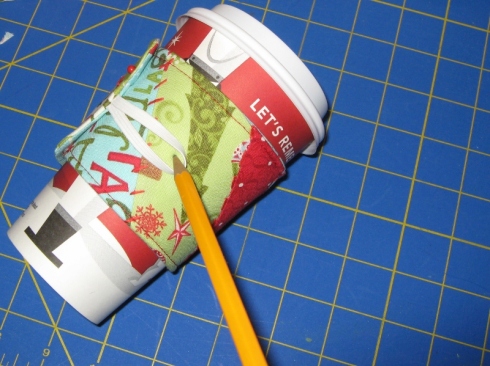
Let’s begin!
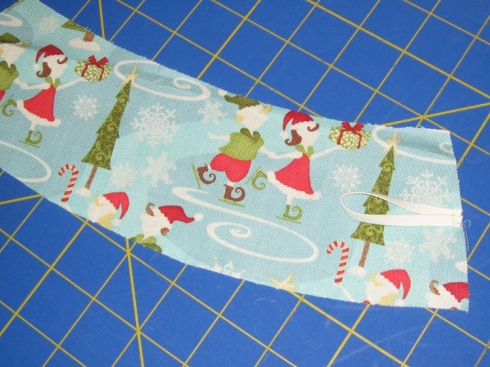
Cut your fabrics into strips and sew them with right sides together as shown.
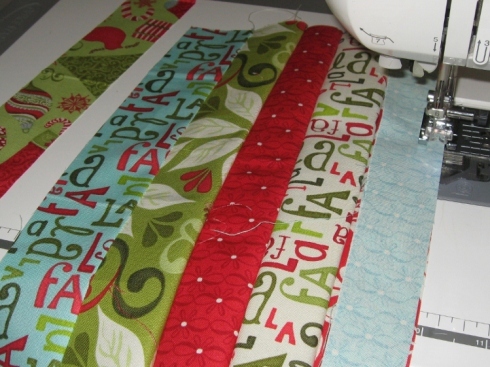
Press all your seams in one direction. Layer your batting and then your pieced fabric with right side up.

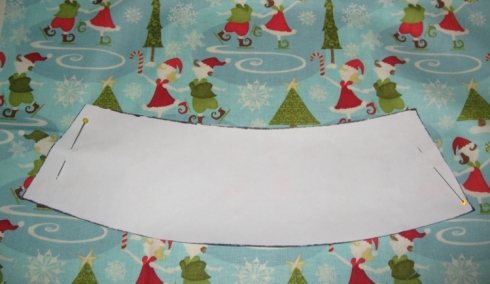
Place your pattern on top and position it on the fabric at a diagonal. Pin. Cut the fabric and batting using your pattern as the guide.
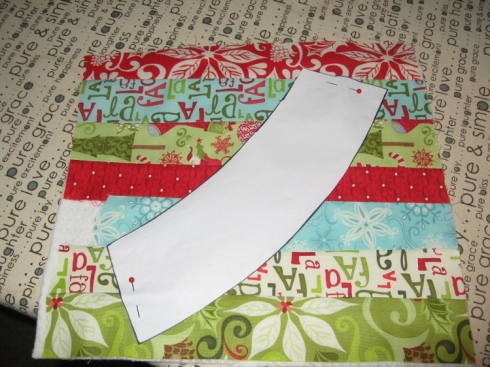
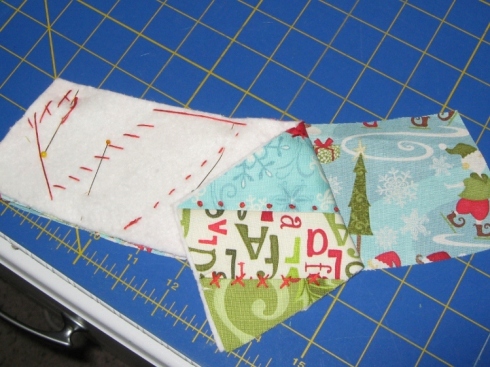
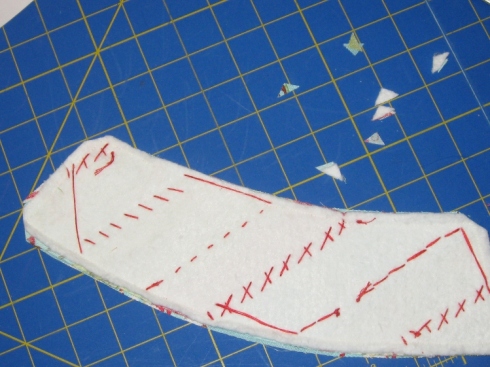
Keeping your cut pieces layered and using 4 strands of floss, embroider on top or close to all your sewn seams. I used a french knot, whip stitch, and back stitch. We’ve added a few helpful stitch guides on the pattern for you. Be Creative!
Cut out your backing fabric by placing the pattern facing down on the right side of your fabric.
Place elastic tie as shown with the loop facing toward the sleeve and on the right side of fabric. Sew across to secure.
Layer your embroidered fabric piece and the backing right sides together and pin.
Using a scant 1/4″ seam, sew around the sleeve, leaving a 3″ opening for turning.
Clip the corners and turn right side out. Making sure to push your corners out.
Iron flat. Top stitch around the sleeve to secure the opening.
With your sleeve positioned on your cup, mark the button placement, making sure that its snug.
Sew on your button and you’re finished! Now, go show off your hard work! Or, place a gift card inside the Eco-friendly cup and you’re one present ahead of the season:)
If your interested in crocheting a mug cozy and coffee sleeve, we found a couple on these links..cozy & sleeve
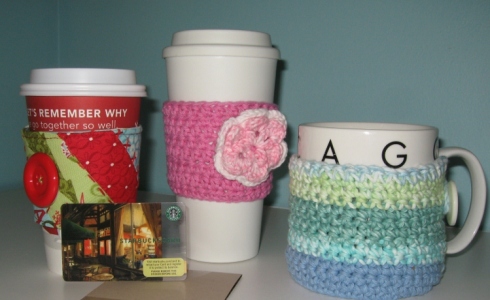
My mom was gracious enough to demo those out for us. They turned out so cute. She added the big flower on the pink one. Be creative and add something special of your own. Maybe a crocheted stocking since it’s Christmas. There are lots of free crochet patterns out there. I love the mug cozy too because I can still read the Chicago around the rim and it’s made in our favorite colors here at SewMod…blue and green!
I hope you’ve enjoyed our tutorial this week. Have a great weekend everyone and try to stay warm!
Can you believe it’s November?!
I’m a bit in denial, although I do Love my holidays. I’m usually ahead of the game by this point. At the beginning of every year I make a Christmas list of all friends and family I’m buying for and add ideas next to their names throughout the year that I think they would like. That way, I’ve at least given some thought to the gift and I’m never rushed to just pick something up. There’s nothing worse than a gift without a little thought behind it, right?
I have started my list but I’m definitively behind on my handmade items. One of my SewMod friends is doing a handmade holiday. It’s so hard for boys and men though! Any suggestions out there? I’d love to hear some ideas.
I’m going to have to kick it into high gear over the coming weeks before Christmas and hopefully by following our blog, we will be able to inspire you as well with some ideas!
Our 1st handmade item is from Stitch Craft Create magazine. I picked this up at Joann’s the other day. I love it! Lots of ideas for stocking stuffers for your favorite quilter and crafty project ideas. I love to craft!
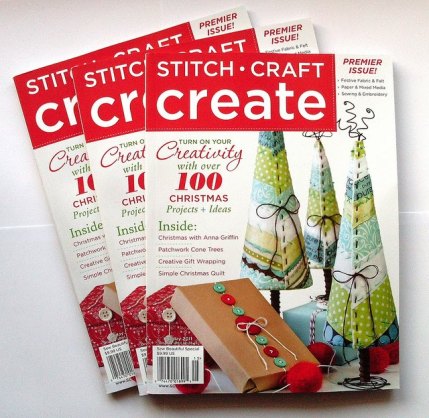
The 1st thing we had to make was those adorable trees on the cover. Paige chose whimsy blue and green Christmas fabrics from the stash and we were off from there onto our 1st Christmas craft. Don’t ya love being able to use scraps for a project?
The directions were easy to follow and I found all the ingredients at Joann’s. The wire is available in the jewelry making section of the store and available in a variety of colors too. The only issue I had making these was the wire is not sturdy enough to balance these trees, so I just left that part out.

The trees are strip pieced, then decoratively stitched at the seams with embroidery floss pinned to the cones and whip stitched up the back. Add a snowman scene as the backdrop and we have our 1st Christmas display:)

And I must say…super cute, right? A little time consuming but most of the work is in the hand stitching, which can be done while watching your favorite holiday movie! Well worth it!
Keep checking back with us. My goal up until Christmas week is to provide a Handmade Holiday craft or sewing project every Friday and sometimes during the week too.
Have a great weekend everyone!
October Birdie is finished and I’m back on schedule. I do have to admit that my stitching was a little shaky trying to do both of these so blocks so close together. But I think it turned out cute.

I switched the moon to the other side and added a witch’s hat to Birdie. She had to have a costume for all that trick or treating she plans on doing!

What kind of candy is she hoping to get the most of this year? Reese’s cups seem to be my, um, her addiction right now!
I finally finished the September block from Little Miss Shabby’s BOM. September to me is apple picking time and back to school. And what kind of school does a Birdie attend? Well, Flight School, of course!

We have an elementary school in the neighborhood that rings the “bell” at the beginning of the school day. I enjoy hearing that while taking Daisy for her morning walk, so I had to incorporate the bell also.

Thanks again for another cute block! Can’t wait to get started on the October one now.
I’m sure some of you noticed the free patterns/tutorials button at the top of the blog. We also have a tab for that on sewmoddesigns.com if you happen to be on that site too. Over the next few months we are going to try to load some extras on there for you. What better thing to start off with than Halloween!
Paige drew up a spooky house

And I thought I’d add retro kitty to a giant pumpkin. She’s so sassy, isn’t she?

I usually cross stitch something for Halloween but didn’t have time this year. I’ll show you some of those projects next week. Embroidery work is so much faster for me to get done. So, to get my Halloween fix on this year, I added retro kitty to a tea towel and used giant rick rack to embellish the bottom.
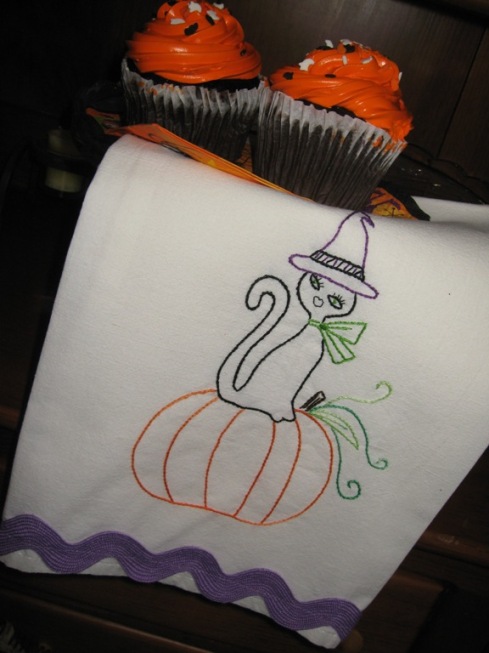
Now for my reward…the cupcake!
Paige and I are very excited to share some good news…we have been working very hard the past few weeks developing and setting up product on our new website! The site will be a place to shop our beautiful fabrics, kits, patterns and notions. We’ll also post class offerings, share valuable tips, provide tutorials and free patterns for everything from embroidery to quilts to how-to.
If you get a chance hop on over and take a peek! Just click on the link…www.sewmoddesigns.com


The buzz is summer’s almost over…bummer:(
Russell’s already registered for school and then before you know it, I’ll be getting up at the crack of dawn. No more sleeping in. I LOVE to sleep in!
I’m actually ready for fall, like I’m sure most of the country is, since we’ve had extreme temperatures this year.
Birdie’s still hanging in there though. I love the sunflower idea and my mom suggested a bumble bee. That was a great addition to an already cute block. Thanks again Little Miss Shabby!


