
You are currently browsing the category archive for the ‘embroidery’ category.

Category Archive
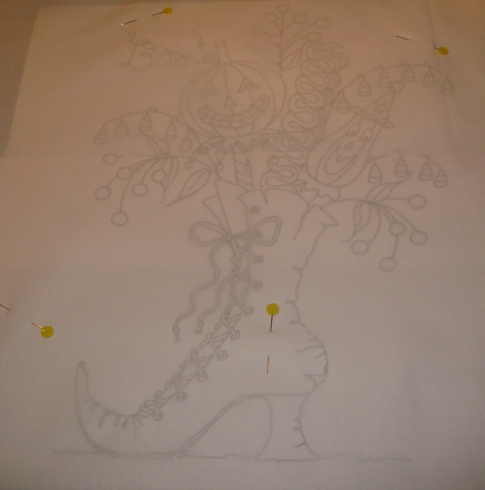
Well…Shelley and I are taking a border challenge class together at one of our local quilt shops, Acorn Quilts.. All we needed to start was to bring a center block of our choice. Of course being the over achievers we are, it had to be something fabulous! I chose the Which Witch’s Boot that I had been embroidering for Paige. I’m almost finished with the center. I’ve been stuck on the circle stitch, actually just dreading doing that stitch, so final decision…I’m not doing that stitch!
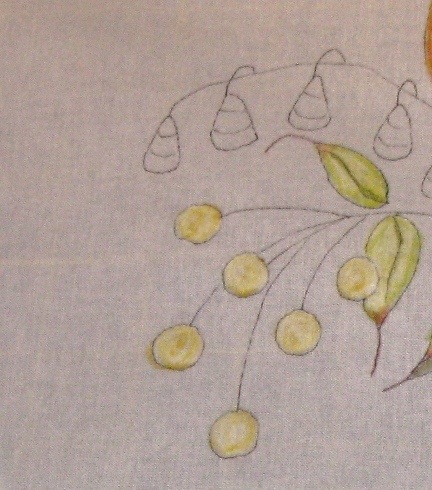
I’m going to add little yellow wool circles to it instead, giving it even more dimension. Since I’m almost finished, I’m going to hold off showing the finished piece till next time.
The quilt hanging in the shop was truly a work of art with attention to detail. And I loved the blue border on it.
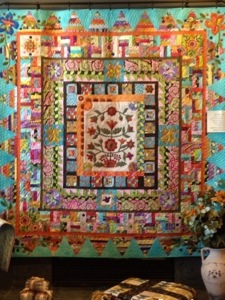
The idea of the class is to start with a center and show up each month for the next border idea, 5 total. Our first class was yesterday evening. After everyone showed off their center, a color was chosen from a crayon box at random and a page number from a quilt block book. Our first border idea must incorporate the color Sepia, (a shade of brown) and flying geese.
It doesn’t matter if it’s a tiny piece of brown or even just one flying geese as long as you can show that was added to the border in some way.
The first thing that comes to mind when I think of flying geese and Halloween is Candy Corn! Pretty excited about that! I hope I can get that to work out.

Next month when we meet there will be a new set of colors/tasks to work with. Each time the fun changes, and so does the inspiration. For example, we asked what was the inspiration for the blue triangle border on the sample quilt and she replied that she had chosen a “My Little Pony” from a basket of “items” and the pony had pointed ears shaped like triangles.

The inspiration is endless!!
Sorry for the lack of posting these days. We’ve been really busy trying to get ready for the Madison show coming up in just about 1 week! Yikes! It’s been a frenzy of assembling kits and cutting fabric. But I did want to sneak in a quick post for everyone…
I got a chance to relax and enjoy our monthly sew-in this last Sunday. We all went out to Pattie’s new home. It was fabulous! She has great taste in decor.
She had a chicken salad ready for us and Watermelon Mojitos…yummy.


Kelly worked on the binding for a Halloween quilt made from charm square scraps.

This is a quilt Pattie had over a sofa in her living room. Stunning comes to mind. I think the kitty liked it too!

Pattie has four kitties. But Pete was our favorite. He insisted on helping us out at every turn. He happened to love the Cosmo floss. I’m pretty sure he thought I had brought it just for him:)

We decided to start a group project next year with all the SewMod girls. Each of us will make a 15″ to 18″ “house” block, whether it be pieced or applique. Anything goes. In January we will pass our block to one of the girls and she will add her own creativity to it, such as beads, applique, embroidery, buttons, etc. In February, it will go the next girl to embellish. I’m really excited about this project and I can’t wait to see the finished blocks. We really have a very talented and diverse group so the end results should be interesting.
So that’s what I worked on during our sew-in. I chose to do an embroidered gingerbread house from a pattern I purchased from an Etsy shop called BigBgd. Very cute stuff! I enlarged one of the designs and embroidered the outer lines so the girls could have fun with the landscape and “candy decor”.

I still have the side candy canes left to embroider but I made some pretty good progress this Sunday. Now gotta get back to embroidering the Witches Boot before another month sneaks by and it’s October.

Thanks Pattie for being a great hostess. We all had a great time and look forward to coming back.
I hope to post a couple of new quilts we’ve recently finished soon, so be sure to check back with us!
I didn’t get to spend too much time with my Jacks this weekend even though I’m really enjoying this embroidery. It has a lot of dimension. I tried to get you a good pic of it so you could see all the french knots and satin stitching.


I can’t wait to start those circle flowers! Why didn’t I get around to those, you ask? Well, I was super busy all weekend working on a new project for our show coming up this weekend, which involved making 80 of these…

More on that later…
And on other subjects, guess what time it is. Girl Scout Cookie time!

That box of Savannah Smiles are yummy. **Please, no comments on how my diet is going.** I had to buy them! Those little girls were in front of the grocery store in freezin’ their little cookies off! I couldn’t say no.
It feels sooo good to mark something off the list as finished. There was a whole lotta that going on around here this week! Three to be precise.
BackYard Baby Quilted, bound & kitted.

I kitted these for our upcoming show in the sand pails with a shovel. After all it is called BackYard Baby. So cute! Hopefully it will draw some attention into the booth.

Wonky WildFlowers Borders on, quilted and bound. Super cute!

Paige meandered the center around the embroidery work to make it pop out.

And I did a little wonkiness in the log cabins.

Spring Dresden Table Runner
We made this with the new fabric line Lush by Patty Young using our pattern, North Garden Dresden Table Runner.
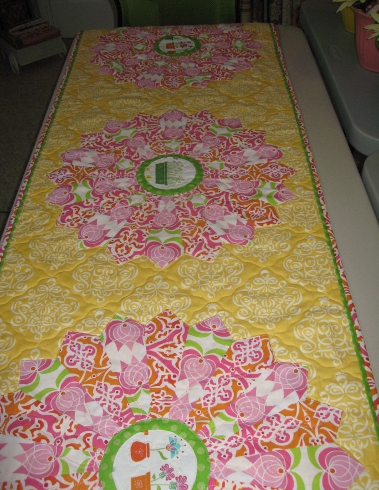
A pretty, butter yellow background with bright creamsicle & pink dresdens.

We fussy cut the Flower Shop fabric for the dresden centers.

Bright and cheery! The perfect project during winter while wishing for spring. And I kitted these inside flower pots and added a cute yellow daisy.

These kits should be available at Etsy and SewModDesigns soon.
Now, on to cutting out my next project. Talk to ya tomorrow:)
Do you yearn to pull out those Crayons and relive your grade school days? Well we can! Tinted embroidery is a great way to spruce up those open spaces in a project and add a little color without all the work of filling in spaces with filler stitches like satin stitching.
So go grab your supplies and let’s get started!
Crayons
Embroidery pattern
Pencil or brown .01 Pigma Pen
Pins
Iron
White paper towels
Floss
I’m working on Crabapple Hill’s Which Witch’s Boot.
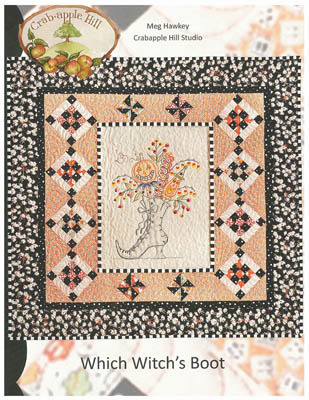
1) Pin your pattern to your fabric.
2) Using a light box, transfer your pattern using a #2 pencil or Pigma pen. Remove pins and pattern.

3) Using a white Crayon, color heavily the areas that will be tinted with color. If your fabric is pulling, try taping your fabric down.

4) Tint the areas with the Crayons. Use light strokes. Remember we are tinting, not coloring. I’ve made this mistake a couple of times. I have a heavy hand. If you’re not following pattern instructions and choosing your own colors, always start tinting with lighter colors first. For example, my leaves are tinted green. Light green first, shaded with a darker green and tinted at the tips with a bit of red.
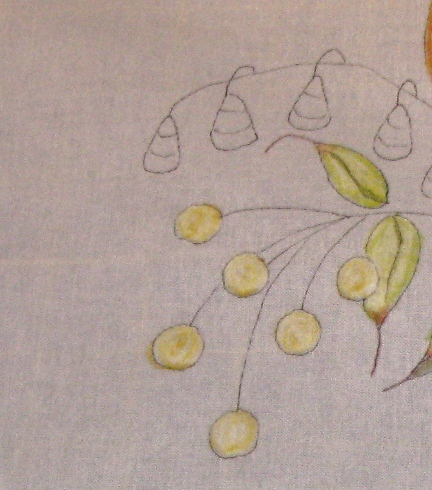

**tip** Check your work carefully. If you find flakes of the Crayon on the fabric, blow them off. You don’t want them to stick to the fabric. Another of my mistakes. I ended up with bits of orange on my gray boot. According to Crabapple Hill, if you need to remove any coloring mistakes, do so before you iron. Heat setting it makes it permanent! Remove mistakes by mixing a paste of baking soda and water. Dip a Q-Tip in the paste and rub the area until the color disappears. Rinse that area with cool water and air dry. Re-color and proceed to step 4.
4) Place your tinted embroidery face up on ironing surface. Cover your tinted areas with white paper towels and press well with a hot iron.

Check the paper towels for crayon residue or bleeding. If there is some, then repeat step 4 with new paper towels until there is no sign of Crayon on the towels.
Now it’s time to start stitching!

I received two Sarah Jane embroidery patterns from my mom for Christmas, Summer Flowers and On Parade.
![]()
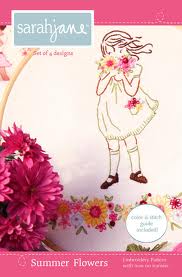
I finally found some in between time to sneak one in and I loved every minute of it. I like a pattern that has several stitches involved and I even learned a new one, which is always exciting.
Here’s Summer Flowers in all her beauty!

I framed it in the hoop and her new home will be proudly displayed in the SewMod bathroom.

The new stitch I learned was the Bullion Stitch. It’s the little bunches of roses that appear to pop off the fabric. Really easy. It’s basically a french knot except wrapped about 15-30 wraps. Once it’s pulled through the needle, the stitch lays curved to create the flower.

If I had a manicure, I’d show you with a little demo, but I don’t and I’m not about to torture you with that sight:) I promise I’ll work on that and do a mini embroidery session for you!
After I finish up the Parade embroidery, this is the one I want to do next, called Make It Do.
![]()
So cute! But before I get started on those, I’m going to be working on a special embroidery project for Paige. So be sure to check back next week for that!
Tomorrow I’ll be showing you some of the prints we recieved from Art Gallery this week and what I worked on during my weekly sewing day with some of the SewMod girls. See you then.
I made another weekend finish, Wonky Wildflowers. Have you ever seen anything soo dang cute!


I really enjoyed doing this. This pattern has many techniques in it that kept me interested. Embroidery of course, applique, both hand and machine, making the hexagons, and using the easy dresden to make all the wedges for the grass and the sun. The one thing I had never done was make the wonky log cabins. I saved them for last and as you can tell by this middle blue and pink one, my first attempt was a little not so wonky.

It’s more difficult than you think to make something not straight! I did let go and not be so uptight when it came to whacking off my edges and finally got the hang of it. But I did notice when I was finished that all my blocks tend to only wonk to one side:)
The only thing left to finish this up is the border. I spent all day Sunday hem hawing over which fabric to use. If you know me, that can be tedious. It has to be right or forget it. After all, I spent all that time and love making it. I’m not going to settle. I did really want to use something from my stash. I had one tiny scrap piece of fabric from the Favorites collection by Me And My Sister and it had to be that.

I had to order it. So I should be able to complete this adorable little wall hanging this week. Then of course the dreaded quilting..ugh! Let the whining begin:)
Can’t wait to show off the finished piece. That will be my motivation!
Next Wonky is…Wonky Winter.
The SewMod group is going to tackle this as a sew-in project hopefully in March. This will be exciting to see all the different versions from our talented group. I already have an idea for mine!
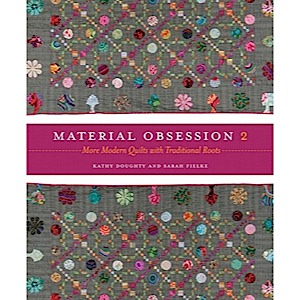
During Christmas break Paige and I decided to do something totally un-work related and for ourselves. So we picked a day and a project...The Seasons, from the book Material Obsession 2. I love both book 1 & 2. Lot’s of inspiring works of art. We love how she takes traditional ideas and uses modern fabrics to bring new life to quilts and projects.

We chose to do a season each instead of the whole quilt so that both of us would have a little wall hanging of our work. I made summer. But we decided that we liked Night & Day for our quilts instead of Summer & Winter.

I found the perfect background in my stash, cute little birdies! And I’d have to say some pretty perfect grass! I added some little crochet flowers and green embroidery to spruce it up. I even added french knots in the border along some of the orange flowers.

Most of my fabrics were Central Park & Fandango by Kate Spain. I made the tree leaves from just a charm pack. And trees can’t grow without sunshine, right?

Paige chose winter for her project. Deep, rich colors with a winters night background. p.s., don’t mind the wobbly binding. It’s pinned on. Ran outta time:(

She added a wool black kitty. He’s out for his evening stroll.

I wish the camera picked up all the beading she added to her quilt. It’s along the grass line, the kitty’s eyes, and in the leaves.

This project was a lot of fun & would make a really fun class for a quilt shop. We used the Easy Dresden tool instead of the paper template. We had it completed and the leaves appliqued in just one sewing day!
I came across a free block of the month over at Shabby Fabrics called Country Cottages. Just what I love, a block that has embroidery & applique. If you’re new to applique she even has a tutorial available. Here’s my version..

The only thing I changed was leaving off the snowflakes because it competed with my background. I think it turned out a bit more swiss cottage than country, but that’s ok. That’s what’s so great about these free BOM’s with their Flickr groups. Everyone gets to post their own interpretation and we can all be inspired by each others work.
I really like her work and patterns so I’m sure this is going to be fun project for the year. Head on over and check it out. Be sure to let me know if you’re going to participate so I can look for your pic on Flickr:)
I have a new handmade item to add to my Christmas decorations this year. A Framed button tree!

I saw this in a holiday magazine and it only requires a few items to make it, which I already owned. If you have buttons, scraps of Christmas fabrics, embroidery floss and an 8×10 frame you’re all set! I only had to purchase the frame and ,of course, I couldn’t find a red one, so I painted it.
I seem to be on a button/embroidery/tree theme this year!


