
You are currently browsing the category archive for the ‘quilts’ category.

Category Archive
We’ve been working really hard to get some new kits together for the special little ones in your life!
This first one is called ‘Sweet Baby Girl’ and it’s from the Sweet Baby Girl fabric line from Riley Blake. The monkeys & frogs in the this line are so cute and the alphabet fabric is adorable with the toys mixed in!

We kit this strip quilt up often and it’s perfect for beginners and experienced quilters alike. A fast quilt that can be made completely DIY style.

The quilt is easy enough to quilt at home with straight line quilting on each side of the seam allowances.

The Sweet Baby Girl complete KIT can be found in the SewModDesigns Etsy shop for $40 plus shipping. Everything is included in your kit except the batting. You even get to select your favorite backing..

To read more about this Sweet quilt click HERE.
A quilt for the future sports star…Play Ball Baby Quilt KIT.

This was my first time kitting the Radio Way pattern from JayBird Quilts. This was just about the easiest thing I’ve sewn! Half of the cutting is already done since it’s made from a jelly roll so this sews up super fast!

Measuring at 40″x40″ and having all of the straight lines on the quilt, make ‘straight line’ quilting easy. Paige actually quilted this one for me with stars and loops so it’s definitely another great quilt for beginners and experienced quilters.

The fabric line is Play Ball from Riley Blake with every sport boys love…baseball, football & basketball. Every piece of the line is featured in the quilt top.

The backing is your choice of tossed jerseys in navy or the Play Ball main print. The complete KIT including the top, backing, binding & pattern is $40 plus shipping and can be found HERE.

Catch-up part 4…
I knew when I saw this Riley Blake line by Emily Taylor that I had to have it and make something beautiful for us grown-ups! It reminds me of a ‘pretty cowgirl’ with all its florals and weathered pieces.

I especially love the blues. It reminds me of a repurposed piece of furniture that you’d find in a farmhouse.

And with any pretty cowgirl theme, there needs to be a star design. I chose to make this kit from Lella Boutiques StarStruck pattern. The large and small florals are featured in a star and snowball quilt combination. The kit assembles easily because the focus fabrics are precut 10″ squares.

Kit comes with fabrics for the top, binding and pattern. Quilt measures 62-1/2″ x 72″.

As of now, I have this quilt sample on display, draped over the couch. It makes my heart smile every time I see it!

I’m pretty sure this sample is one that will have a permanent home in my house!
As of this post, most of the Chatsworth fabrics have been sold. I have kits left and a couple of layer cakes and a FQ bundle along with one bolt of the dainty blue floral backing. If you’d like to check these out you can find them in the SewMod Etsy shop.
Christmas is fast approaching but there’s still time to whip up a special handmade gift for the baby in your life.
The Equilateral quilt kit that I kitted for the boys is a popular seller so why shouldn’t the girls get as just a cute quilt as the boys? The Wildflower Meadow line from Melly & Me and Riley Blake Fabrics is perfect for the triangles.

Comfort baby in all the goodness of theses adorable nature friends. The focus fabric in this line features hedgehogs, sweet little bluebirds and playful squirrels all tossed amoung the pretty wildflowers! Aren’t these little hedgehogs adorable!?!

The quilt top colors of this KIT are bright pink, blues, and yellows. The backing is blue wildflowers on white with tiny pink birds tied all together with a hot pink binding.

Complete KIT comes with enough fabric to make the quilt top, binding, backing and free quilt instructions. Batting NOT included. Quilt measures approx. 35″x 42.5″. $42 plus shipping.

Pattern includes step-by-step instructions for assembly. Equilateral triangle quilts are fun and fast to make. After you make one using the pattern, you’ll want to make more! The quilt can either be cut using the template provided in the pattern or using the Creative Grids 60 degree triangle ruler found here. The Equilateral tutorial can be found here if you’d like more info on how to assemble it.
Now…a new one for baby boy…Dino-Roar!

Dino-Roar is made using Riley Blake’s Dinosaur fabric line in a traditional Road To Tennessee quilt layout. A Road to Tennessee block is basically a Snowball block with only two of the corners replaced with a coordinating fabric instead of all four. So easy and perfect for any fabrics and especially scraps.
Dino-Roar uses 8 different fun prints in oranges, greens, browns & blues. There are Dinos tossed in different sizes, a sweet little leaf print and other coordinating Dino ‘egg’ prints. Kona Snow is used for the white. The binding ties it all together with Kona Chocolate.

Dino-Roar measures 45″ x 45″ and is a complete kit as well including the backing, binding and free pattern. $55 plus shipping.
The backing is available in any of the Dinosaur prints and can be selected here at the time of checkout.

Kit comes with bonus instructions for an 18″ pillow using your Dinosaur scraps! Check back tomorrow when I’ll be doing the step-by-step tutorial using a 3-1/2″ Road to Tennessee quilt block.

Easy, fast & fun and just in time for Christmas! Feel free to convo me if you have any questions.

I have been wanting to make a clamshell quilt for quite some time now. I knew this would be perfect to show off all of these fabulous prints.

Now I know that some of you are groaning. Knowing how much I like handwork, you’re assuming that it’s hand appliqued, right? Well, it’s not!! I’m a big fan of Crazy Old Ladies patterns and Emily Herrick designed one called ‘Clambake’.

For all of you modern quilters out there who love a quick fix and instant satisfaction, this quilt assembles fast with a quick cutting method and machine appliqued clamshells.

Clambake measures at approx. 55″ x 62″ for a perfect lap quilt. Or, I’m thinking it would be really pretty hanging in my bedroom!

As I was assembling this beauty, I found a few shortcuts to an already simple pattern. Every little but helps so I’ve listed a few tips & tricks below if you happen to purchase the kit or buy the pattern.
Clambake Tips & Tricks
Use a thicker box to cut the template from so that you can easily rest and guide your rotary cutter along the edge while cutting. I used a leftover USPS box. Cut more than one template from the box just in case you end up ‘shaving’ a bit from your original template while your cut your clamshells out.
Use a new sharp blade to easily cut through multiple fabrics at a time.
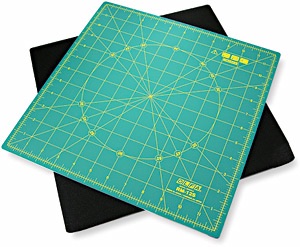
Use a rotating rotary mat, like the Olfa Spinning Rotary Mat.
Spin the mat around while you cut out the template. This alleviates the need to move and shift your fabrics around while cutting. These are also great to use for fussy cutting projects.
If you don’t want to mark the center of each clamshell, you can finger press to crease the center right before you begin lining them up on their rows by folding them in half to find the center point.
Use ‘Perfect Shape’ template plastic. I’ve tried so many template plastics over the years and haven’t found any that can withstand the heat I put them through except this one from The Stencil Company called ‘Perfect Shape’. It never melts and I only used ONE template for all of my clamshells. Trust me, when this product says ‘no melt’, it actually means it!!

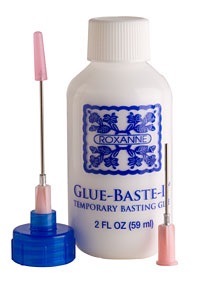
Instead of pinning my clamshells, I used Roxanne’s Glue Baste It. I did not pin ANYTHING while sewing my clamshells! “Roxanne ‘s Glue-Baste-It is 100% water soluble, dries in minutes, and the unique applicator top allows for controlled placement of tiny glue droplets. It does not feel stiff, and does not contain harmful chemicals, dyes, or waxes. It cleans up with water and washes out of fabric with soapy water, even after ironing or sewing.”
Apply the glue along the edge of your clamshell. Give it a good press with the iron, move to the next one and so on until you’ve ‘glue basted’ your row. It bonds quickly so you don’t have to worry about it coming undone when you move it. Take it to your sewing machine and top stitch the clamshell 1/8″ away from the edge. I use this glue on all of my applique projects.
I’d give this quilt ⭐️⭐️⭐️⭐️⭐️. I had fun, it wasn’t too time intensive, and I got to use some of my favorite products. Whew! I love it when I can share my favorite products with you guys!
The Clambake kits are available at all the upcoming shows while supplies last (see Visit SewMod at the top of the blog) along with the coordinating fabrics. If you can’t make it to a show, visit us in the SewModDesigns Etsy shop. Kits include the fabrics for quilt top, binding and pattern. Backing & Batting NOT included.
If you’re buying the kit and are interested in either a sheet of the Perfect Shape or a small bottle of Roxanne’s, I have them available too. Neither of these products are available at your local craft and hobby shops. Only some quilt shops carry them. You can purchase the Appliqué Add-On kit here.
Have a great weekend everyone!
Our newest kit, Vintage Snowballs, combines Vintage Noel & Sugar Rush from Blend Fabrics in a snowball block design. A snowball block is one of the easiest blocks you’ll ever make. Not only is it simple, it’s a fabulous block to show off medium to large scale prints. It’s perfect for these fabrics!

You can easily see the Vintage Ornaments, Snow Globes & perfectly cute Gingerbread Houses!

To add some interest I wanted to separate the snowball blocks with a sashing and candy stripe cornerstones.

Then I carried that stripe out to the binding to tie everything together.

Let’s not forget about the backing…it deserves just as much attention to detail. When I have time, I like to use most of my scraps up on the backing. Just randomly pieced and flying by the seat of my pants is usually the way I roll with my backs. I think this one turned out great!

I didn’t stop there though. You know I love Christmas fabric!! So I made up a couple of cute Allie dogs too. This is a pattern by Bunny Hill that’s in the shop. So stinkin’ cute and simple. Ive made these in the past as package toppers for your favorite puppy lover, or ornaments hung from the tree.

I made one when Daisy came to live with us. Her puppy nestles every year in my Christmas tree. Puppy’s first ornament. Too add the extra touch of cuteness, head over to Petsmart and have a few dog tags made to adorn their necks.

If you’d like a Vintage Snowball Kit or the Allie Dog pattern, visit the SewModDesigns Etsy shop. Kit is $47.50 plus shipping. Quilt measures approx. 50″ x 59″ and comes with an instruction sheet, quilt top and binding fabrics. Backing and Batting NOT included.
I’ve had this pattern, Posh Tot by Blue Underground, for awhile. I even sell it in the shop but I’ve never gotten around to making it till now.
Only three different fabrics are needed for this quilt. I used a Kona pink, Riley Blake’s ‘Girl Crazy’ line and a pop of color in the square centers to make this modern baby quilt.

I did choose to make the binding from the ‘Girl Crazy’ stripe to make it a bit more interesting.

I love it when my projects can be completed within the day…at least my quilt tops that is. The directions are so easy, I barely had to give them a second glance. I would have been able to finish it all in one day, but I was going to leave the quilting magic up to Paige this time. The pattern comes with different sizes so I bet once you see how easy & fast Posh Tot is, you’ll wanna make more! Maybe even one for yourself:)
Posh Tot can be easily quilted in straight lines, a wavy serpentine stitch, or an all-over.

The kit comes complete with the Blue Underground pattern, quilt top, binding and backing. Batting NOT included.
My sample was made using the stripe and a solid but the kits are also available using the Girl Crazy main fabric in pink or white as the backing. Your choice!
The finished quilt measures 39″x49″ and the KITS are available in the SewModDesigns Etsy shop for $42.00 plus shipping.
So, get all Girl Crazy and make a special little girl a Posh Tot!
Take a Fancy Free bike ride and smell all the pretty flowers along the way.

I used one of our easiest patterns, ‘Baby Me Blankie’, to make this baby girl quilt. Simple cutting and strip piecing help this baby assemble fast! Wanna know how long it takes me to make one of these? 40 minutes. Yep. You heard me right…40 minutes! So, if I factor in cut time, I’ve made this quilt top in less than an hour.

The quilting on ‘Baby Me Blankie’ is simple enough to do yourself. Heck, I even did it! All you need to do is properly pin the layers and stitch a 1/4″ along each side of the strips seam allowances. Wanna know how long it took me? About 45 minutes!

Add in your binding time and you’ve got yourself a handmade baby gift for a special bitty one all finished in just one day! Fast, Easy, & Fancy Free.

These kits are available now in the SewModDesigns Etsy shop.Kit is $40.00 plus shipping and comes complete with top, backing, binding & free pattern.
“Strawberry Vintage Market” COMPLETE Baby Quilt Kit is here. I spent some time this week kitting this cutie up.

Looking for a sweet & adorable baby girl quilt that is quick and easy to put together?
Vintage Market is Riley Blake’s newest fabric line and we’ve taken all the sweetness of this much awaited line from Tasha Noel and designed it just for baby in our most popular quilt kit.

Take baby on a stroller ride to the local market, where vintage quilts are hung for sale, sweet strawberries and homemade jam are sold at the farmstand and fresh flowers are in bloom.

The center fabric is framed with the red strawberry scalloped vines and carried over to the binding.

The border fabric is a navy tossed bouquet of flowers and the backing is your choice of a fun bike ride or pink strawberries. You get to choose to make it your own!

This quilt is perfect for a new baby, the nursery, as a wall hanging or a blankie for the carrier or stroller.
Quilt KIT is a perfect for the beginner & measures 40″ x 40″ .
Everything is included with your quilt including, backing, binding, quilt front and a free pattern!
The only thing needed is the batting.
Vintage Market has complete step by step instructions to ensure you have a great time creating a one of a kind baby heirloom that’s handmade by you.

If you’re looking for Vintage Market fabric, we have FQ stacks and some yardage left. Visit the SewModDesigns Etsy shop.


Our June guild swap was ‘fabric baskets’. I used that super cute Paris Bonjour fabric that arrived from Timeless Treasures and a tutorial found at St. Louis Folk Victorian. The instructions were easy and clear, which made this basket a breeze but made it difficult for me to bid it adieu because it turned out so darned cute! Not to fret. It went to a good home:)

What I received in return was one of these fab one hour baskets made by Shelley over at Elsie’s Girl. Don’t you just love that stripe & polka dot!

I also managed to finish up yet another MineCraft quilt. But I’ll spare you yet another pic of that. But expect a new MineCraft character to be gracing a quilt top soon, with a tutorial…psst..it’s the bad guy in MineCraft, if your wondering. BOOM!
I partially watched The Sound Of Music while cutting 27 new kits.

Paige quilted an HST baby elephant quilt for me.

This was just made using my leftover squares from the Spinning Star demo I did here. And ‘Oh Boy’, did it turn out cute or what?!

This is bound and you can find this SewMod cutie for sale in the SewModMakes Etsy shop.

And lastly, I spent some time making a block for our next guild lottery entry. We’re doing a Halloween theme with a specific color palette this time using paint chips that Shelley picked…A Modern Halloween.

It will be interesting to see what everyone comes up with. I think I’ll make two more to increase my chances of winning!

But for now, I’ll say…
🎶🎶So long, farewell, auf wiedersehen, adieu
Adieu, adieu, to you and you and you🎶🎶
I get caught up in the excitement of starting something new. The wonder of its potential greatness. I accomplish just enough to satisfy my need…then something shiny and more pretty catches my eye. Sound familiar?

Uh huh..thought so. Now, since we’re all in the same boat, I guess there won’t be any judgement when I say … I started another Christmas quilt. I just can’t help myself! I have all of this other work to do (UFO’s) and I start another project!? It wasn’t my fault. I was going through my Christmas stash and came across the Anna Griffin Isabelle fabric I had been hoarding.
It’s shiny and pretty. It’s got that vintagey feel.
It’s tough photographing a quilt in 0° weather after a blizzard. I froze my ass off out there today. I have no place to lay it out. So, till the deep freeze melts, you get partial views…and obviously wrinkly ones. Who has time to take perfect pics when your toes are getting frost bite!

I made it with the Fruitcakes pattern and used Kona Snow as the background. I’m gave it my treasured Lakehouse black dot fabric for the flange, backing and binding. And those scallops on the border fabric...you know, the ones you can barely see in the photo… Love it! You’ll have to take my word:)

The guild had a charity sew-in a couple of Saturday’s ago. We donate quilts to breast cancer treatment and surgery patients at Centegra Gaver’s Breast Cancer Center in McHenry County. I whipped up this little lovely. A quick quilt and a great way to use up some stash for a good cause. It’s in Paige’s hands now too. I think she’s gonna be pretty busy…

I did happen to finish 1/2 of a UFO this week. One of two bindings are now marked off my list! I’ll post the entire quilt pic soon.

Until then, pour a glass of wine, put your feet up & enjoy your weekend. You deserve it!


