Literally..I still have so many quilts tucked away and keeping them buried in plastic tubs in the garage makes me cringe..

So I’ve put my beautiful little Tea Cup Quilt on eBay to see if it can find a good home. Where it will be loved. Where it can be displayed. Where it won’t be stuck in a tub!

I made this quilt while I belonged to my Tea Buddies Flickr group. While I was a member, I met lots of ladies I still keep an eye on and a share a sweet word with every now and then.

I had a lot of fun in that group. I was a part of something where I created and my Buddies supported my efforts. I would strongly encourage anyone to get involved. Jump in and join a group. Join a block exchange. Join a swap. Make friends y’all…Yes, online friends!

I designed this quilt myself. I hand appliquéd the tea cups and hand embroidered the flowers. I can’t remember if I used the embroidery designs from a CrabApple Hill or Black Cat Creations pattern. I believe I adapted them a bit to fit in a tea cup.

I was inspired by my collection of tea cups I displayed on my kitchen hutch…flowers, cups and doilies.

Originally, my design was supposed to incorporate my moms crochet doilies but once I finished the quilt, it was a little too busy with the crochet. But no worries mom..I kept the doilies:)

So tell your all your tea buddies that there’s a special quilt top out there for sale!

All it needs is a quilter to finish it off, or instead, just add the backing and make it a table topper. It’s small enough to even use as a wall hanging or a throw.

Don’t let quilts live in plastic tubs! Adopt one today:)

Help us make room for new ideas and fabric!

We’re having an Inventory Reduction Sale! All fabrics, kits, and supplies on sale including the new arrivals! New arrivals are 20% off. All other fabrics are $6/yard. Half yards $3. Patterns & books 20% off. Select kits are up to 1/2 off.

Let’s get to know each other better. I’ve met lots of wonderful people through social media and I’d like to get to know you too!

My favorite pastime these days is, of courses, Pinterest. You can find me as Lorrie McKey if you search by name for pinners. I love to collect and add to my boards. It’s like shopping, without the commitment. I have lots of quilt pics to browse through and hopefully we can inspire each other. My favorite thing to pin is crochet ideas and retro bikes!

Do you Instagram? I find instagram to be lots of fun and it’s not only a great way to share ideas, but know each other on a more personal level. Instagram is the fun of the social media world. You can post food, what you’re working on that day, your puppy, whatever you want..even the goofy pics! You can me here as @SmorieLorrie.

I know y’all are on Facebook! So let’s hook up there. I post frequently and showcase what’s coming up and going on at SewMod. You’ll find great ideas and hopefully we can start being ‘friends’. Now head over and push that ‘Like’ button for ‘SewModDesigns‘!

Send me a tweet @SewModDesigns. Here’s where I like to tweet out tutorials from different designers, links to special deals, or trending stories.

And finally, what about Flickr? I’m SmorieLorrie here too. Lots of pics to inspire you to create! And I love collecting others pics in my favorites.

Let’s not forget about the blog. You’re here. I’m here. Now don’t be shy! Leave me a comment to let me know what you’re working on, if you’ve learned a new technique, or if you just wanna chat. Give me a shout out and let’s be friends. I look forward to getting to know you!

Two new pattern books

Art To Heart Curiosities & Mischief Check out that adorable butterfly pillow!

“Full of curiosity, mischief, wonder, energy and love. Kids are the best! These projects will make their lives more bright and fun. Children’s theme projects include: quilts (68″ x 68″), wall quilts, pillow shams, pillows, nap mats, tooth fairy pillows. Pull out section of patterns included. Uses Benartex fabric from the Mischief and Curiosities lines.”

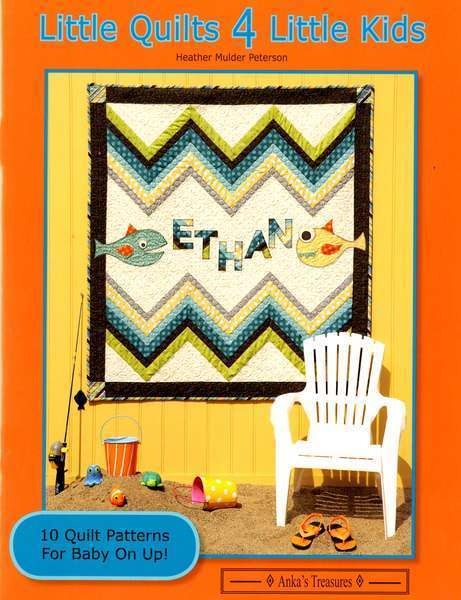
Little Quilts 4 Little Kids by Heather Mulder Peterson is a book featuring 10 fun quilt patterns for babies on up. It contains a range of skill levels as well as traditional to modern styles. Visit Heathers blog to see all the photos of the boy quilts and girl quilts that are in this book.

Oh Boy! From Riley Blake has arrived and it’s adorable!

Kona in Lipstick is back in stock!

More new patterns…

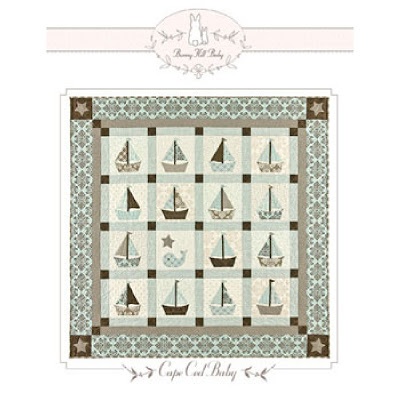
Cape Cod Baby from Bunny Hill

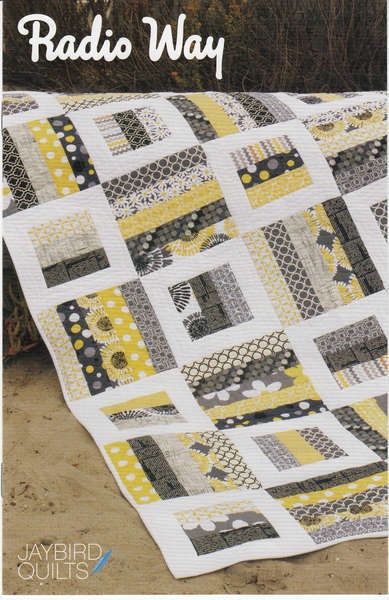
Radio Way Radio Way is a great project to use pre-cut 2-1/2in strips.

And Henrietta Turtle Make a new friend in Henrietta turtle (or skip the flower corsage and make a Henry Turtle). Henrietta will gladly house your pins & needles or entertain your baby or pet – but not at the same time!

SpongeBob SquarePants ain’t got nothin’ on the cute sea creatures featured on Riley Blake’s newest fabric line. Dive In The Ocean to find octopus, squid, sea horses and schools of colorful fishes.

When a new fabric line arrives, the first thing I ask myself is…“What can I make with this?”…besides a quilt?

I think we all like different options when it comes to sewing, whether it’s making bags, skirts, or gifties for the special ones in our lives.

So I chose to make a cute accent pillow for a baby’s room!

I like projects that I can embellish and use different techniques like appliqué & embroidery. A chain stitch for the Splash really made the words ‘pop’ and adding the accent French knots to the anemone gave that some extra dimension too.  

Part of the fun of embellishing is searching for the trims and buttons. I came across tiny fish buttons and dug around my scraps for the ribbon. I even had some leftover Riley Blake jumbo red rick rack! Don’t throw those extra scrap pieces away. You might be able to use them on your own pillow!

And check out those little fishes swimming through the ocean stripes. My mom is the crochet artist in the family, so we have to thank her for that bit of cuteness!

I couldn’t forget the back of the pillow. It deserves something just as special. I fussy cut the selvage since the fishes were representing the color codes. A simple zig zag to tack it down and now it’s done!

After I finish something, I can’t wait to show it off. I didn’t hear..”It’s adorable”, or “That’s so cute”. The first thing I heard was…Who’s Alex?!?

Lol I don’t know who Alex is! I just needed a shop sample and we have no babies so Alex was a name I came up with!

Does anyone need an Alex baby pillow?…..

You can find all of these ‘In The Ocean’ fabrics and many of the newer baby lines in the SewModDesigns Etsy shop!

I promise this is my last post on Glimma. I just want to let y’all know that the cupboards looking pretty bare! Sadly but gladly, we’re almost sold out of the Glimma. I don’t think I’ve ever had so much fun and made so many projects from one fabric line!

A few yardage amounts are still with us. I took the pic to give you an idea of how much of each one we have on hand. $9 $6

Our pre-cuts include several half yards @$4.50 $3 and 1 fat quarter set of 18. $40 $28

We have all of the solids on the bolt and pre-cut into fat quarter sets of 4. $7.50 $5

They need a good home. So hurry and get yours before they’re completely gone! If you have any questions or need a custom listing in the SewMod shop, I’m happy to help! Convo me:)

Just think of all the fun you’ll have with your Glimma!

Even after making that cute “True Blue” quilt, I still can’t get me enough of them. I did an Etsy search for baby whales and came across some other very cute baby ideas. And…whale, I hope you like them too!

Finley the crocheted whale from FloraBellaBoutique would be a great giftie or package topper for a special baby. She even makes this whale in different colors or into a mobile!

Children’s wall decals look fab in their rooms or in the nursery! I used a wall decal over Daisy’s bed and really liked the way it looked and how dang easy it was to put up. Love the whale one over the crib with the baby’s name from Zapoart.

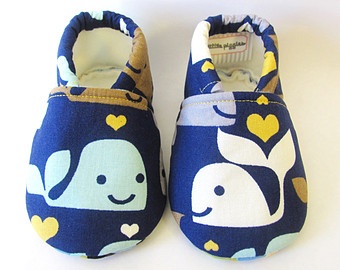
I can’t get over how stinkin’ cute these blue baby shoes are from TheWeeLittlePig.

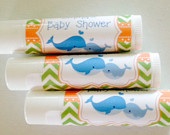
Need party favors for the shower goodie bags? Well how about these whale personalized lip balms from LakeSideLipBalms! Made from sunflower oil, beeswax and many flavors to choose from.

And if your cupcakes for the shower aren’t cute enough then add these cupcake whale toppers made from vanilla fondant from MissSweetSends. Oh my! I don’t think I’ve seen anything sweeter than this!

The Etsy community is built of handmade artists and suppliers and is helped spread by word of mouth. Support your favorite Etsians!

The great things about hexagons are that they only require scraps and you can work on them anywhere…at the orthodontist visit, after school pick up, or road trips! The Molecular Hexies quilt block is the final block for the CLMQG BOM. I hope to complete my remaining 4 blocks (8,9,10,&11) next week so that I can begin putting the quilt together soon! This is a 12.5 inch(12″ finished) hexagon block based on the craftsy.com BOM and tutorial by echinopsaster.blogspot.com. Supplies: 12.5″ background fabric Scraps of fabric for hexies Paper template Scissors Needle & thread *read all directions before starting your project… For the original CLMQG block, I used a 1-1/4″ hexie template and arranged them in rows of 5 & 4. If you’re working on the CLMQG BOM, but are unable to do handwork, I’ve provided the link to Jacquie Gering’s blog tutorial on Sewing Hexagons By Machine Without Marking for an alternative to English Paper Piecing. For the block variation, I used a variety of the hexagon templates to create a Molecular Hexie block and laid them out in a fun pattern. You get to choose which design you’d like to add to your quilt. Be creative! Print your templates and cut out the hexagons. Template downloads 3/4″ Hexie 1″ Hexie 1-1/4″ Hexie 1-1/2″ Hexie 2″ Hexie After you’ve cut the paper templates out, gather your fabrics and cut your scrap at least a 1/4″ around on all sides of the template for easy turning. Use a small pin to secure the paper to the fabric. Either finger press, or if it makes you feel more comfortable until you get the hang of it, iron down all the sides. Once you’ve mastered the hexies you’ll no longer need to iron. Thread your needle and make a small knot. Use any thread to baste your hexagons. I like to use up some of my older, less expensive spools here. Starting on one of the points, work your way in and out around the hexagon and through the paper. To attach the hexagons, layer right sides together and whip stitch, grabbing just enough fabric to keep them together, but not going through the paper this time. For this step I use a coordinating YLI silk thread which can be found at your LQS. It glides right though the fabrics without knotting, is strong, & buries your stitches making them barely noticeable! I use YLI silks for all of my hexies and appliqué projects. Tiny whip stitches make all the difference to make sure your stitching is barely visible from the front. Practice, practice:) Once your hexagons are attached to one another, clip the basting threads and release the paper. Starch and press back into shape. But don’t toss those papers out yet! You can reuse them for other hexie projects. Decide on the hexie placement of your block and pin into place on the background fabric. Appliqué your hexies with a top stitch close to the edge onto your background fabric. My Molecular Hexie was made using a variety of Kaffe and other modern prints and machine appliquéd onto a hand-dyed background fabric. I enjoyed this block and I hope you do too! Now wasn’t that easy? The hardest part was just deciding which Hexie block to make!

True Blue Baby I Love You…Tips On Cutting And Assembly

“Have a whale of a good time with the fun nautical prints in the True Blue Collection featuring whimsical whales, splashing waves and fun geometrics. Anchors away!”

True Blue is designed by Ana Davis. I just love her children’s prints and Blend never, never disappoints me in the quality of their fabrics. I’ve loved every piece I’ve ever ordered from them and this is no exception! True Blue is vibrant and fun to work with.

I knew I wanted to do a strip quilt with this line. It’s perfect with the big playful whales and the baby whales in a row!

The kit is available in the Etsy shop. It includes step-by-step instructions to strip piece the quilt in no time for that special little one. Kit includes all your fabrics, binding and backing, and sews up fast for a baby shower or gift. You can easily quilt with straight lines. It’s a DIY complete project! *batting not included.

And I have some helpful tips for you if you’ve purchased the kit and are ready to start on your baby quilt.

I fussy cut the baby whales to make this quilt, but it wasn’t any trouble to do so since the fabric was printed really straight to begin with. Straighten the edge of your fabric so that the ‘white wave’ is on the cut. Line your ruler up for the 2 inches. The white wave that’s next in line should fall somewhere on that 2 inches. As you can see in the photo, my ruler lined up between the waves.

Cut your strip out and attach to the selected fabrics, taking note of the whale directions. They swim opposite each other!

After all these years sewing, I make the most basic mistakes:( Am I the only one out there that still does this?!? The seam ripper is my best friend..

Sew the strips together in pairs and trim the edges. *When sewing rows, alternate your sewing direction right to left and left to right. Alternating will keep rows straight and help prevent stretching in one direction.

I hope you have as much fun making this as I did! And if you have anymore questions about the True Blue baby quilt, don’t hesitate to ask. I’m happy to help!

Isn’t it beautiful outside today? …well it was when I wrote this blog:) Sunny blue skies and mild temps make me wanna spend all my time outside while I can. So today I took to the outdoors for a little crafting. I set up all my supplies on the patio, poured myself some sweet tea and enjoyed the weather while I created the sweetest little clock for my moms sewing room.

Today I’m going to show you how to make that adorable Button Clock that everyone has been pinning on Pinterest. So gather up the supplies, beg your mom to make you some crocheted flowers and lets get crafty!

Supplies needed:
Clock mechanism & battery (which can be found at Michaels for about $7)
8 inch Wooden embroidery hoop
2 fat quarters, clock fabric & lining
Embroidery floss
Buttons
Crocheted flowers
Craft paint & brush, pink of course!
Scissors, marking utensil
Chipboard (found in the scrapbook section)

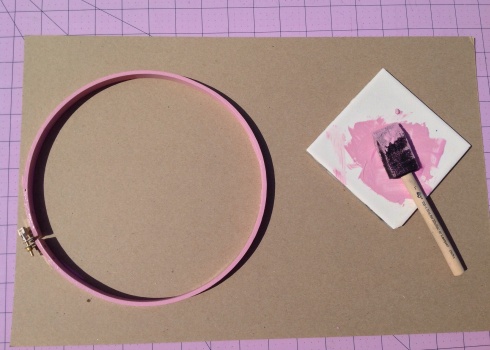
Start by painting your hoop with the craft paint and allowing it to dry.
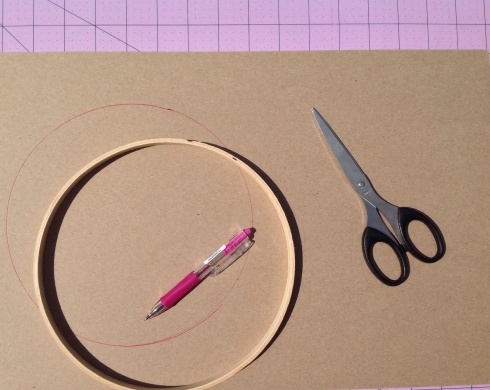
Trace the inner hoop onto your chipboard and cut out with scissors.
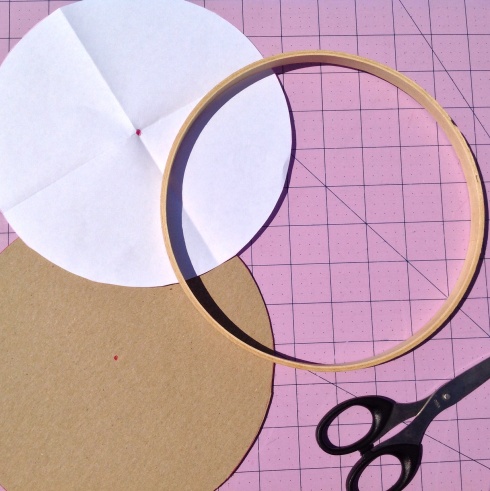
To find the center of your chipboard circle, trace the inner hoop again but this time on a piece of paper. Cut out and fold the paper into quarters. Open and mark the center with a dot. Lay the paper circle on top of the chipboard circle and mark the dot through onto your chipboard. Using an awl or your scissors create a hole where the dot is for the mechanism. Set the chipboard aside. We’ll use it in a bit…
Place your lining fabric behind your clock fabric and tighten securely between the hoops.
Make sure the fabrics are snug and secure by tightening the screw at the top of the outside hoop.
Place your paper circle on top of your hoop and mark the center of your clock fabric with a dot. This will be where your clock mechanism will fit through. Make a small hole with your scissors through both fabrics big enough for the mechanism to fit through.
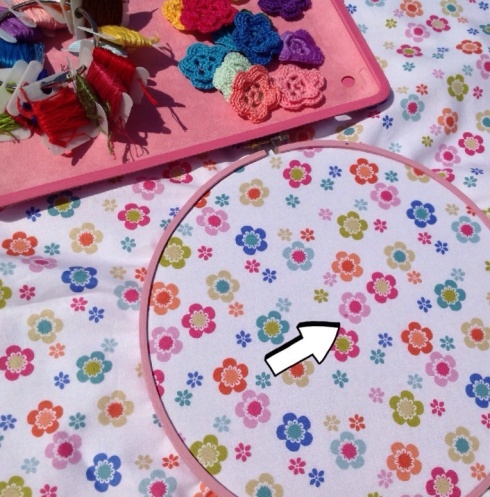
Now the fun part! Attach your flowers and buttons with the embroidery floss. I started with the “12” & “6”. Then the “3” & “9” and eyeballed the remaining numbers.
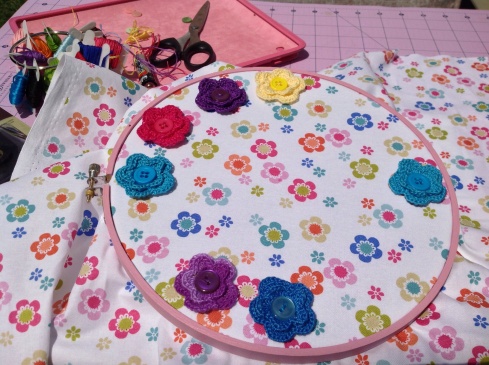
Once you’re finished sewing the buttons on, trim the piece approximately 2″ around the hoop. Add your chipboard circle to the back. This will provide stability for the weight of the clock mechanism.
FYI I added the clock mechanism before this step as you can see in the pic, but I would recommend doing it last. It made for difficult sewing in the next step:(
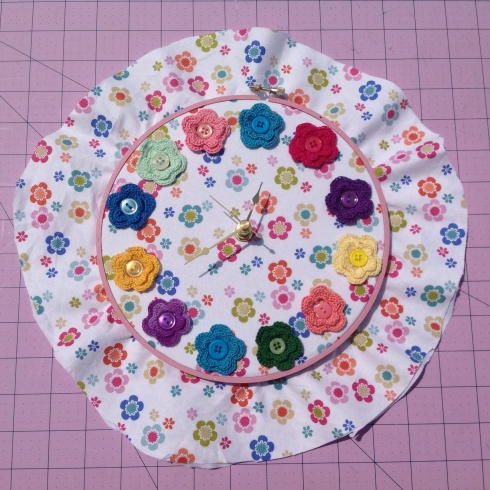
Using a piece of embroidery floss, create a gathering stitch in the fabrics. Pull and knot the thread in the back to make the edges ‘finished’. This will help the clock lie flat against the wall when hanging.  At this point, most hoop art is then covered from behind for a nice finished look, but if we do that, we won’t be able to change out the clock battery now will we?
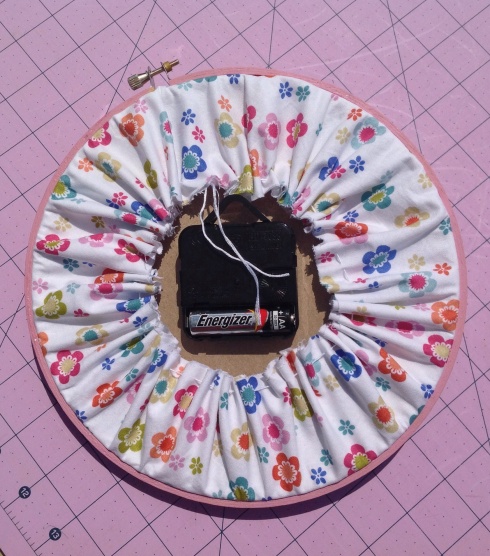
Add the clock mechanism following the instructional diagram provided with the packaging. Tip:Make sure to press down and get a snug fit with the ‘minute’ hand. Otherwise it will spin and loose time. I also removed the rubber washer because it created too much bulk and my clock still keeps great time.
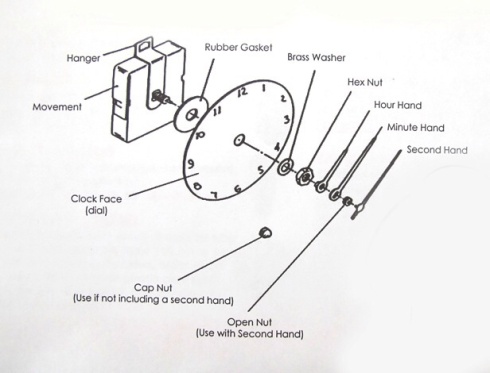
Add the battery, set the time and you’re all finished! Pour yourself another glass of sweet tea while you admire your craftiness!
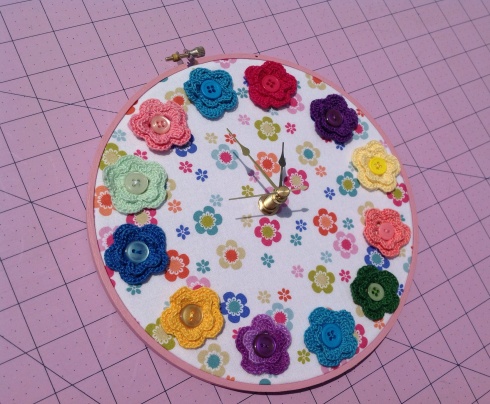
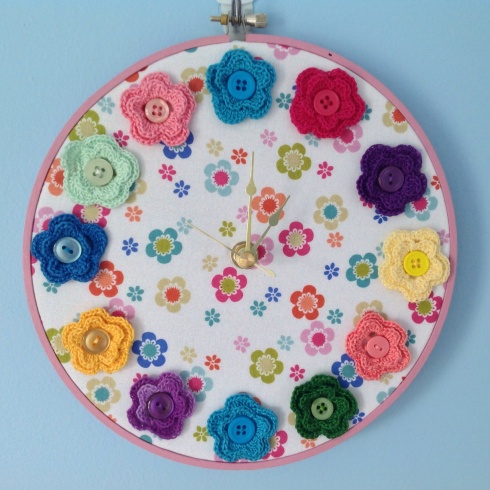
Love this sweet little button clock? Well you’re in luck because I’ve assembled the complete kit and they’re available in the SewMod Etsy Shop. Kit includes the 2 fat quarters, crochet flowers, floss, buttons, chipboard, hoop, & clock mechanism for $25.00. Click on the SewMod link or convo me if you’re interested!

Enter your email address to follow this blog and receive notifications of new posts by email.

Email Address:

MineCraft Tutorial

Crayon Embroidery Tutorial

Machine Binding Tutorial

Blog Archive