
You are currently browsing Lorrie’s articles.

Author Archive
We’ve been working really hard to get some new kits together for the special little ones in your life!
This first one is called ‘Sweet Baby Girl’ and it’s from the Sweet Baby Girl fabric line from Riley Blake. The monkeys & frogs in the this line are so cute and the alphabet fabric is adorable with the toys mixed in!

We kit this strip quilt up often and it’s perfect for beginners and experienced quilters alike. A fast quilt that can be made completely DIY style.

The quilt is easy enough to quilt at home with straight line quilting on each side of the seam allowances.

The Sweet Baby Girl complete KIT can be found in the SewModDesigns Etsy shop for $40 plus shipping. Everything is included in your kit except the batting. You even get to select your favorite backing..

To read more about this Sweet quilt click HERE.
A quilt for the future sports star…Play Ball Baby Quilt KIT.

This was my first time kitting the Radio Way pattern from JayBird Quilts. This was just about the easiest thing I’ve sewn! Half of the cutting is already done since it’s made from a jelly roll so this sews up super fast!

Measuring at 40″x40″ and having all of the straight lines on the quilt, make ‘straight line’ quilting easy. Paige actually quilted this one for me with stars and loops so it’s definitely another great quilt for beginners and experienced quilters.

The fabric line is Play Ball from Riley Blake with every sport boys love…baseball, football & basketball. Every piece of the line is featured in the quilt top.

The backing is your choice of tossed jerseys in navy or the Play Ball main print. The complete KIT including the top, backing, binding & pattern is $40 plus shipping and can be found HERE.

A new year with the CLMQG means new projects, block lotteries, and Secret Pals! I’m really excited. We have the entire year planned and I’m positive it’s going to be fun & exciting. I’ve never played Secret Pal so I’m pretty giddy over this one. Although, I’m sure I’ll blow the surprise. Or she will instantly know it came from me because chances are there will, at some point, be a crocheted flower, embroidery work on her gift or I’ll have no self control and show it all over the blog and instagram. If you figure me out early Secret Pal, I apologize now lol.
The other program we started in January is a Medallion Border challenge. We start with a center square of our choice and each month a new set of guidelines will be chosen for us to complete a border.
For example..this is my center square I showed in January. It’s a retro dress design from a Sizzix die that I traced to turn into a pattern I could hand appliqué. I wanted to work with lots of florals so I chose to focus on some of the LakeHouse and Flower Sugar fabrics I’d been hoarding. I appliquéd them onto a white tone-on-tone dotty background. It took on a dresden like effect when I decided to lay them out in a circular pattern.

My favorite is the navy blue with the big cherries on it!

A recurring theme I’m planning on having is cherries, strawberries, dots, and florals. And of course I’m going to add lots of hand embroidery. To start, I embroidered a purse in the center of my medallion. Every great dress deserves a beautiful purse! This is an embroidery design by CrabApple Hill from her Sundress pattern. I’m going to be incorporating several of those designs into this challenge. Hopefully more along the center corners and into the borders as well.

Each month a design task and a new color is randomly chosen for us to incorporate into the next border. In January the task was a Snowball block and the color was red-violet. Here’s a few Google images so you can visualize my task this month…we can use as many or as few blocks in our row and as much or as little of the red-violet. We just need to to be able to identify it to the challenge coordinator.

For the February meeting I will need to come prepared to show my finished row attached to my medallion or risk being expelled from the program or worse…having some sort of fitting punishment. Oh my. That sounds worse doesn’t it? The unknown is ALWAYS worse!
So I’d better get moving if I want to make my deadline. I’ll be back soon to show you my progress!
Catch-up part 5…we’re almost done!
If you love it, you will save it. Every bitty piece of the line! This is not a typical trait of mine but I’m so glad that I did just that with Tasha Noel’s Vintage Market line.
I mean how the heck can you even discard this cuteness to the trash can anyway!?!
It came into good use when I decided to have a sew day with Paige. We worked all day on the Scrap Happy Purse pattern by Crazy Mom Quilts.

We had a blast making these! We get so much accomplished during our sew days. I love to try to have the girls over once a month. We usually pick a Saturday and start bright and early, about 9am. I fix lunch, there’s always wine involved, and we usually end with a finished project. I like to keep everybody on track!

You need about 200 skinny scraps for the front and back panel. That sounds like a lot but once you start cutting it really isn’t. I actually had leftovers…which I did not toss away…
The only difficult part of the pattern is attaching the handles. It takes time, working your needle through the leather. I’d suggest getting the tool to help with that, which Dritz makes, or puncturing the premade holes in the strap to help your needle slide in and out of easier. Check out this tutorial on how to use the Speedy Stitcher from Dritz at Sew4Home. This handy tool is definitely on my list to buy next time I come across one. Anyone out there ever use this?

Just in case someone tried to run away with my sweet little purse, I added my name label to it along with a cute embroidered heart! Lol

Paige decided on a more scrappy look, using up some of her leftover fabrics.

The Scrap Happy Purse pattern can be found along with the cute red & white polka dot handles in the SewMod Etsy shop. Sadly, all of my Vinatge Market fabric is sold out but don’t fret, I’m awaiting a new shipment!
Now that we’re all caught up from last year, I’m going to try to stay on track. Oh…who am I kidding lol.
Catch-up part 4…
I knew when I saw this Riley Blake line by Emily Taylor that I had to have it and make something beautiful for us grown-ups! It reminds me of a ‘pretty cowgirl’ with all its florals and weathered pieces.

I especially love the blues. It reminds me of a repurposed piece of furniture that you’d find in a farmhouse.

And with any pretty cowgirl theme, there needs to be a star design. I chose to make this kit from Lella Boutiques StarStruck pattern. The large and small florals are featured in a star and snowball quilt combination. The kit assembles easily because the focus fabrics are precut 10″ squares.

Kit comes with fabrics for the top, binding and pattern. Quilt measures 62-1/2″ x 72″.

As of now, I have this quilt sample on display, draped over the couch. It makes my heart smile every time I see it!

I’m pretty sure this sample is one that will have a permanent home in my house!
As of this post, most of the Chatsworth fabrics have been sold. I have kits left and a couple of layer cakes and a FQ bundle along with one bolt of the dainty blue floral backing. If you’d like to check these out you can find them in the SewMod Etsy shop.

SewMod has been invited to host our Handmade Littles presentation…‘Small ways to create fun things with fabric’.
We will be doing a presentation on a variety of small projects designed by SewMod and other artists. We love to make quilts but it’s also rewarding to sprinkle in some of the Littles along the way. We will have quilt examples and sewing patterns showing how we use up scraps, feature our favorite fabrics, and create unique, fun items for gifts.
We’d love to have you join us Thursday, February 4th at the Country Quilters Of McHenry Guild from 7-9pm for the program and vending at…
Shepherd Of The Hills Church
404 N. Green Street
McHenry, IL 60050
We hope to see you there!
Catch-up part 3…
Lazy Girl Designs brings us a fun way to play around with all of those zippers we collect. You can easily interchange your zipper pulls in this SweetPea Pods pattern.

With the One-Zip technique, you cut the zipper apart and remove the pull. Sew one side of the zipper to the fabric, use her trick to get a coordinating pull back on and complete the sewing process.
This technique works with the Atkinson zippers and pulls and we have the colorful pulls in stock in the shop! The package comes with about 30 pulls to mix and match with your zippers.

These make great little gifts and whip up in no time. Two different FQ fabrics, one for the outside and one for the inside will give you 2 Pea Pods.
I made these for the board members for Christmas and stuffed them with binder clips.
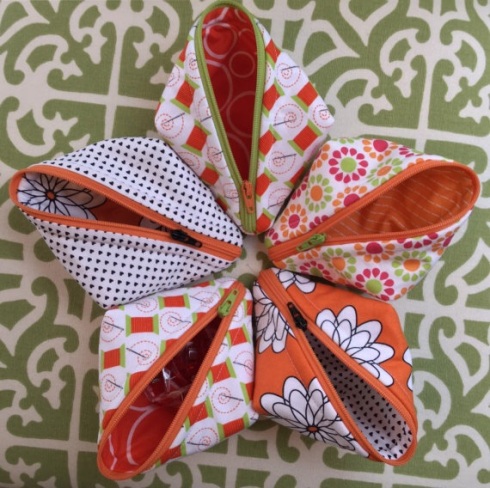
This cute Pea Pod would also make a handy doggie treat holder when you take your pup on the road with you. I’m adding this idea to my project list!
Or how about a Valentine’s one for your secret pal filled with chocolate hearts!
The zipper pull technique also works on Joan’s Becca Bag pattern. I can’t wait to try this one next:)

Both patterns and pulls can be found in the SewMod Etsy shop.
Catch-up part 2…So more on the subject from yesterday about ‘slowing time down‘…
I was so focused last year on refocusing SewMod that I stayed constantly busy and barely left any time for myself. Owning your own business can sometimes leave you ‘working’ more and ‘enjoying’ your craft less. I do have to say though, all of that hard work does have its benefits. SewMod had its best year ever and continues to grow. In 2015 I chose to regroup and send SewMod in the direction of more quilt kits and less fabric on the bolt. With the ever increasing online shops popping up, making my way as a small fabric shop on the Internet became difficult and I knew I needed a new game plan. I began providing you with affordable kits, most of them complete with backings and patterns, along with tips and tricks on the blog, focusing mostly on baby.
Most or all of the fabrics I order come into the shop with a preplanned purpose of kitting. The kit sample is made, the fabrics are immediately cut and kitted, and the fabrics that are then unused for the kits and left on the bolts are sold in the Esty shop or precut for quilt shows.
This method has worked wonders for SewMod. I think I may have found my groove and I only have y’all to thank for hanging in there an being such great friends and customers while I try to figure everything out. I really do appreciate you!
So while I completely transition SewMod over to this new method that’s worked so well, look for some upcoming sales. The first one will be for our CLMQG guild sew-in for January. I’m bringing all of the bolts from the Sale category on the Etsy shop and selling them for $5 a yard. If you see something you like guild members, just convo me and I’ll set it aside for you! Please bring cash for this event.
And while I do enjoy kitting up all of the cute baby kits and sewing with all of the beautiful fabrics for you grown-ups too, I still want to leave time for myself to create something just for me. One of my New Years resolutions this year is to set time aside each month to create something that’s all mine. Something pretty. After all, SewMod’s tag line has always been Need to Create. And I know by doing this, SewMod as a whole will benefit from it too. And hopefully, I’ll not only be more creative, but I’ll inspire you as well.
So along with making myself the Classmate for Christmas, Paige and I got together for a sew day at the end of last year and worked on Lella Boutique’s Goody Goody Binding Kit. A traveling kit that holds your thread, binder clips, needles and scissors. This is genius, especially since I’m always working on a binding while I’m in the car. And did I mention that’s it’s so stinkin’ cute?!
You can find her complete step-by-step instructions along with with photos on her blog if you’d like to make one too. This project can easily be finished in one afternoon.
I made one for our guild Christmas swap.

And filled it with all kinds of ‘goodies’.

Amd one for myself.

I used all of the girly fabrics I like. The front and inside is Riley Blake’s retro Dresses fabric, my pocket is a bicycle print with flowers overflowing from the baskets, and of course, some polka dots! Whenever I take my quilts on a car trip for binding I always travel with the bobbin instead of the spool. So on mine, I added a piece of tiny ric rac and a button wrap closure instead of the Velcro thread holder which suits your Aurifil spool nicely.

And this one is Paige’s. She used some of her Echino fabrics and also adapted hers for the bobbins also.


Well done Paige! I love the fussy cut deer and that whimsy button!
Stay tuned…more catch up coming this week!
Playing catch-up…better late than never.
whew..the end of 2015 went by so fast my head is still spinning. And while I feel like I accomplished quite a bit over the holidays, I definetly slacked when it came to blogging, so I’m going to try to play catch up over the next couple of weeks. Which, btw, did you realize it’s already the third week in January!?!
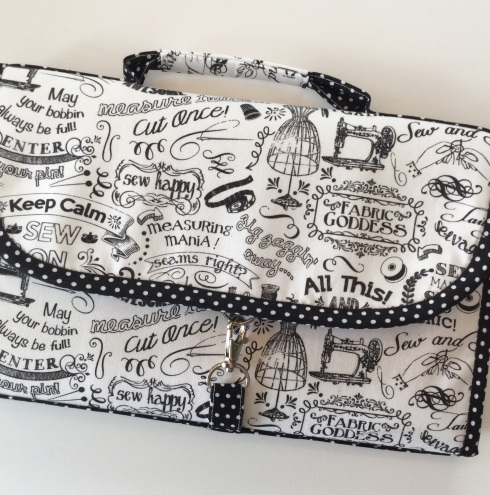
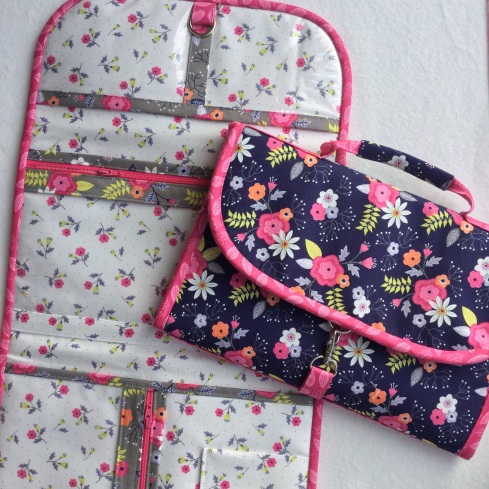
First up is the Classmate pattern from Atkinson designs. I can’t say enough about how well her patterns are written. Step-by-step instructions that are clear as day make something that looks a little difficult, seem sooo easy!
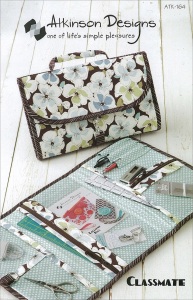
So ‘easy’ in fact that I made 4 of them in about 3 days! What a great tote to keep all your tools and supplies in for that quilt class or to take along with you to guild sew-ins.
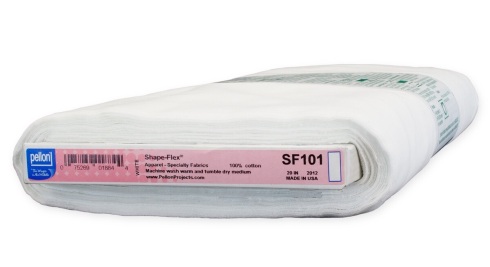
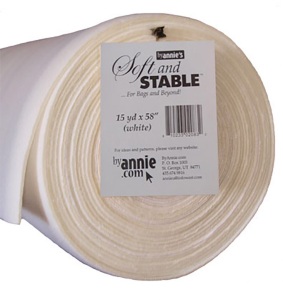
The first thing I want to talk about is some of the ingredients needed for this project that I haven’t used before.
Annie’s Soft And Stable and Pellon’s Shape-Flex.
Shape-Flex is pressed onto the back of the fabrics before cutting. This is the best interfacing y’all! I’m totally going to use this more often and I’m just wondering how the heck had I not heard of it before now?! I read that it’s great for purses and backing my embroidery projects before stitching. It’s so nice and flexible. I think it just might help with that icky wrinkly effect that some interfacings give you even after its pressed onto the fabrics.
Annie’s Soft And Stable gave my project the stability it needed without feeling stiff. This is used as a replacement for your batting in projects like bags and totes. I wish you could touch my finished Classmate to see for yourself!
And never fear the zipper installment when working on a Atkinson pattern. Once you sew a zipper with her method, you’ll always refer back to it on all of your other patterns that need a zipper.
There’s also a great tip for sewing with vinyl. Just layer tissue paper between the presser foot and the vinyl. This helps the foot glide along without sticking. I just sewed mine right on top of the vinyl and pulled it away after I was was finished.
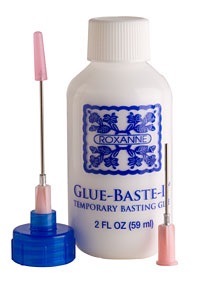
The other tip I have is to skip the basting and use the Roxanne’s Glue Baste-it. This sped up my sewing and didn’t give me any issues whatsoever for taking the short cut of not pinning anything. I glue basted the entire thing!!
I did skip the step on adding the pen pocket. I never carry marking utensils and if I did, I’d keep them zippered up, so I just made that an extra pocket.
One last bit of advice…take the time to hand bind it and don’t forget to add your label. That’s the finishing touch.
My Classmates came out looking so professional if I do say so myself! I gave them away to the girls for Christmas presents this year. But don’t take my word for it. Check ’em out!
This one was made for Paige using Timeless Treasures ‘Sewing Words‘ fabric. Which I’m almost out out of, so if you love it like we do, then you’d better hurry!
I made these two for Shelley & Wendy using two different prints from the Paradise line from Camelot Fabrics.
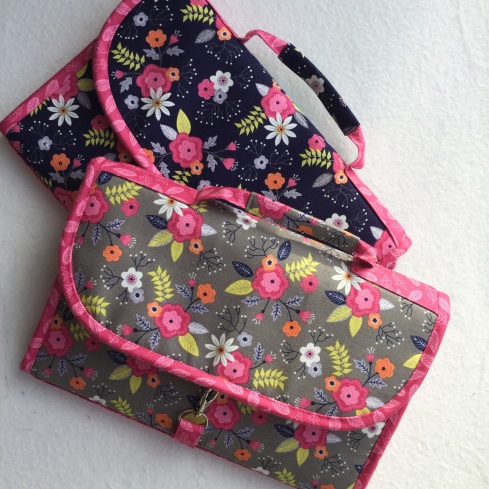
I just love that little white floral print for the inside.
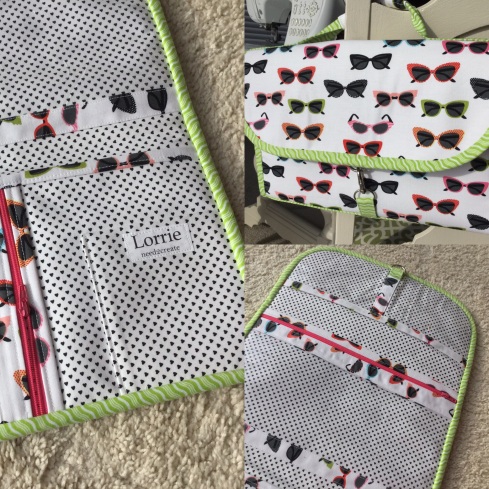
And this one I kept for myself!
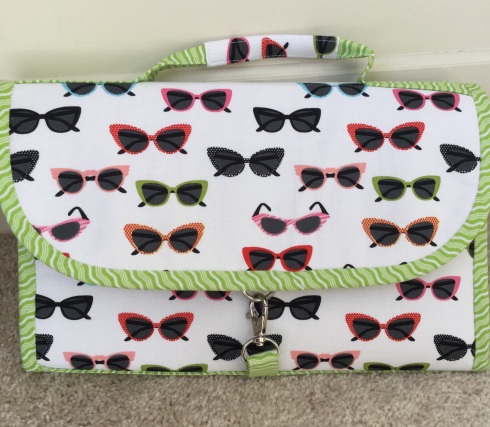
Made with Riley Blake’s retro Sunglasses fabric and coordinating crimped green binding. And how cute are those tiny black hearts for my inside?…swoon…
I do hope that you take some time this year to make one of these. You won’t regret it. I promise!
Oh, and I also hope this year doesn’t speed by as fast as 2015. How do we make time slow down? Is there a secret?
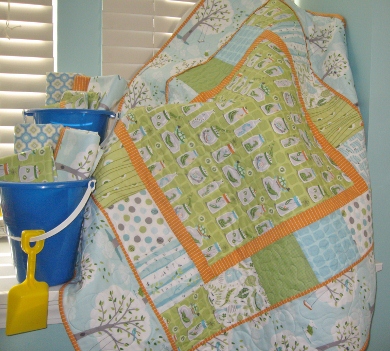
A quick way to add some dimension and decorative flair to your quilt is by adding a flange. On the pattern, Backyard Baby, we add it as one of the ways to transition the borders from one to the other. A flange can be used between borders or before you attach your binding. Using Backyard Baby as our pattern, I’m going to show you just how easy adding a flange is!
Cut (3) 1″ strips WOF.

Connect all 3 strips on the diagonal…just like you would when you prepare a binding.

Trim the seam to 1/4″ and press open.

Press your flange wrong sides together lengthwise.

Starting on one side of the quilt, place raw edges together and lay the folded edge of your flange facing in towards the quilt.

At this point we’re basically going to baste the flange to the quilt. I use a normal stitch length and about an 1/8″ seam allowance.

When you come to the end of the first side of the quilt, stop and trim the flange even with the bottom.
You’ll notice that I did not cut and measure my flange according to the length of each side, but instead left all three lengths a continuous piece and trimmed as I went. Since Backyard Baby is a small quilt, I feel the risk of stretching it out of proportion is minimal…and I’m a wee bit lazy… But if you feel you’d rather cut the specific flange lengths, then you would first cut (4) 27-1/2″ pieces and proceed with the following steps. If you are adding a flange to a larger quilt or the binding on a different quilt, please measure your sides and pre-cut your flange accordingly to ensure that you do not stretch your sides. This will keep your quilt ‘squared up’.

Turn the quilt to work on the next side. Place your flange right on top of the first flange, and continue basting this side until you reach the bottom, and trim again.

Repeat for all four sides of your quilt.

At this point, you’ll begin adding your borders, right on top of the flange, using a 1/4″ seam allowance. Basically pretending your flange isn’t even there. And your end result should look something like this…


2015 was an fabulous year and we couldn’t have done it without you! We attended successful quilt shows and met many new quilters in person and on the Etsy shop. We look forward to another creative year!
All yardage in the shop is 20% off and that includes all of the Oval Elements in stock! So fill up while they last!

All Sale fabrics are marked down to under $5.00! Choose from a variety of Art Gallery, Blend prints and many others. Most of these would make great backings for those unfinished projects and charity quilts you’re working on next year.
Sale runs Sunday, December 27th, 2015 thru Thursday, December 31st, 2015.


