
You are currently browsing Lorrie’s articles.

Author Archive
It’s the end of April. It’s rainy. And cold. I don’t like it one bit and I’m feelin’ a little under the weather myself. If it doesn’t warm up soon here, I will be gettin’ the official Couch Potato award. I’ve gone thru an entire series of Rules Of Engagement, Orange Is The New Black, and now I’m working on American Horror Story. Yes…I said Series, not season. I’m losing touch with reality…
Of course, I’m watching all of this in between the fabulous sewing, cooking and cleaning a housewife does. What? Didn’t you heard me say I was losing touch with reality!
Even though I’m not a housewife, or even married for that matter, I’ve always wanted to be the Retro Housewife. I’m a mid century girl caught in a modern world. I actually do love all of the domestic goddess duties. I would have thrived in June Cleaver’s time, complete with party dress, hostess apron and a cocktail in my hand just waiting for my Ward to come home from a hard day’s work.

Hey..it’s my “reality”..don’t judge!
And as any good hostess would, I’m going share my White Beans & Ham recipe..so let’s get started…
1lb dried northern beans, soaked overnight and rinsed
ham hock
leftover Easter ham, diced
handfull diced carrots
1/4 tsp oregano
Salt, pepper, garlic powder to taste
5 cups water
1 pkg. Jiffy cornbread
Throw it all in the crock-pot on low for about 5-6 hours or till your beans are tender.
Be sure and make that cornbread before your Ward gets home.
Now give him a kiss when he walks through the door. Sit him at the table and serve up the goodness. Smile when he has seconds, cause it’s just that good!

The only thing missing is my sweet tea and that’s because I drank it all last week! Guess it’s wine then.
Cheers y’all!
Some of you might be looking for a wedding gift, baby shower or just wanting something quick and easy to stitch up at your next quilt retreat. If so, you’re in luck! We’ve taken the guesswork outta the process and assembled fantastic kits for you. Take a peek below and if you see something you’re interested in, click on the kit name and you’ll be whisked away to the SewMod Etsy Shop.
Summer Tweets
Welcome spring and summer in with a fresh new quilt! Brighten up your decor, add to a girls bedroom or take it on a picnic. We have designed a quilt kit with the new fabrics from designer – Josephine Kimberling for Blend Fabrics. The fabrics feature fun fruit, flower designs and modern geometric shapes.


Little Wallets
The Little Wallet is perfect for carrying your cards and cash. A simple and fast kit…Make more for your friends or as quick gifts! Modern fabrics and a crochet flower make this wallet unique. Choose from a variety of kits.

Rosalie
This Artful quilt kit is assembled around the ever so popular quilt pattern, Rosalie by Valori Wells, using all quality, quilt store designer fabrics from Art Gallery. Art Gallery is known for their exceptional quality in cotton fabrics. We’ve gathered a collection of deep blues, grays and colorful prints for you to create a beautiful quilt for you to treasure.

Boy Crazy
The focus fabric has everything boys love on it…submarines, robots, cars, baseball hats & more!
Kit includes step-by-step instructions to strip piece the quilt in no time for that special little one. Kit sews up fast for a baby shower or gift.
A great beginner quilt!

Owl Pals
Make these softie owls up for someone special. Makes a great gift for the little ones, whether it’s a holiday gift featuring Christmas or Halloween fabrics or to hang out with them as a room decor or an owl friend!
Owls can kitted up with any fabric combination from the shop.

Pre-Quilted Fat Quarters
We’ve quilted fat quarters in a variety of designs and fabrics so that you could jump right in and begin working on all of those adorable Curby’s Closet patterns. Each fat quarter will make 1 pair of shoes.

YogaMod Yoga Mat Sling
The kit is pre-cut for you. We’ve cut the fabric and interfacing out so all you have to do is follow our step-by-step instructions complete with photos to create your own Mat Sling! Also available in a variety of kit fabrics.

Happy Shopping!

I’ve used cloth napkins so long, I feel GUILTY when I reach for a paper towel. My Grandma made me some for Christmas about 15 years ago with matching place mats and after I moved away from OKC to Chicago I thought about her every time I used them. So not only are cloth napkins the “green” way to go but I’ve also developed a sort of comfort attachment in some way I guess.. I tucked those napkins and place mats away for safe keeping and I’ve just gotten around to replacing them and I’m going to give you an easy tutorial on how to make some for yourself.
Over the years, I’ve used several methods for making napkins. From one-sided to the fancy ones that are doubled-sided with mitered corners..these are reserved for the holidays,

but today we are just going to make double-sided with a top stitch.

The pic above is from the “I Glimma All Over The Place” blog post about a month ago and those napkins have been tried and tested through many washes and I am here to tell ya that they look and feel like new! So don’t hesitate on going green yourself… let’s get started on your own set!
I used fat quarters for mine but you can use up some of that fabric from your stash by cutting 18 ” squares. You will need 2 per napkin.

Place your (2) 18″ squares right sides together. Pin so it doesn’t shift while sewing.
Using a 1/4″ seam allowance sew all the way around the fabric, leaving a 3-4 inch opening for turning.

Clip the corners, being careful not to cut through the stitches.

Turn right sides out through the opening. I used this handy little thingamajig to poke my corners out nicely. Just make sure you don’t push too hard. You’ll push right through your seams.

Press, making sure to turn in the openings raw edges.

Top stitch close to the edge on all sides to secure the opening. This helps keep the fabric from shifting and will help it lie nicely over time.

And you’re all finished! Now go make a nice meal for your Babe or Sweetie to compliment your pretty napkins!


Make sets for your holiday table..

Or gifties for your friends. They’re sure to be impressed!
The Crystal Lake Modern Quilt Guild is doing a BOM quilt and some of the members are helping out by doing the demo on each one. Our demo was the “X and +” block. The demos are done in all the same colors, which are our CLMQG logo colors, but each member can make their own version. Should be interesting to see what everyone comes up with since we all have so many different styles. The demo quilt blocks will be put together and raffled off after we’re all finished.
Our inspiration for this block was a tutorial provided by Amy at BadSkirt.com.
If you live in the Northwestern suburbs of Chicago and haven’t visited us, please do! We have a great time. There is lots to learn from each other. Many workshops are offered throughout the year and it’s a great time to catch up on all those UFO’s you have laying around. We meet in the basement of the Crystal Lake Home State Bank Mortgage Center on Route 14 typically the 2nd Sunday of every month. We look forward to seeing you!
So what do you say let’s get started on this block?
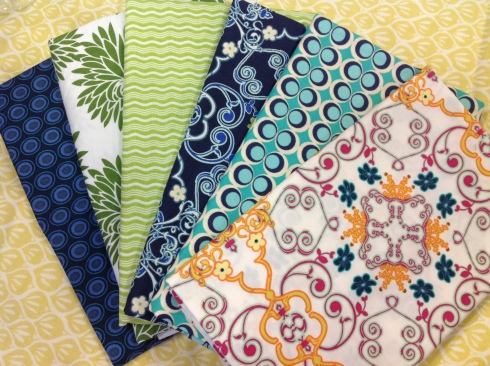
Gather up those fabrics. We used Kona cottons for the demo but you can make this scrappy too. What a great way to use up some of that fabric!

“X And +” 12 inch finished quilt block
Begin by cutting your fabric:
For the center cross, cut (4) green 2.5″ squares and (1) 2.5″ orange square
For the edges of the cross, cut (4) white 2.5″ x 3.5″ rectangles
For the background triangles, cut (8) light blue 3.5″ squares
For the X cut (4) navy blue 5.5″ squares

Making the X block:
On the back of the light blue squares, mark with a pencil from corner to corner.

Sew directly on the line and using a rotary cutter, trim the seam allowance to 1/4″. Repeat for each block.

Press and repeat for the opposite corner.

To make the + in the center of the X, sew the blocks in the order according to the picture. Press the seams to the left.

Sew the remaining green squares to the white rectangles.

Lay out your block according to picture and begin by sewing the X blocks to either side of the green/white units. Press to the right. Finish by sewing the rows to the top and bottom of the middle white/green/orange unit.

And here is the finished X and + quilt block for the Guild! Easy,right?

This is the one we are adding to our BOM quilt. Paige picked out a variety of hand dyes, modern plaids, and Kaffe fabrics. It’s going to be wild, crazy modern and I am excited to put this together! Check back often to see our other blocks from the quilt.

Happy Easter everyone! What are some of your traditions that you do with family? Is the Easter Bunny visiting this year?
Yes, that’s a curly headed Lorrie with her fingers in her mouth. I always got a new Easter dress, hat, gloves and pretty patent leather shoes. I loved dressing up for Easter. Even more than the Easter Bunny visit.

I passed all of the traditions on to my family plus a little more..
The night before Easter Sunday, we’d decorate eggs.

Then Russell would put the colored eggs, along with the empty plastic eggs in his basket.

We also planted magic jelly beans in the garden. And guess what grows overnight?..Lollipops!! A cute little surprise on Easter morning.

By morning the Easter Bunny had arrived and left a trail of jelly beans from his bed to the exact location of the hidden basket. That Easter Bunny is a sneaky one! All the eggs were hidden and replaced with the “loot”.

Now the fun part..find all the eggs! Hopefully the Easter Bunny has filled up those plastic eggs with a special goodie. Our Bunny liked adding candy, loose change and some of the scratch off lottery tickets inside them. Here in Chicago, it’s usually too cold to go outside and hide the eggs, so the Bunny hid them in the house. But when I was little, I remember spending hours outside hiding and finding eggs. We all went to Grandma’s house for Easter dinner and all of our cousins were there to play with. Now that I remember back, it was really gross, we ate those eggs after they had been tossed around and played with for hours..yuck. I’m sure mom would not have approved!

I don’t remember much about other holidays when I was little, except of course Christmas. But I do remember and have fond memories of Easter and the time I spent with my family. I hope I have passed these traditions on to my son and one day I will be enjoying them all over again when he has a family of his own.
Happy Easter!

My little Daisy May is absolutely the best pup. Having never been around small ones, she had no idea what to expect. She’s been toted around like a baby, had her hair brushed and put into pony tails. She’s endured countless dress-ups & posed for more pictures than a model.
She’s always rewarded generously, a little too generously I might add, for her patience. She is snacked frequently.
Her favorite snacks are the homemade treats that we make. I’ve shared this recipe before but here goes again…

Oatmeal Peanut-Butter Doggie Treats
1/2C oatmeal
1/2C flour
1/2C corn meal
1/2C oil
1-1/2C whole wheat flour
2 eggs
2TBSP vanilla
2TBSP peanut-butter
1-1/2C water*as needed
Mix all dry ingredients in bowl. Make a well and add wet ingredients. Mix and add water in gradually till moist but not wet. Roll onto floured surface. Cut with cookie cutters and place on lightly greased cookie sheets. Bake @400 for 20min. Turn oven off and let them sit in oven for another 20min. to dry out.
While your letting those cool, take your BFF to the doggie park, for a long walk around the neighborhood, or or even for ride on the swing..lol

Now that she’s played and eaten well, let’s make her a new leash. Everyone loves a new outfit, right? Well, unless your dressing your pup up in the latest trends, then her collar and leash are as close to new duds as she’s gonna get.
Supplies for approx. 3/4″ by 5 foot leash:
2.5″ x 72″ strip of stylish fabric for your leash
2″ x 71″ strip of Pellon Decor Bond #809 iron on interfacing
3/4″ Snap Hook

Center the the Pellon on the wrong side of the leash fabric, leaving 1/2 inch at each end for turning in and fuse according to manufacturers directions.

Press the un-fused ends in toward the Pellon.

Press the leash in half to create a crease in the center. At this point you can use a pencil and lightly mark the crease to use as a guide in the next step.

Press each side toward the center of the leash.

Press the leash in half.

Edge stitch the leash, starting on one end and working all the way back.

Insert 2″ of one end of the leash through the snap hook and secure using a box stitch.

With your leash lying flat as shown in the picture above…Make the handle of your leash by folding the opposite free end in approx. 7″ and secure once again with a box stitch.

All finished! Don’t forget to make some for your pups friends too. Their owners will be amazed at your mad skills!

Now take your pup for another walk so she can show off her new outfit! Let’s go daisy…

The Michael Miller challenge fabrics arrived, are cut and are ready to be passed out this Sunday at the CLMQG meeting. I hope you’re as excited as me! This fabric is beautiful and so soft. I have an idea in my head about what I want to do with it, but of course I have to keep it a secret!

We have 2 alternate times for pick-ups for those of you who have registered for the challenge but can’t make it to Sundays meeting.
Paige and I will be at the Starbucks on route 31 in Cary in front of the Super Walmart from 9am to 10am on Friday, April 11th.
Shelley will also have them available from 12-5 Friday afternoon at Material Girl.
I spent all day cutting & bundling these.

And after I bundled them, I added a little ‘fortune cookie’ note to set the mood!

If you’re unfamiliar with the challenge, visit the Modern Quilt Guild website and catch up because I’m sure you’ll want to see the winners and original quilts that the talented modern quilters come up with!
Have you met Wendy? She’s the newest designer for SewMod. Wendy is a longtime Yogi and creator of YogaMod. Being a Sewista and health conscious, it’s only fitting that her first design be reflective of that.

She’s designed a Yoga Mat Sling with Fashion, Form & Function in mind.
Fashion: She uses the latest modern fabrics. The possibilities are endless when it comes to personalizing the sling with all of the trending fabrics. You could have one made for each outfit!

Form:The Sling is versatile and can be worn over the shoulder or across the body.The metal hardware keeps it secure and your mat won’t slip. The length is easily adjustable using the loops. Bring them closer together for a longer strap and further apart to shorten.

Function: . The Sling can accommodate more than one mat or a towel.
The extra D-Ring allows you to attach your keys, small wallet or a personal accessory.

The pattern is in a downloadable PDF and hard copy and it’s designed with step by step photo instructions making the assembly easy peasy! We have the Sling available in pre-cut kits including the metal hardware. And we also have the option of buying one handcrafted by SewMod. So stop by the shop and check them out!
We look forward to more ideas Wendy has to share. And maybe she can also provide us with stretching and relaxation techniques too. I know we could all use that after sewing all day!
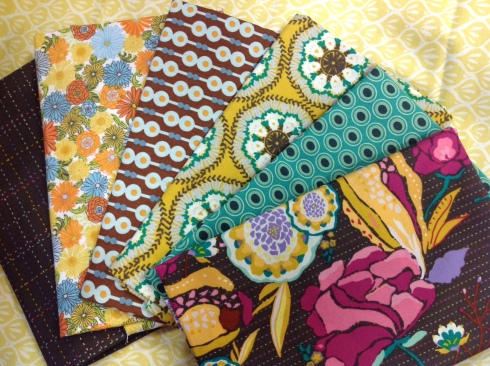
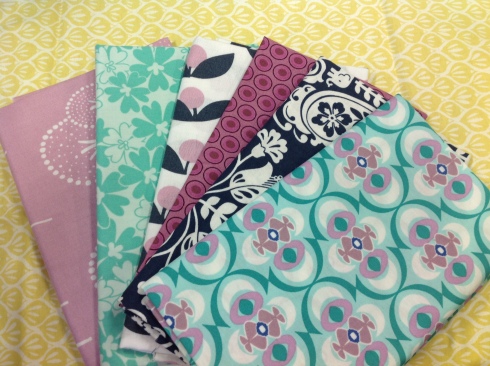
Can I just tell you how obsessed I am with this Lotta Jansdotter line, Glimma? It’s a good thing we carry it in the shop…or maybe for y’all it’s a bad thing cause I’ve personally used most of it now. I know she has a new line out now, but I haven’t finished using all of the first one up!
I like it because its gender neutral. Don’t get me wrong..I’m girly, but some people in my life are not so partial to flowers and rainbows(aka…boyfriend). He’s cramping my style on all things pink!
I’d like to show you what I did with a Glimma Fat Quarter Bundle. First we kitted Cannon Beach with it. 20 fat quarters are required to make this, not including the background.

After the quilt top is cut and appliqued, the backing is trimmed away to reduce bulk and I was left with this messy pile that screamed…Make me ‘Glimma’!

So I obeyed. I decided to make a bag to hold, well just about everything including the kitchen sink. Paige designed Sophie’s Bag and everyone has one but me..guess I’ll have to make my own, Paige:) it requires just 1 yard of quilted fabric. First thing I did was take the trimmed backing and cut into useable sizes, and I sewed it together to make the inside piece and handles for the bag. I then just cut as many leftover Glimma pieces as possible into random squares and rectangles to ‘piece’ a top.

Design away! Just try to keep your dog from thinking it’s her new blankie:(

And this is my new yardage for my bag. And no, I have not finished quilting it. Y’all know how much I hate to quilt! But it’s coming along and soon, hopefully by next week I’ll have an update on the finished bag.

So, while you wait patiently while I curse and cry through my quilting, let me show you what I did with my second Glimma fat quarter bundle…
I had serious unruly grocery store bags. My organizational OCD demanded I contain them so I searched Pinterest for an easy sewing project. I made this in about an hour. And yes it’s surrounded by all things pink:)

Then I made these double sided napkins with the rest!
But wait, there’s more! Wendy made a clock for her sewing room out of one of them too.

I still have a tiny bit left over from my bundles….scrappy potholders perhaps?
A big thanks to everyone who came to see us at the Pride Of The Prairie quilt show last weekend. It was a huge success and we really love vending there. We were so busy I didn’t even get a chance to see the quilts but I heard they were beautiful…bummer.
I worked my mad skills on the booth. I seem to enjoy that process a lot. I love seeing the transformation from a backdrop and a table to something that draws people over..smiling and shopping of course. I wish I had taken a before pic.
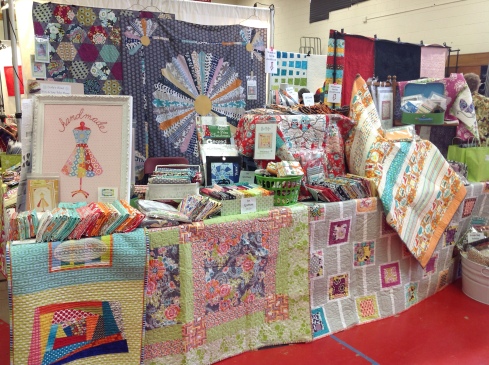
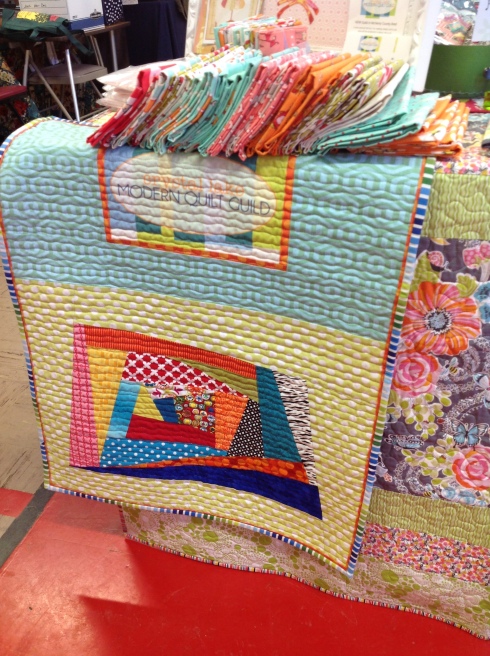
Did a little promoting of the Crystal lake Modern Quilt Guild, which by the way is growing tremendously. We now have 61 members and its only our 1st year! I’d say that is amazing, right!
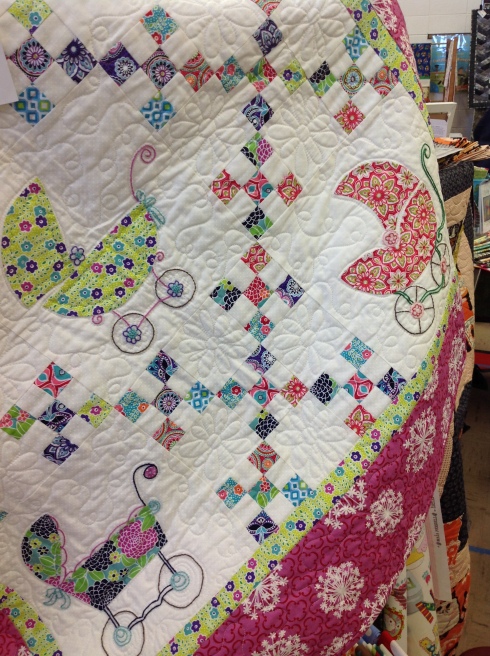
Took this great shot of the Sassy Strollers Quilt. So sweet…
And Paige managed to work her mad skills creating some more SewMod Stacks while we were there. You can find these and many more in the Etsy shop. I added about 12 new sets the other day. The SewMod Stacks pull from different fabric companies & different lines to mix & match. We like to show quilters that you can jump out of that pre-made bundle and mix it up. It’s ok to do your own thing! The SewMod Stacks tend to sell pretty fast. We offer them at a 15% discount.
It was really hard trying to keep Paige away from sneaking off with them for herself!
Next week were releasing a new SewMod pattern so stay tuned ya’ll. Until then have a great weekend!


