
You are currently browsing Lorrie’s articles.

Author Archive
Good morning everyone! I’m feelin’ a bit better. My cast is on and the Doc says I’m healing nicely.
We’ve been busy getting ready for our 1st quilt show this weekend. We set up on Thursday. All of our friends have been so supportive, stopping by to sew or cut fabric for me. A big thank you to everyone who is helping!
Here’s the show info if you’re in the ChicagoLand area. We’d love to meet you!

Prairie Stone Sports & Wellness Center. 5050 Sedge Blvd. Hoffman Estates, IL 60192 Fri 10-8, Saturday 10-5
Since it’s so hard to type one handed, how about some show & tell?
Here’s a quilt we developed for the show. We call it Sassy Strollers and is available in pattern or kit.


Thanks for hanging with me these past weeks. I’ll try to post more often. I’ll definitely take plenty of pics of the booth this weekend.
Isn’t this the cutest and saddest little kitty ever!!

I need to take a bit of a break from blogging these next couple of weeks because I, too, have broken my arm. I was stacking fabric, leaned too far to one side, and tipped my chair. I know, I should have used a step ladder. I’ve learned my lesson! At least I can still claim it’s a quilting injury…right?
It seems I broke both bones and shattered one of them into about 6 pieces. So, in about an hour I’m heading off to the hospital for surgery and to have a plate put in. I just wish I looked as cute as that kitty right now!
No worries though, I’ve been blessed with an amazing support system of friends that have gathered to help me. Thanks to everyone. I truly appreciate all the love:)
{{{{Hugs everyone}}}}
It’s official. Her name is Rose, and she’s all dressed up because I just had to see what my new clutch looks like with some fancy clothes.

Paige and I worked on this pattern by Heather Bailey.

With this fabric combo
Added a finishing touch, a jeweled pin instead of a flower and now I have, or should I say, Rose has, a perfect clutch for her outfit!

We purchased a few dress forms a couple of months ago and I’ve been jonesing to fancy her up a bit. I knew exactly what I wanted to do and use…a Honey Child ensemble of p.j.’s, slippers, eye mask, and a cute tee, and I wanted it to be very Girly!
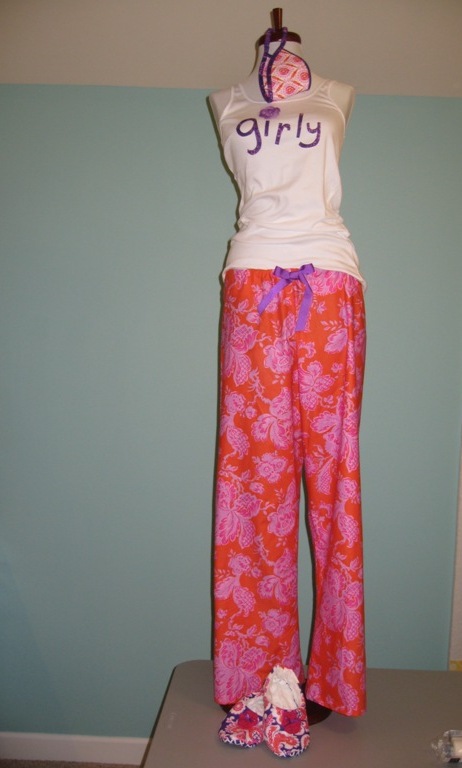
The slippers are made from the pattern Pigs In A Blanket. They have a Minky inner lining and leather patches for the sole. I attached a couple of the crocheted flowers my mom made with a tiny purple ribbon for extra cuteness. This was a pretty easy pattern. These would make really cute Christmas presents.


I couldn’t leave her topless, so I bought a tank top at Old navy for $7 and appliqued the word Girly to the top. I also used one of the crochet flowers to dot the “i”. An eye mask completes her look.

I’m thinking my inspiration word worked. It’s very girly. Now my girly girl needs a name…hmmm. I’ll have to think about that one. Any ideas?
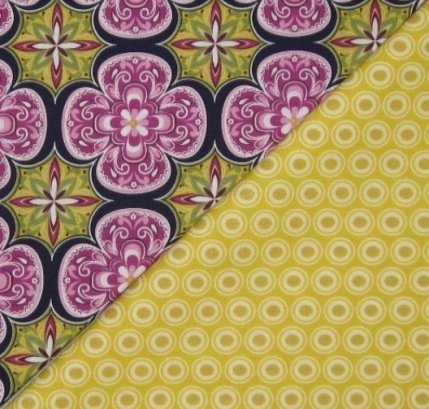
Taza, by Dena Designs, arrived a couple of days ago. It has a shabby chic, fresh feeling to it. I also can see a really pretty, modern baby room designed around this.

And I just couldn’t resist adding the Kaffe Polka dot to the collection. It’s perfect! This yellow Ribbon Damask is one of my fave’s from the line.

And this one catches my eye too.

My mom loved the stripe. I’m tellin’ ya, I totally see a baby girl here!

And speaking of my mom, look at the adorable crocheted flowers she made for an owl kit we’re working on. Won’t these be cute as little owl hair accessories! Thanks mom:)

And another thing, if I had to rely on my gardening skills to survive, I’m afraid I would starve to death! I planted tomatoes at the beginning of summer and I swear the plant only grew to about 18″ tall and produced the saddest little tomato I’ve seen.

My neighbor said it looked like a giant strawberry…ouch. Thank goodness there is always a back-up plan…the local farmer’s market:)
This quilt!
We used the Riley Blake, Hoo’s In The Forest, fabric to make this super easy baby quilt. A charm pack, a few yards of fabric, throw in some appliqued cuteness, & a couple hours of sewing and you’ve got an adorable keepsake!

I appliqued strawberries in one corner and a sweet little owl in the other.


Paige designed SewMod labels for all our handmade items. The are just printed on this fabric paper we found at the craft store.

I used pinking shears to trim the edges and sewed it right into the binding.

This is a really inexpensive and easy quilt. The kit is available for $29 and that includes the backing and binding. It’s available in 3 colorways, yellow, blue, and pink. This quilt is going to be part of our booth at the show but also will be available in our new store coming soon on Etsy …
This shop will be dedicated to handmade baby items, fabric and patterns. We’re pretty excited about launching this as part of SewMod! We have sooo many things going on, my head is spinning!!
Good morning!
Thanks to everyone who left comments, subscribed to the blog, took the poll and “liked” us on Facebook. We had 70+ votes in the poll and the majority, around 46%, look for patterns and the next category, with around 18%, are interested in the kits.
We picked the winners a little different this time since some of you left answers and comments on the blog, Facebook & Polldaddy. I wrote each entry down and we drew the winner.

Shuffle, shuffle…I promise I didn’t peek..and
The winners are….

Congratulations girls! This is a great way to start off your week! Thanks everyone for your continued support!
Ok, not a penny, but how about some fat quarters from Joel Dewberry’s latest line…Heirloom? I thought you’d like that better!

We are going to pick 2 lucky winners. One will receive 7 fat quarters in the Amber collection and one will receive 7 fat quarters of the Sapphire collection.

We’ve got the NSQG quilt show coming up this September and we’d like some feedback on what you look for when you’re at the shows.
Here’s how it works….you can have up to 3 entries by doing the following:
- Take the poll and leave a comment stating that you’ve voted
- Like us on Facebook http://www.facebook.com/SewModDesigns Make sure you leave an additional comment with your Facebook ID on the SewMod blog.
- Follow the blog by becoming an email subscriber by clicking on Email Subscriptions on the left sidebar of the blog. Leave another comment on the blog confirming you’ve subscribed or are an existing subscriber.
The giveaway starts today 8/8/2011 and ends midnight on Sunday 8/14/2011. We will announce the winner Monday morning 8/15/2011.
We love our international customers too, so feel free to play along:)
Good luck everyone!
Unfortunately our antique store here in Crystal Lake flooded a couple of weeks ago and they decided to clear inventory with a huge sale. I thought I’d make a trip over there to see if they had a few items to use as props or display items for our upcoming booth at the show.
I found this picket fence flower box, which I’m going to paint. I thought it would be cute to hold a grouping of fat quarters and maybe hang patterns from the picket fence part. It even looks cute with the butterfly quilt behind it.

I found these window frames for $2!

Look at how these could turn into a way to display fabric lines. But my first idea was how awesome these would be with an embroidered or appliqued design in each square.

And lastly, my cutest find is these children’s chair backs, which were taken off the seat and had holes drilled into the backs so that they could be “propped” against the wall and things hung from them.

Like all my cute dishtowels!

We are workingon some projects that we hope to show off next week. Take care and have a great weekend everyone!

The buzz is summer’s almost over…bummer:(
Russell’s already registered for school and then before you know it, I’ll be getting up at the crack of dawn. No more sleeping in. I LOVE to sleep in!
I’m actually ready for fall, like I’m sure most of the country is, since we’ve had extreme temperatures this year.
Birdie’s still hanging in there though. I love the sunflower idea and my mom suggested a bumble bee. That was a great addition to an already cute block. Thanks again Little Miss Shabby!


