You know, laminated fabric is not just for tablecloths anymore…

Riley Blake is coming out with several laminate prints in May. They are supposed to be “soft and supple..like butter.” Really?…I hope I will be able to get my hands on a few yards of this. My fabric Diet will be over by then and I’d  love something that’s new and exciting to work with.

I decided to do a little searching to see what I could make with the laminated fabric and here’s what I came across on Flickr……

Niesz Vintage Fabric's

Lil.B.Designs'

cerise422

searching through Google….

sewing wall organizer from SewCanDo.blogspot

and on Etsy…

uhreusable's Etsy shop

I love that lunch box and now that I’m working, it might be added to my to-do list:)

Have a great weekend everyone!

I just finished machine quilting this on the Gammill for Kelly  (supercool Kelly as Lorrie puts it!). Her quilts inspire me so much the creativity just flows so easily. She designed this quilt from the center out until it reached the dimensions she wanted @ 96×101! I believe most or all the fabrics are Wonderland by Momo for Moda Fabrics. Here are a few of my favorite pictures…

Isn’t this design perfect for flying geese?

The back of the quilt turned out just as interesting lots of texture.

Check out my Flickr site for more pictures!

Beware…you will leave navigate away from this post with organizational envy.

So, you’ve heard me mention SuperCool Kelly before…I like to call her that…Well, she’s sent me the pics to her new organized sewing room, and I gotta say… WOW!

Her fabric is so organized, she doesn’t even have to hide it. Look at this wall display. The fabrics are wrapped around mini bolts from Polar Notions. It’s like a tiny fabric store.

She calls it her fabric library.

She has a closet outfitted with the Elfa system from The Container Store.  It can be designed for any closet and is easily rearranged if needed. I have an Elfa system in my bedroom closet and I love mine too. I wish I had one for my sewing closet….see, the envy is already starting:)

The black boxes are from Ikea and have labels on them using a P-Touch label maker. This is where she keeps all her projects.

I get to see this fabulous sewing room in person next month. I’m not sure I can wait!

I hope you enjoyed looking at Kelly’s sewing room as much as I did.  Thanks for sharing your pics with us Kelly!

Lorrie and I were working hard on some projects last Sunday – the air was cold but the sun was warm and bright. It was time for lunch we planned on homemade French Onion soup but we needed something to calm the onions and quench our thirst! I made up this festive drink using Frontera Cranberry Sangria mix, a red Zinfandel by Blackstone, fresh cranberries and orange slices…YUM!!!  The glass pitcher and mix are both from Crate & Barrel and they are resting upon hand crocheted placemats I picked up years ago at a resale shop -don’t they go perfectly together. What a beautiful color cranberry is!


The onion soup was fabulous too Lorrie modified Paula Dean’s recipe and it tastes like it simmered all day – it was so flavorful with the added Thyme.

Here is her revised recipe:

1 big yellow or Vidalia onion sliced
1 clove garlic minced
Drizzled with olive oil
2 TBSP flour
1-16oz. beef broth
Pinch thyme
1 bay leaf
French bread cubed
Mozzarella or Provolone

Sauté the onions and garlic till tender.
Sprinkle with flour and brown.
Add broth thyme and bay leaf.
Reduce heat and simmer 20 min.
Ladle in bowls top with french bread and cheese …place under broiler (toaster oven)

I don’t know about you but my mouth is watering!

A couple of the girls in our SewMod group are doing a free embroidered BOM from Little Miss Shabby called Birdie Stitches.

I’m going to be using Moda’s new line from Lauren and Jessie Jung called Hideaway.

The background fabric is an really pretty turquoise, and we’re using a very cute yellow and white polka dot for borders. I say we because this is not my fabric even though I really, really want it. I’m on a fabric diet…ugh.

Vicki has a fat quarter stack and layer cake of this line and I told her I would stitch it up for her cause I really wanted to make it and I can do this stitching pretty fast….plus all the scraps will be  mine:)

I should have my first block done soon and I can’t wait to show y’all. But until then here’s a the Flickr group page if you wanna see everyone’s progress.

Happy sewing this weekend!

I finally finished my Snowbound quilt and only a day behind schedule. I decided against the chain blocks because they competed too much with the snowmen. I thought a simple scrappy nine patch worked best. The only image I see when I look at this quilt is a swirly, yummy lollipop. It has all the colors…pretty fun, huh?

Maybe I have a thing for candy…..  I’ve also made a quilt and all I kept seeing was saltwater taffy:)

How many of you would like to organize for the new year? I know I could use all the help I can get, especially since I sew in such a small space. So every Tuesday for the month of January we will be talking about organization… rooms, spaces, closets, drawers etc. We will also be showing you some of the tips from the girls in our SewMod group. A peak behind the creativity.

Every time I went to take a class at the LQS I would end up having to purchase something because I just didn’t have a complete kit put together for leaving the house. I can’t even begin to tell you how many red spools of thread I have because of this.

Paige carries a sewing box purchased from Joann’s that has all the essentials in it. I loved that idea! No more scrambling at the last minute.  My brother and his girlfriend sent me this one for Christmas and my best friend gave me a Joann’s gift card. So, off to fill up my new kit.

Here’s the list of things in it…

large and small scissors

rotary tool, extra blade, small ruler, and tiny mat

pins and some satey pins for machine quilting

notebook, mechanical pencil, water and air erasable marker,  marking pen

machine needles, and any other set of needles you might use

thread…black, gray, white and for me…red, extra bobbins

seam ripper……..I was actually teased for not bringing one of these to class once:)

calculator

small binder clips

This could be ready and waiting for you. No more hassle trying to remember the tools and supplies every time. Just grab and go. Take it to class, retreats and sew-ins or on the road with you.

Thanks for the great idea Paige!

Hi all and welcome to the new year! I’m so excited for you to move on to the next practice sample. This technique will introduce you to working with a larger quilt sandwich and to doodle with some guidance. Some of you found it a little challenging to doodle on a blank sheet of paper so in this step you will utilize the fabric design to create shapes not only by tracing around the designs but to embellish and fill in the space.  Try continuous sewing no need to be perfect here…let yourself be free and incorporate the shapes you practiced in Part 4 like loops, stars, vines/leaves. But don’t worry if you find yourself in a pickle with nowhere to go stop, secure the thread and start fresh in another location.

Hopefully you found a nice large print and basted your sandwich. Below I used safety pins roughly 6-8 inches apart.  I choose this fun flower pattern which has several different flowers some solid some just outer lines. If you are just joining us click here for the supply list.

It is best to begin quilting from the center outward this will help keep you organized and to help avoid stretches, folds and bubbles in the top fabric. In the beginning it’s inevitable these will happen but as you practice more and more you will begin to use counter maneuvers to prevent them from occurring.  By starting from the center and moving outward the top fabric moves with you if you decide to wonder off one direction then come back another you risk ending up with an un-quilted area surrounded by quilted areas. The un-quilted fabric is now secured all around and has nowhere to move as you quilt it…a fold or bubble is likely.

As you can see this fabric design provided a great palate to embellish. I quilted around the green petals and then added a design within them. The white line flowers I used as a background only and created my own flower design over them. Definitely have fun with this!

A few tips:

1) In free motion quilting your thread tension will need to be adjusted so be sure to test before you begin quilting.

Remember the following:

*If your top thread looks like a solid line on the top and you see bobbin thread poking thru – loosen your top thread tension.
*If the bobbin thread looks like a solid line on the back and you see the top thread poking thru – tighten your top thread tension.

2) If you are still having tension issues check your thread weight every sewing machine is different but using a 40wt thread on the top and a 50wt in the bobbin can help – preferably the same brand. I find bobbins like thinner threads. Try this combination unless you are experienced at adjusting the bobbin tension…this is a topic for a future post!

3) Make sure you workspace is clean and free of obstructions. You won’t be happy if your sandwich hits something as you are in the middle of a nice smooth loop.

4) Quilting gloves can help eliminate hand and arm fatigue.

5) Be sure to remove the safety pins as you quilt an area.

6) Don’t rush though finding the right rhythm will increase stitch length consistency and provide a more fluid motion.

For those of you who successfully quilt your entire sandwich leave a comment here letting me know how this project went. Include your email address and I will email you a bag pattern to make out of your newly quilted sandwich!

Definitely have fun with this!

Paige

I hope y’all had a great time last night with family and friends. I spent the time with some friends in the neighborhood. I’m no party animal. I like to be in  my pajamas when that ball drops.

Both,  Susan and I are from the lower half of the US. Her being from Alabama and me from Oklahoma. So we decided to end the year with our favorite food…fried chicken, macaroni and cheese, mashed potatoes and gravy. It was the best dinner ever and the most fattening. But who cares right….we were in our pj’s:)

Oh, and I forgot, we also had banana cream pie after.

I’m so glad someone finally transplanted up here from the south!

I’m going to try and send the Sooners some good luck today for the Fiesta Bowl game against the Huskies.

Go Sooners!

Its the last Friday of the year and I was just thinking…. what fabric I should post about today? I decided to show some pics of the fabric in our stash that we would really like to use up in the coming new year and list the projects that we would like to accomplish in 2011.

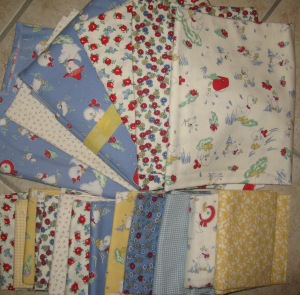
I would really like to get through the Lucy’s Feather Bed fabric. I bought a lot of this because it is soooo darn cute! But I’ve had it a long time. I think I’ll make some baby items up…burp cloths, changing pads, etc.

Now for the list…

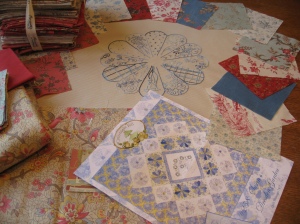
1. Of course the Grandmother’s Flower Garden blocks are atop my list.

2. Susan’s Dresdens….I’m halfway through the embroidery and finished with the bitty dresdens. I have all the dresden blades cut out. I want to show this during our SewMod quilt show in July.

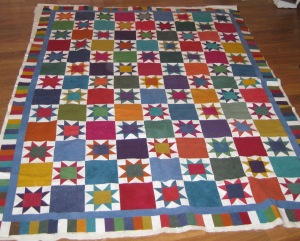
3. Welcome to the North Pole

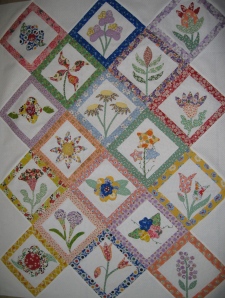
4. Auntie’s Flower Garden…I only have borders left to applique and attach.

5. New York Beauty blocks…I’m going to work on these during our SewMod Sunday Sew-ins and at the end of the year I can decide how to put them into a quilt.

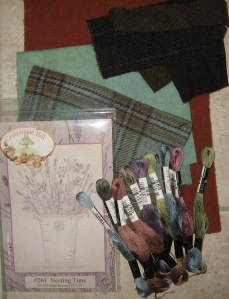
6. Nesting Time embroidery project. I’m pretty excited about this one. Instead of embroidering the pot, nest and eggs, I will be using this wool. Just imagine the nest with different brown strips of wool and maybe some ribbon woven through it…like you’d see in a real nest.

My list is usually a full page but with the Etsy shop and working at the LQS, I’m sure that I’ll be pretty busy. I can’t wait to see if I’ve been able to check these off my list come December 2011.

******************

When I started my longarm quilting business 4 years ago I ended up putting several projects on hold and boy do I miss them! Now that I’ve pretty much halted machine quilting for clients I’m so looking forward to finishing them up and creating a bunch more!

As I went through my stacks and containers to pull all the unfinished projects I began to hyperventilate when I realized how long some of these projects have been around…so sad,  all these beautiful fabrics and ideas waiting to be made into a special gift or cozy blanket. So, my goal this year is to tackle one at a time starting with some of the ones pictured below and of course use as much of my stash as possible!

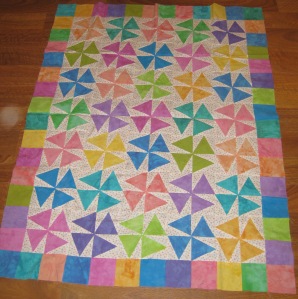
1.  This baby pinwheel top has to be more than 5 yrs old my memory isn’t so good I will have to ask my friend Karen V. where we got this she has an amazing memory and we tap into her constantly!

2. This is Amy Butler’s Mid-Mod quilt pattern I’m hoping I have enough of the Midwest Modern border fabric I just love the flower pattern.

3. I picked up this kit at a shop in Saginaw Michigan a couple years ago on a retreat with my longtime sewing group the Pieceful Pals. The pattern is called Flora and fabrics are by Valori Wells. I thought it would be a wonderful spring throw to brighten up my living room.

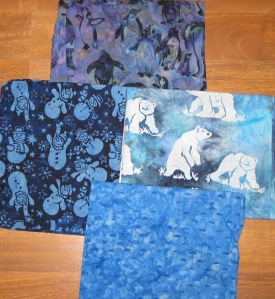
4. These cute winter batiks are adorable…I just haven’t found the right pattern yet…any ideas????

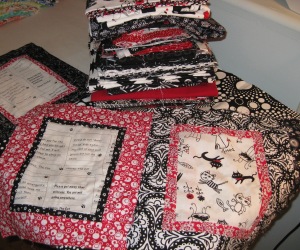
5. I started these blocks earlier this year in one of our SewMod sewing days. I just love the little black cat so reminds me of my Kitty!

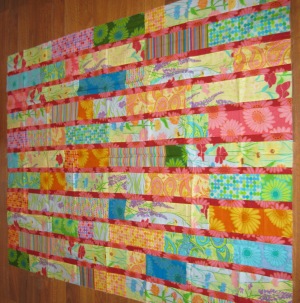
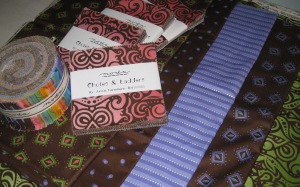
6. I picked up this jelly roll and charm packs at the Rosemont Quilt Show at least 3 years ago. Not my usual style but I was drawn to the combination of the purples, browns and greens. Still haven’t found the right pattern…bought enough of the green for the backing and/or borders.

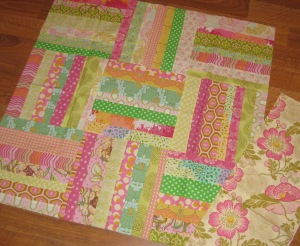
7. This bunch will eventually be made into 7 giant bags one of my designs we will have on Esty soon! Each pair of fabrics from the top down will be quilted together, bound and straps added -they are really cute and carry a ton of stuff…I fill it up with fabric and projects when I go on retreats. They will hold 3-4 large quilts. I even use it as an  overnight bag it will hold my pillow, change of clothes and all my toiletries and of course some quilt magazines!

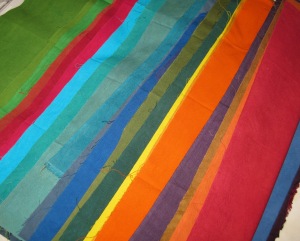
8. I have all these wonderful hand-dyed fabrics…they are pushing 15 years old by now. So beautiful and soft! They actually inspired my very first quilt below which I paper-pieced the summer of 1995 using copier paper… never will do that again! Took forever to pick out all the paper. I also sewed it using my mom’s Singer which had two speeds screamin’ fast or off.

I still can’t believe this quilt is rolled up in a bag waiting to be finished. Back in ’95 I had no idea how to machine quilt so there are a billion little stipple stitches throughout all the white areas. A few years ago my mom started picking out the stitches, I took over last year. Very tedious work so I decided to pick out from the backside so if I accidentally ripped the fabric it didn’t matter because it is just plain white fabric…doing it this way is definitely protecting the front from any damage and speeding up the process.

After all the stitching is gone it will be ready for the Gammill…I’m still working on the quilting design -stay tuned if I get this done by the end of the year I will jump for joy – I can’t wait to wrap myself up in it!

Paige

Enter your email address to follow this blog and receive notifications of new posts by email.

Email Address:

MineCraft Tutorial

Crayon Embroidery Tutorial

Machine Binding Tutorial

Blog Archive