
You are currently browsing the category archive for the ‘Tutorials’ category.

Category Archive
UPDATE: 12/30/2016 All MineCraft kits are currently sold out!
Looking for a quick birthday or Christmas present for your little gamer this year? If your kids and adults..you know who you are…have been hit by the MineCraft craze, then I know they’d be super excited to have this throw to snuggle up with on the couch. It also makes perfect decor for their bedroom or game room.

I’ve made a lot of MineCraft quilts! And I’ve had a few questions on size and cutting, so I thought I’d share with you how easy this is to make! A great beginner project from start to finish.
MineCraft Creeper Quilt
Supplies:
1 Half Yard Black
5 Half Yards Assorted Kona Greens in Honeydew, Basil, Grass, Tarragon & Chartreuse
Binding: scrappy or 1/2 yard, cut into 2-1/2″ strips
Backing 2-2/3 yards for machine quilting.
Batting 48″ x 57″
Quilt measures approx. 45″ x 54″
With a 10 x 12 setting, you will need (120) 5″ (charm) squares…
20 black & 100 green. I used a variety of Kona Cottons in green to create the pixel effect.

1/2 yard = 24 charm squares
Minecraft needs (5)-1/2 yards for variety
Cut each half yard into 3 strips of 5″ WOF.

You will have a little strip left over after cutting the (3) 5″ strips. Save those for your scrappy binding.

Trim the selvedge from your 5″ strips.

Cut each strip into (8) 5 inch squares. These are doubled from cutting…Each half yard will yield 24 squares.

Lay your quilt out according to the drawing in a 10 x 12 block setting. And if you’re wondering…why, yes, I was working on this at Starbucks and all this green talk made me thirsty for a Green Tea Frappuccino!

Sew your charm squares together into rows, Pressing each row in alternating directions.

Sew the rows together. Press.
For the backing fabric, cut the 2-2/3 yards into (2) 48″ long pieces. Trim the selvedge edges and sew the pieces together lengthwise. Press your seam open. Now you should have a pieced backing that measures approx. 48″ x 84″. We only need a backing that measures approx. 48″ x 57″, so let’s trim about 26″ off of the bottom of the backing. (See photo).

The backing seam will run horizontally in the middle of the back of your quilt instead of vertically. This saved us a little bit of $$ and if your backing is not directional, then it’s no biggie!
**TIP: Use the extra backing and scraps fabric to make a cute matching pillow!
Layer your quilt top, batting and backing.
I can give you a few tips that I use to help me with successful quilting.
This quilt is small enough so that you can work at your kitchen table. I begin by placing a well pressed backing face down. If desired, tape the backing to the table with painters tape. Next, I add batting, smoothing out from the middle so that there are no wrinkles. Finally, I add my pressed quilt top, right side up, on top of the batting, once again smoothing the fabric out from the middle to make sure there are no bumps or wrinkles and taping the top down to decrease puckering.

Pin your quilt sandwich well, making sure you’re catching all the layers. The more pins you use, the less likely you will have any puckers as you’re quilting. I use a pin in each of the squares on my Minecraft quilt. ….sorry for the icky pic…indoor lighting in the winter here is, well, icky! I really do need a crash course in Photoshop…

**a note on pins..buy the ‘fine wire‘ pins from the notions wall. They are not the same pins as the ones found in the office supply section at Walmart..no matter how hard your boyfriend tries to convince you that they are lol!
Some of you may need to attach your walking foot at this point to quilt.
To begin quilting, I increase my stitch length .5 and always work from the middle out. So this means when quilting the Minecraft quilt, I start at the top, 5 rows over, and work my way down the quilt and all the way over to one side. Then I work toward the other side from the middle out.
I quilted mine with straight lines approximately 3/8″ on each side of the ‘ditch’, horizontally and vertically to keep with the pixel effect of the game using green thread. I eyeballed it by sewing with the edge of my presser foot butted against the seam as my guide.

Bind your quilt. I like scrappy binding so I pieced all of my leftover strips together. I typically like to cut my binding at 2-1/4″- 2-1/2″ depending on which technique I bind with, whether it be by machine or by hand.

If you’re machine binding, you might find this tutorial helpful.
And in keeping with the ‘theme of the game’, the backing is a black and white skull fabric. So perfect!

sssSSSsss…BOOM you’re finished!
**********************INTERNATIONAL CUSTOMERS**************************
KIT SHIPPMENT: Once again, if you are an international customer, please convo me as shipping rates are different for each country. International shipping rates are set by the USPS and KITS are mailed in a flat rate mailer. SewMod does not charge our customers for any ‘handling fees’. USPS prices for Canada are $20.85 and “everywhere else” including Australia and Europe are $25.25. A separate PayPal invoice will be made available to you after you convo me with the package destination. I’m happy to help! Thanks.

***If you’d like a MineCraft Quilt KIT, twin/full size 54″x72″, click on the PayPal button below. The full size KIT is 68.50 plus $12.25 in shipping for U.S. customers.THIS SIZE KIT IS SOLD OUT and no longer available.
***Standard mattress sizes for a twin measure at approx. 39″x75-79″ and a full measures at 54″x75″.
This quilt KIT will fit a twin and provide a drop over the mattress on the sides. It will be a few inches shy on the length, but a pillow at the top fixes that:) We keep the sample MineCraft quilt on the twin in the studio, and it looks great!!
***If you’d like a MineCraft Quilt KIT, throw size 45″x54″, click on the PayPal button below. Each KIT is $48.50 plus $5.05 in shipping for U.S. Customers.-THIS SIZE KIT IS SOLD OUT and no longer available.
KITs include enough fabric to make a complete MineCraft quilt, including top, backing, scrappy binding and tutorial. Batting NOT included. If you’d like to replace the Cobblestone grey option below with one of the greens used in the kit as your backing fabric, convo me. I’m happy to help!

To choose your backing fabric, convo me in the ‘Contact Us’ tab at the top of the blog or send me an email at SewMod at hotmail.com. If no backing choice is chosen at checkout or by convo, the kit will be sent with the cobblestone grey.
Attention: The PayPal buttons are for U.S. customers only! Please convo me in the ‘contact us‘ tab or by leaving a comment in this blog posting if you need a shipment outside the U.S. Thanks!
7/31/15 Update! We’re happy to have the Enderman kits available as well as the Creeper. If you’re interested in the Enderman, please click HERE for the blog post. Thanks so much! Lorrie:)

This Clutch was made using the demo from the Martha Stewart show and pattern provided by UpStyle Design. You can find the printable PDF under Tutorials and Free Patterns.

Supply List:
ONE FQ Non-directional Decorative fabric for outside of clutch. (Cotton may be used)
ONE FQ Cotton fabric for lining.
1/2 yard Heavy weight fusible stabilizer Pellon 808
1/2 yard Fusible fleece Pellon TP971F
UpStyle Clutch Frame
Basic supplies including: Sewing machine and standard foot. We will not be sewing 1/4″ seams. Coordinating thread, iron, tape, small binder clips, Rotary cutter, cutting mat, E-6000 glue.
*A note about glue…original pattern suggests Gutermann Textile HT2 which is imported, expensive and only sold online. The Martha Stewart show suggests Bond 527 Multi-Purpose Cement and I used E-6000 which has always been very dependable for any project.
Don’t forget any embellishments that you might want to ‘bling up’ your clutch with!
Cutting:
Cut your outer clutch fabric and lining to 13″H x 13-1/2″W
Cut your fusible stabilizer to 12-3/4 x 13-1/4″. (Your stabilizer should be 1/8″ smaller than your outer clutch fabric on each side)
Cut your fusible fleece to a 10″ x 13″ piece
*I recommend back-stitching your project.
Let’s begin!
Fuse your stabilizer to the back of your outer clutch fabric according to manufacturer’s directions. Center your fusible fleece and press into place on top of the stabilizer.

Layer the lining fabric and the outer clutch fabric right sides together and pin into place.
Sew 1/2″ seam along the top and bottom edges…the 13-1/2″ edges.

Making The French Seams:
Turn right side out and press. Fold the clutch in half matching the seams. Use small clips to secure the top of the clutch. This will prevent it from slipping while you sew.

Sew a 3/8″ seam along the short edges (sides).

Trim seams to 1/8″ and clip corners. Snip through the corner seams about 1/8″ to create a tiny opening. This helps the fabric lay flat after turning.

Turn the clutch so that the lining fabric is on the outside and sew 3/8″ side seams. Turn right side out.

With the corners of the bottom of your clutch flat, use a pencil to mark a 1-1/2″ diagonal line ACROSS the point as shown. *If you mark more than 1-1/2″ across it will alter the dimensions of your finished project.


Sew on the line creating the gusset. Repeat for the other point. Sewing across the marked line is easier if you place the bulk of the fabric under the machine as shown.

Trim the points to 1/8″.
Turn once more so that the lining is on the outside and sew a 3/8″ seam. Sew slowly through all the layers. Turn right side out and press your clutch well before adding the frame.

Mark the center of your fabric with a pencil. My clutch measures 11-1/2”, so my center is 5-3/4”.
Center your frame on the clutch with the clasp opening in the middle and insert your fabric. Place a piece of tape on each side where the ends of the frame are. This is your guideline for frame placement after you insert the glue and the tape will help protect the fabric from any glue that may ooze out.

Remove your frame. Working one side at a time, apply the glue into the channel of the frame, starting 1/2″ in on each outer edge. Do not add too much glue. Work the glue towards the edges.
*I used the cut off end of a Q-tip. It doesn’t take too much glue for the fabric to bond. Use the Q-Tip to spread the glue into the channel. Do not fill the entire channel with glue y’all! Less is more!
It’s best to be patient and if it seems like it’s not adhering after the recommended bonding time, remove and add more glue.
After applying glue into the channel, center the frame and insert the fabric. Secure with tape. Allow glue to set for 30 minutes before repeating the process for the other side.
Remove the tape, open the frame and tuck the corners in under the hinges and close the frame.

Pattern and hardware can be purchased from Robin Grawunder @ UpStyle.Etsy.com.

Here’s a quick YouTube video for this demo from the Martha Stewart show. Happy sewing everyone!
The great things about hexagons are that they only require scraps and you can work on them anywhere…at the orthodontist visit, after school pick up, or road trips! The Molecular Hexies quilt block is the final block for the CLMQG BOM. I hope to complete my remaining 4 blocks (8,9,10,&11) next week so that I can begin putting the quilt together soon! This is a 12.5 inch(12″ finished) hexagon block based on the craftsy.com BOM and tutorial by echinopsaster.blogspot.com.  Supplies: 12.5″ background fabric Scraps of fabric for hexies Paper template Scissors Needle & thread *read all directions before starting your project… For the original CLMQG block, I used a 1-1/4″ hexie template and arranged them in rows of 5 & 4. If you’re working on the CLMQG BOM, but are unable to do handwork, I’ve provided the link to Jacquie Gering’s blog tutorial on Sewing Hexagons By Machine Without Marking for an alternative to English Paper Piecing. For the block variation, I used a variety of the hexagon templates to create a Molecular Hexie block and laid them out in a fun pattern. You get to choose which design you’d like to add to your quilt. Be creative! Print your templates and cut out the hexagons. Template downloads 3/4″ Hexie 1″ Hexie 1-1/4″ Hexie 1-1/2″ Hexie 2″ Hexie After you’ve cut the paper templates out, gather your fabrics and cut your scrap at least a 1/4″ around on all sides of the template for easy turning. Use a small pin to secure the paper to the fabric.
  Either finger press, or if it makes you feel more comfortable until you get the hang of it, iron down all the sides. Once you’ve mastered the hexies you’ll no longer need to iron.
  Thread your needle and make a small knot. Use any thread to baste your hexagons. I like to use up some of my older, less expensive spools here. Starting on one of the points, work your way in and out around the hexagon and through the paper.
  To attach the hexagons, layer right sides together and whip stitch, grabbing just enough fabric to keep them together, but not going through the paper this time. For this step I use a coordinating YLI silk thread which can be found at your LQS. It glides right though the fabrics without knotting, is strong, & buries your stitches making them barely noticeable! I use YLI silks for all of my hexies and appliqué projects.
  Tiny whip stitches make all the difference to make sure your stitching is barely visible from the front. Practice, practice:) Once your hexagons are attached to one another, clip the basting threads and release the paper. Starch and press back into shape. But don’t toss those papers out yet! You can reuse them for other hexie projects.
  Decide on the hexie placement of your block and pin into place on the background fabric.
  Appliqué your hexies with a top stitch close to the edge onto your background fabric.
  My Molecular Hexie was made using a variety of Kaffe and other modern prints and machine appliquéd onto a hand-dyed background fabric. I enjoyed this block and I hope you do too!
 Now wasn’t that easy? The hardest part was just deciding which Hexie block to make!
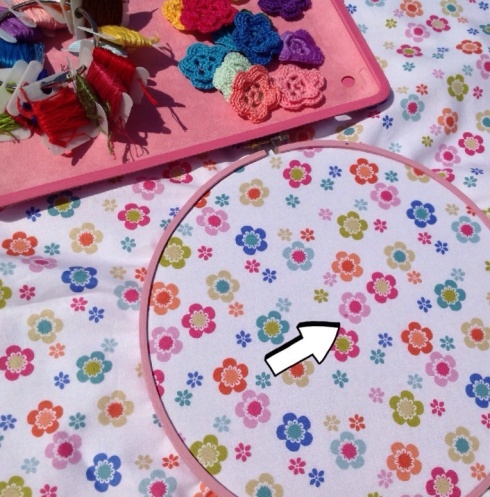
Isn’t it beautiful outside today? …well it was when I wrote this blog:) Sunny blue skies and mild temps make me wanna spend all my time outside while I can. So today I took to the outdoors for a little crafting. I set up all my supplies on the patio, poured myself some sweet tea and enjoyed the weather while I created the sweetest little clock for my moms sewing room.
Today I’m going to show you how to make that adorable Button Clock that everyone has been pinning on Pinterest. So gather up the supplies, beg your mom to make you some crocheted flowers and lets get crafty!

Supplies needed:
Clock mechanism & battery (which can be found at Michaels for about $7)
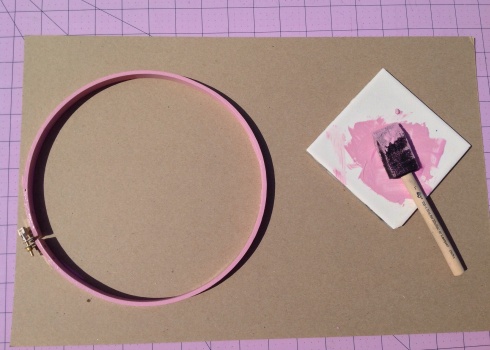
8 inch Wooden embroidery hoop
2 fat quarters, clock fabric & lining
Embroidery floss
Buttons
Crocheted flowers
Craft paint & brush, pink of course!
Scissors, marking utensil
Chipboard (found in the scrapbook section)
Start by painting your hoop with the craft paint and allowing it to dry.
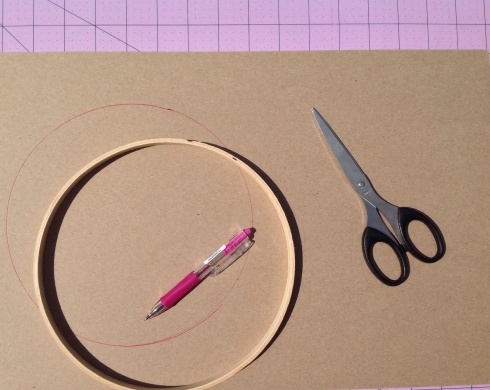
Trace the inner hoop onto your chipboard and cut out with scissors.
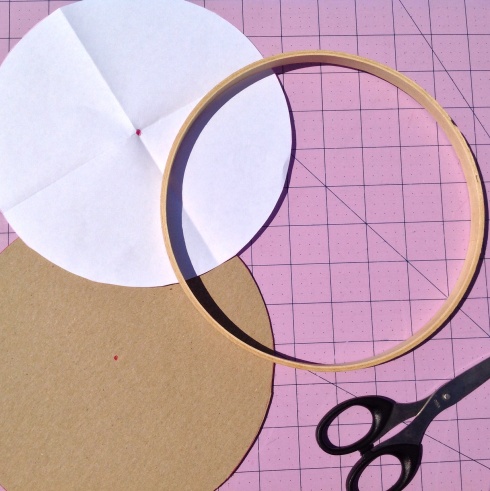
To find the center of your chipboard circle, trace the inner hoop again but this time on a piece of paper. Cut out and fold the paper into quarters. Open and mark the center with a dot. Lay the paper circle on top of the chipboard circle and mark the dot through onto your chipboard. Using an awl or your scissors create a hole where the dot is for the mechanism. Set the chipboard aside. We’ll use it in a bit…
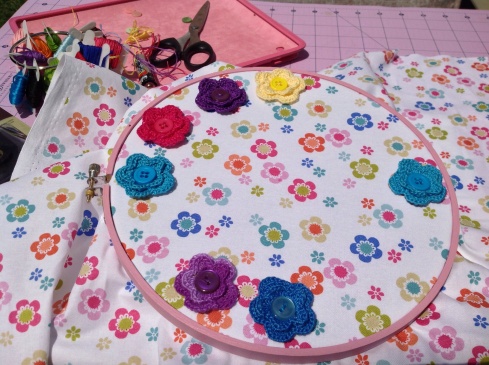
Place your lining fabric behind your clock fabric and tighten securely between the hoops.
Make sure the fabrics are snug and secure by tightening the screw at the top of the outside hoop.
Place your paper circle on top of your hoop and mark the center of your clock fabric with a dot. This will be where your clock mechanism will fit through. Make a small hole with your scissors through both fabrics big enough for the mechanism to fit through.
Now the fun part! Attach your flowers and buttons with the embroidery floss. I started with the “12” & “6”. Then the “3” & “9” and eyeballed the remaining numbers.
Once you’re finished sewing the buttons on, trim the piece approximately 2″ around the hoop. Add your chipboard circle to the back. This will provide stability for the weight of the clock mechanism.
FYI I added the clock mechanism before this step as you can see in the pic, but I would recommend doing it last. It made for difficult sewing in the next step:(
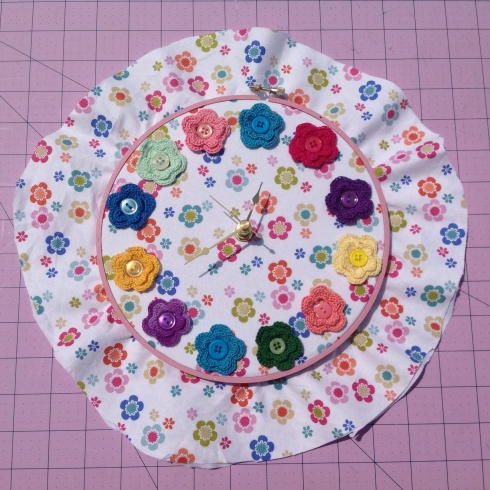
Using a piece of embroidery floss, create a gathering stitch in the fabrics. Pull and knot the thread in the back to make the edges ‘finished’. This will help the clock lie flat against the wall when hanging. At this point, most hoop art is then covered from behind for a nice finished look, but if we do that, we won’t be able to change out the clock battery now will we?
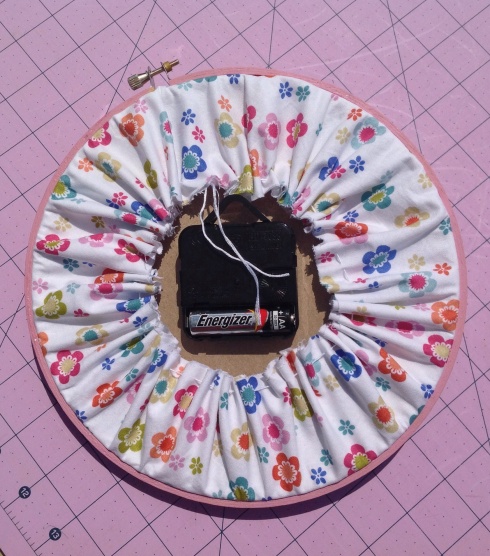
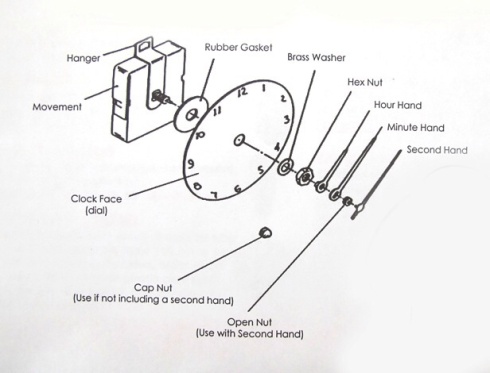
Add the clock mechanism following the instructional diagram provided with the packaging. Tip:Make sure to press down and get a snug fit with the ‘minute’ hand. Otherwise it will spin and loose time. I also removed the rubber washer because it created too much bulk and my clock still keeps great time.
Add the battery, set the time and you’re all finished! Pour yourself another glass of sweet tea while you admire your craftiness!
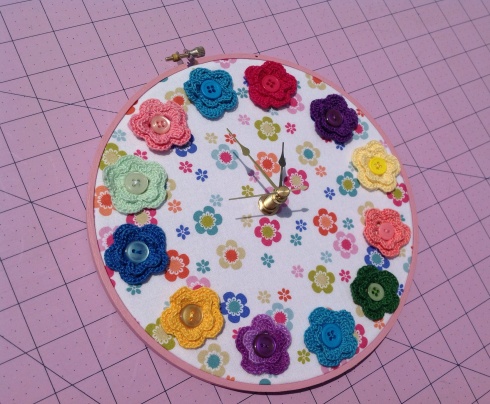
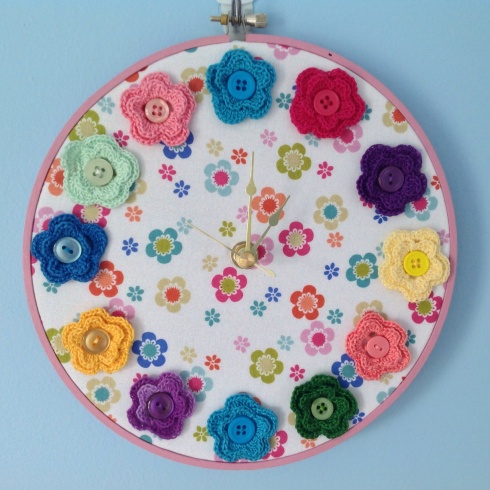
Love this sweet little button clock? Well you’re in luck because I’ve assembled the complete kit and they’re available in the SewMod Etsy Shop. Kit includes the 2 fat quarters, crochet flowers, floss, buttons, chipboard, hoop, & clock mechanism for $25.00. Click on the SewMod link or convo me if you’re interested!
Before you hit the road for your summer family vacation, make sure you have all the things for a stress free ride with the kiddies.
Here’s a list we never leave without..you can never have too many options when trying to figure out how to entertain children on a long road trip.
Snacks & water
Electronic devices
Art supply case
Car Bucks & rewards
Games
Books
Blankie
And…a travel pillow
Today I’m going to show you how to make the little ones a travel pillowcase that is so easy it can be done in an hour! So let’s get started so you can start packing for that vaca.
Supplies:
1 half yard for the cuff
1 half yard for the body
Pillow form. I used a 16″ x 12″
Basic sewing supplies
Use 3/8″ seam allowances

Cut the cuff fabric 6″ x 25-1/4″
Cut the body fabric 13″ x 31″

Making the cuff:
With right sides together, sew the short ends together and press the seam open.

Fold the cuff in half, wrong sides together and press.

Making the body:
With right sides together, sew the 2 side seams leaving the top open.

Trim the seams to 1/4″ and stitch the raw edges using a zig zag stitch to reduce fraying.

Turn right sides out and slip the cuff over the body, right sides together, matching the raw edges and the side seams. Pin well. Sew around the cuff/body opening.

Trim the seam allowance to 1/4″ and use a zig zig stitch to reduce the fraying.
Press the seam allowance toward the body of the pillowcase. At this point, feel free to add a top stitch if desired. Otherwise, you’re all finished!


So tell me girls…where will you be traveling this summer?
Who? Hot? What?
Hot Who Hot Pads is our all time best selling pattern. Customers love these! We love these! Our little Hoo samples follow us from quilt show to quilt show and of course the first question by everyone who buys the pattern or kit is…“are these hard to make?”

My answer is they’re easy of course! But really…they are. I’ve made a minor adjustment in how I choose to make mine that is different from the pattern instructions and I’d like to share with you how and why I’ve done that.
Why? Because I try to find the easiest and most efficient ways to make shop samples while keeping my quality of work intact simply because I only have so much time to make so many things. And I’m really bad lazy at reading instructions so initially I had just assumed it was to be completed like this.
How? Instead of taking the time to turn the eyes and nose inside out, I appliqued them on with a small zig zag stitch. This made the sewing process…easy peasy…and I’ve also tested this technique by washing and drying these owl babies to ensure that my method doesn’t fall apart or fray away. They came out just like new.
First things first…you’ll need the pattern. We have it back in stock in the Etsy shop. So don’t waste time time hootin’ around. Go get that pattern!
I picked out my fabrics. This is the fun part and the part that takes me the most time!

Trace all of the eyes, nose and wing parts to the paper side of a piece of Heat ‘n’ Bond.

Fuse to the back of your fabrics according to the manufacturers directions.

Cut out your shapes on the drawn line.

Peel away the paper backing making sure the fusible is still attached to the fabric. Sometimes it’s sneaky and likes to peel away too. You’ll notice your fabric is nice & shiny on the back now.

Position your pieces on the front body of the hot pad and fuse into place.

Zig-Zig around all of your fused pieces with coordinating thread.
Layer your fabrics as shown… Insul-Bright, Warm & Natural Batting, back body of owl face up, and front body of owl face down.

Pin.

Sew a 1/4″ seam around the body, leaving about 2-3 inches for turning.
Turn right side out through the opening. Press the opening seam in, insert your ribbon holder and top stitch around the owl. There are a lot of layers to go through. I also recommend a heavier needle.

Now that I’ve shown you a simple shortcut to making this hot pad easier, you can get started on some of your own. They make cute gifts for teachers, friends, bakers and your Mama might appreciate some too!
Or, if your shortcut consists of purchasing a pair of hot pads then your in luck too! These cuties are available in the SewModDesigns Etsy shop under the Handmade category.

I’m back with my second CLMQG BOM tutorial. Our inspiration for this block came from Sara Peterson at KnottyGnome.com. Remember, if you want to play along too, you can find us at The Crystal Lake Modern Quilt Guild or download the BOM instructions directly from the CLMQG blog.
Gather your fabrics & lets get started!

Begin by cutting your fabrics.
(12) 2.5″ white squares
(8) 2.5″ orange squares
(4) 4.5″ dark blue squares
(1) 4.5″ white square
(4) 4.5″ x 2.5″ green rectangles
(4) 4.5″ x 2.5″ light blue rectangles

On the wrong side of your fabric, use a pencil to mark a diagonal line through your (12) 2.5″ white & (8) 2.5″ orange squares.

Making your corner squares:
Place one of the white squares and one of the orange squares in opposite corners of the dark blue square. Sew directly on the diagonal line.

Use your ruler to trim 1/4 inch away from your seam.

Press your block and repeat with the other two corners. This time using (2) 2.5″ white squares. Press. Make 4 of these units.

Making your center square:
Using the same method as you did to make the corner squares, place a 2.5″ orange square in opposite corners of the 4.5″ white square. Sew on the diagonal line. Trim 1/4″ away from your seam and press.


Repeat with the other two corners using (2) 2.5″ orange squares. Press.

Making the middle rectangles:
Sew the green rectangle to the light blue rectangle along the long side. Press these seams open. Make 4.

Finishing the block:
Lay out the block according to the photo. Begin by sewing the blocks into 3 rows.

**A helpful hint** while you’re sewing your blocks into rows.
To keep your corner square (Diamond) points aligned with the seam of the middle rectangles…
Place your corner unit and middle rectangle unit right sides together. Insert a straight pin into the intersecting point of the corner unit.

Making sure that the end of the straight pin goes directly into the seam from the other side.

Pin. This will prevent your blocks from shifting while sewing and keep the seam aligned with the Diamond point.

Using a 1/4″ seam allowance, sew over the intersecting point. Remember to go slowly if you’re like me and love to sew over your pins:)

After all of that careful pinning, you will be rewarded with beautiful points!

Sew the rows together.

You’ve completed your Rolling Diamonds Quilt Block! This is our block for Crystal Lake Modern Quilt Guild.

And this fabulous version is going into our BOM.


I’ve used cloth napkins so long, I feel GUILTY when I reach for a paper towel. My Grandma made me some for Christmas about 15 years ago with matching place mats and after I moved away from OKC to Chicago I thought about her every time I used them. So not only are cloth napkins the “green” way to go but I’ve also developed a sort of comfort attachment in some way I guess.. I tucked those napkins and place mats away for safe keeping and I’ve just gotten around to replacing them and I’m going to give you an easy tutorial on how to make some for yourself.
Over the years, I’ve used several methods for making napkins. From one-sided to the fancy ones that are doubled-sided with mitered corners..these are reserved for the holidays,

but today we are just going to make double-sided with a top stitch.

The pic above is from the “I Glimma All Over The Place” blog post about a month ago and those napkins have been tried and tested through many washes and I am here to tell ya that they look and feel like new! So don’t hesitate on going green yourself… let’s get started on your own set!
I used fat quarters for mine but you can use up some of that fabric from your stash by cutting 18 ” squares. You will need 2 per napkin.

Place your (2) 18″ squares right sides together. Pin so it doesn’t shift while sewing.
Using a 1/4″ seam allowance sew all the way around the fabric, leaving a 3-4 inch opening for turning.

Clip the corners, being careful not to cut through the stitches.

Turn right sides out through the opening. I used this handy little thingamajig to poke my corners out nicely. Just make sure you don’t push too hard. You’ll push right through your seams.

Press, making sure to turn in the openings raw edges.

Top stitch close to the edge on all sides to secure the opening. This helps keep the fabric from shifting and will help it lie nicely over time.

And you’re all finished! Now go make a nice meal for your Babe or Sweetie to compliment your pretty napkins!


Make sets for your holiday table..

Or gifties for your friends. They’re sure to be impressed!
The Crystal Lake Modern Quilt Guild is doing a BOM quilt and some of the members are helping out by doing the demo on each one. Our demo was the “X and +” block. The demos are done in all the same colors, which are our CLMQG logo colors, but each member can make their own version. Should be interesting to see what everyone comes up with since we all have so many different styles. The demo quilt blocks will be put together and raffled off after we’re all finished.
Our inspiration for this block was a tutorial provided by Amy at BadSkirt.com.
If you live in the Northwestern suburbs of Chicago and haven’t visited us, please do! We have a great time. There is lots to learn from each other. Many workshops are offered throughout the year and it’s a great time to catch up on all those UFO’s you have laying around. We meet in the basement of the Crystal Lake Home State Bank Mortgage Center on Route 14 typically the 2nd Sunday of every month. We look forward to seeing you!
So what do you say let’s get started on this block?
Gather up those fabrics. We used Kona cottons for the demo but you can make this scrappy too. What a great way to use up some of that fabric!

“X And +” 12 inch finished quilt block
Begin by cutting your fabric:
For the center cross, cut (4) green 2.5″ squares and (1) 2.5″ orange square
For the edges of the cross, cut (4) white 2.5″ x 3.5″ rectangles
For the background triangles, cut (8) light blue 3.5″ squares
For the X cut (4) navy blue 5.5″ squares

Making the X block:
On the back of the light blue squares, mark with a pencil from corner to corner.

Sew directly on the line and using a rotary cutter, trim the seam allowance to 1/4″. Repeat for each block.

Press and repeat for the opposite corner.

To make the + in the center of the X, sew the blocks in the order according to the picture. Press the seams to the left.

Sew the remaining green squares to the white rectangles.

Lay out your block according to picture and begin by sewing the X blocks to either side of the green/white units. Press to the right. Finish by sewing the rows to the top and bottom of the middle white/green/orange unit.

And here is the finished X and + quilt block for the Guild! Easy,right?

This is the one we are adding to our BOM quilt. Paige picked out a variety of hand dyes, modern plaids, and Kaffe fabrics. It’s going to be wild, crazy modern and I am excited to put this together! Check back often to see our other blocks from the quilt.


My little Daisy May is absolutely the best pup. Having never been around small ones, she had no idea what to expect. She’s been toted around like a baby, had her hair brushed and put into pony tails. She’s endured countless dress-ups & posed for more pictures than a model.
She’s always rewarded generously, a little too generously I might add, for her patience. She is snacked frequently.
Her favorite snacks are the homemade treats that we make. I’ve shared this recipe before but here goes again…

Oatmeal Peanut-Butter Doggie Treats
1/2C oatmeal
1/2C flour
1/2C corn meal
1/2C oil
1-1/2C whole wheat flour
2 eggs
2TBSP vanilla
2TBSP peanut-butter
1-1/2C water*as needed
Mix all dry ingredients in bowl. Make a well and add wet ingredients. Mix and add water in gradually till moist but not wet. Roll onto floured surface. Cut with cookie cutters and place on lightly greased cookie sheets. Bake @400 for 20min. Turn oven off and let them sit in oven for another 20min. to dry out.
While your letting those cool, take your BFF to the doggie park, for a long walk around the neighborhood, or or even for ride on the swing..lol

Now that she’s played and eaten well, let’s make her a new leash. Everyone loves a new outfit, right? Well, unless your dressing your pup up in the latest trends, then her collar and leash are as close to new duds as she’s gonna get.
Supplies for approx. 3/4″ by 5 foot leash:
2.5″ x 72″ strip of stylish fabric for your leash
2″ x 71″ strip of Pellon Decor Bond #809 iron on interfacing
3/4″ Snap Hook

Center the the Pellon on the wrong side of the leash fabric, leaving 1/2 inch at each end for turning in and fuse according to manufacturers directions.

Press the un-fused ends in toward the Pellon.

Press the leash in half to create a crease in the center. At this point you can use a pencil and lightly mark the crease to use as a guide in the next step.

Press each side toward the center of the leash.

Press the leash in half.

Edge stitch the leash, starting on one end and working all the way back.

Insert 2″ of one end of the leash through the snap hook and secure using a box stitch.

With your leash lying flat as shown in the picture above…Make the handle of your leash by folding the opposite free end in approx. 7″ and secure once again with a box stitch.

All finished! Don’t forget to make some for your pups friends too. Their owners will be amazed at your mad skills!

Now take your pup for another walk so she can show off her new outfit! Let’s go daisy…


